background image

3-5

REM

STAR

 P

RO

 M S

ERIES

 U

SER

 M

ANUAL

3.4  S

UPPLYING

 P

OWER


TO


THE

 D

EVICE

You can power the device using AC or DC power.

Caution:


If this device has been exposed to either very hot or very cold tempera-
tures, allow it to adjust to room temperature before beginning the 
following setup procedures.

Warning:


Route the wires to avoid tripping.

Warning:


This device is activated when the power cord is connected. Pressing 
the  

 button turns the airflow on or off.

Important!


If you are using your device with a humidifier, refer to the Quickstart 
Guide included with your device or the instructions included with your 
humidifier for details on how to power the device and humidifier. 

3.4.1  U

SING

 AC P

OWER


Complete the following steps to operate the device using AC power.
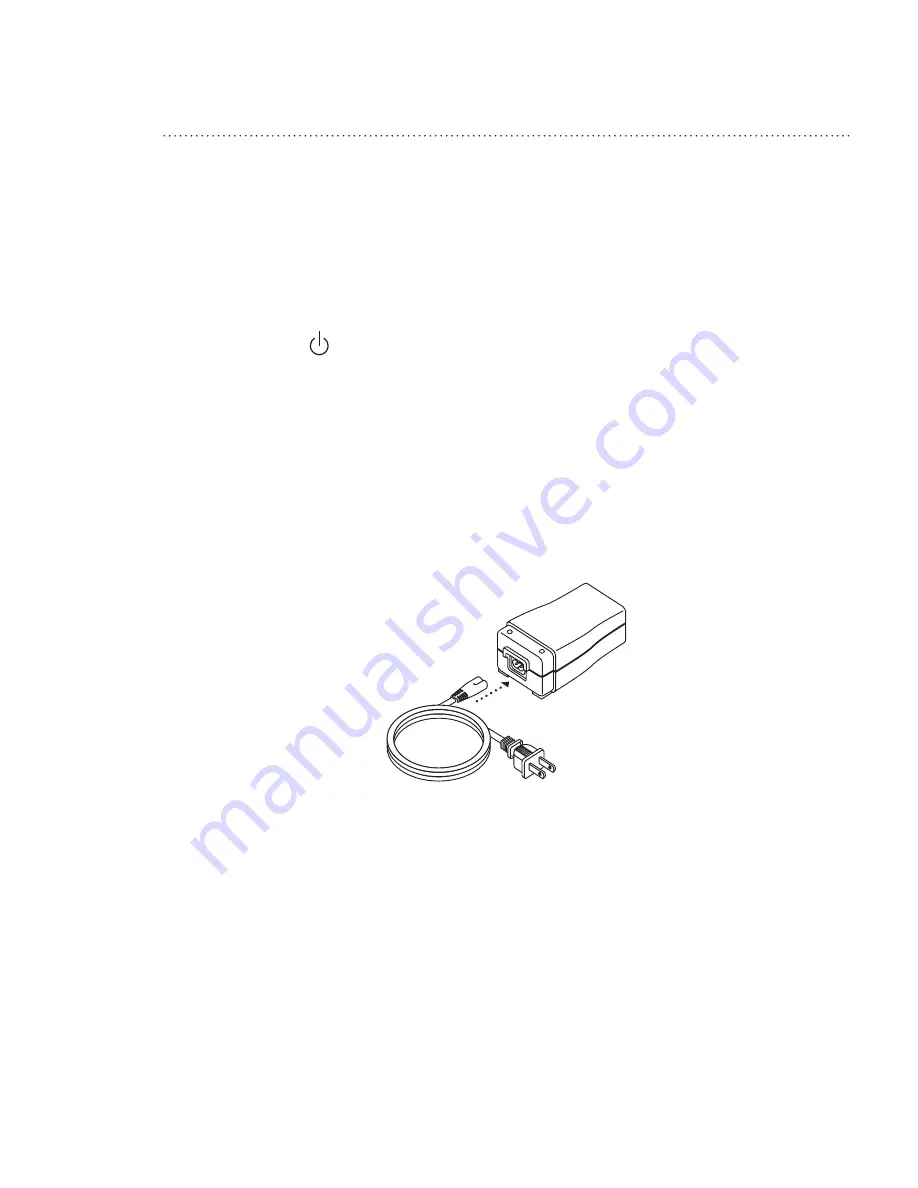
1.  Plug the socket end of the AC power cord into the power supply, as shown in Figure 3–5.

F

IGURE

 3–5  C

ONNECTING


THE

 P

OWER

 C

ORD


TO


THE

 P

OWER

 S

UPPLY

2.  Plug the pronged end of the AC power cord into an electrical outlet that is not controlled by 

a wall switch.

Summary of Contents for REMstar Pro

Page 1: ...1016444 JH 2 14 06 USER MANUAL ...

Page 2: ...____________________________ located on the bottom of the device System Prescribed for __________________________________________ Date of Purchase or Rental ______________________________________ Pressure Setting _____ cm H2 O Mask Type __________________________________________________ Mask Size ___________________________________________________ If you have any questions concerning the system co...

Page 3: ... you like to receive information regarding new products from Respironics Yes No Product Identification Information Numbers located on the bottom of the device Model Serial Please complete the following or register online at www mseries respironics com If Yes Preferred Method Direct Mail Phone Email C M Y CM MY CY CMY K reply_card2 pdf 9 19 05 11 22 20 AM reply_card2 pdf 9 19 05 11 22 20 AM ...

Page 4: ...PO BOX 7014 GRAND RAPIDS MN 55744 8029 FIRST CLASS MAIL PERMIT NO 231 GRAND RAPIDS MN C M Y CM MY CY CMY K reply_card1 pdf 9 19 05 10 52 10 AM reply_card1 pdf 9 19 05 10 52 10 AM ...

Page 5: ...free medical alert _____bracelet or _____necklace _____I am undecided but please send me a free copy of the newsletter _____I would like to know if there is an A W A K E group near me PLEASE SEND TO American Sleep Apnea Association 1424 K Street NW Suite 302 Washington D C 20005 Respironics Inc provided a grant to and is recognized as a founding sponsor of the American Sleep Apnea Association As a...

Page 6: ... mutual help support groups A W A K E meetings provide the opportunity to share information and support with others who have been affected by sleep apnea G O A L S To reduce disability and death from Sleep Apnea and other breathing disorders during sleep To improve the clinical care of Sleep Apnea by educating the public and medical profession about the disorder To establish and nurture mutual hel...

Page 7: ...1 10 Chapter 2 Device Controls and Displays 2 1 2 1 Controls and Displays 2 1 2 1 1 Control Panel Inactivity 2 3 2 2 Rear Panel 2 3 Chapter 3 Setup 3 1 3 1 Installing the Air Filters 3 1 3 2 Where to Place the Device 3 2 3 3 Connecting the Breathing Circuit 3 2 3 4 Supplying Power to the Device 3 5 3 4 1 Using AC Power 3 5 3 4 2 Using DC Power 3 6 3 5 Complete Assembly Example 3 7 Chapter 4 Device...

Page 8: ...n 4 12 Chapter 5 Device Alerts and Troubleshooting 5 1 5 1 Device Alerts 5 1 5 2 Troubleshooting 5 4 Chapter 6 Accessories 6 1 6 1 Adding a Humidifier 6 1 6 2 Using the SmartCard 6 2 6 3 Adding Supplemental Oxygen 6 2 Chapter 7 Cleaning and Maintenance 7 1 7 1 Cleaning the Device 7 1 7 2 Cleaning or Replacing the Filters 7 1 7 3 Cleaning the Tubing 7 3 7 4 Service 7 3 7 5 Traveling with the System ...

Page 9: ...o M Series system includes the following items REMstarPro M Series Device Flexible Tubing Reusable Gray Foam Filter Disposable Ultra fine Filter Power Supply AC Power Cord Carrying Case User Manual Quickstart Guide C F le x FIGURE 1 1 SYSTEM CONTENTS Note If your system includes a humidifier you will receive additional items with your package See the instructions included with your humidifier for mo...

Page 10: ...or should read and understand this entire manual before using the device This device is not intended for life support The device should be used only with masks and connectors recommended by Respironics or with those recommended by the health care professional or respiratory therapist A mask should not be used unless the device is turned on and operating properly The exhalation port s associated wi...

Page 11: ...e performance of this device if it is making un usual or harsh sounds if the device or the power supply are dropped or mishandled if water is spilled into the enclosure or if the enclosure is broken discontinue use and contact your home care provider Repairs and adjustments must be performed by Respironics authorized service personnel only Unauthorized service could cause injury invalidate the war...

Page 12: ...ing this equipment the clinician should understand that this device can deliver pressures up to 20 cm H2 O In the event of certain fault conditions a maximum pressure of 30 cm H2 O is possible Studies have shown that the following pre existing conditions may contraindicate the use of CPAP therapy for some patients Bullous Lung Disease Pathologically Low Blood Pressure Bypassed Upper Airway Pneumot...

Page 13: ...ortable The ramp function allows you to lower the pressure when you are trying to fall asleep The air pressure will gradually increase until your prescription pressure is reached You also have the option of not using the ramp feature at all Additionally the C Flex comfort feature provides you with pressure relief during the expiratory phase of breathing Several accessories are also available for u...

Page 14: ... C Flex is prescribed for you See Chapter 4 for more information about C Flex Display Screen Shows therapy settings patient data instructions and error messages Filter Area A reusable gray foam filter must be placed in the filter area to screen out normal household dust and pollens An optional white ultra fine filter can also be used for more complete filtration of very fine particles Medical Equipment ...

Page 15: ...mouth depending on which interface has been prescribed for you An exhalation device to vent exhaled air from the circuit Circuit Tubing Exhalation Device Patient Interface Circuit with Separate Exhalation Device Circuit with Mask with Integrated Exhalation Port Flexible Tubing Connector Mask s Connector Exhalation Port FIGURE 1 4 TYPICAL BREATHING CIRCUITS Note The exhalation port may be part of t...

Page 16: ...al Outcomes of Sleep Questionnaire A quality of life ques tionnaire designed specifically for people with sleep disorders The results allow health care professionals to assess how CPAP therapy has improved the quality of their patients lives LPM Liters Per Minute OSA Obstructive Sleep Apnea Patient Data Menu The display mode in which you can view certain stored information such as therapy usage hou...

Page 17: ...panying instructions for use DC Power Type BF Applied Part Class II Double Insulated IPX1 Drip Proof Equipment Electrostatic Discharge European Declaration of Conformity Canadian US Certification Notified Body Approval for Standards Compliance TUV Safety Standard Compliance UL Recognized for Canada and the United States No User Serviceable Parts ...

Page 18: ...ave your device serviced contact your home care provider If you need to contact Respironics directly call the Respironics Customer Service department at 1 800 345 6443 or 1 724 387 4000 You can also use the following address Visit Respironics web site at www respironics com ...

Page 19: ...he airflow pressure and then gradually increases it allowing you to fall asleep more easily Start Stop This button starts the device s airflow and places the device in the Active state or stops the airflow and places the device in Standby You can also press this button to exit any setting screen C Flex C Flex This button adjusts the C Flex comfort setting If you do not want to modify the settings tha...

Page 20: ...e the settings on the setup screens Allows you to enter the Setup screens Also allows you to increase the settings on the setup screens The device s display screen shows the set pressure patient data instructions and error messages See Chapter 4 for instructions on navigating the display screens Figure 2 3 provides a view of the entire device control panel with the cover door open Cover Door Previ...

Page 21: ... s rear panel without a humidifier Air Outlet Port Accessory Slot Filter Area DC Power Inlet FIGURE 2 4 REMSTAR PRO M SERIES REAR PANEL The rear panel contains the following An accessory slot for optional accessories such as the SmartCard or modem see Chapter 6 Accessories for more information A filter area where the filter s supplied with your device should be inserted A DC power inlet where the pow...

Page 22: ...2 4 REMSTAR PRO M SERIES USER MANUAL ...

Page 23: ...fine particles The gray reusable filter must be in place at all times when the device is operating The ultra fine filter is recommended for people who are sensitive to tobacco smoke or other small particles Two reusable gray foam filters and one disposable ultra fine filter are supplied with the device If your filters are not already installed when you receive your device you must at least install the reu...

Page 24: ... work properly Make sure the device is away from any heating or cooling equipment e g forced air vents radiators air conditioners 3 3 CONNECTING THE BREATHING CIRCUIT To use the system you will need the following accessories in order to assemble the recommended circuit Respironics interface e g nasal mask with integrated exhalation port or Respironics inter face with a separate exhalation device s...

Page 25: ...n remove the swivel and con nect the tubing directly to the air outlet Detachable Swivel FIGURE 3 2 CONNECTING THE FLEXIBLE TUBING Note If required connect a bacteria filter to the device air outlet and then connect the flexible tubing to the outlet of the bacteria filter 2 Connect the tubing to the mask a If you are using a mask with a built in exhalation port connect the mask s connector to the flex...

Page 26: ...Flexible Tubing Connector FIGURE 3 4 CONNECTING A MASK WITH A SEPARATE EXHALATION DEVICE Warning The exhalation device e g Whisper Swivel II or exhalation port on masks with an integrated exhalation port is designed to exhaust CO2 from the patient circuit Do not block or seal the ports on the exhala tion device Warning If you are using a full face mask i e a mask covering both your mouth and your ...

Page 27: ...ressing the button turns the airflow on or off Important If you are using your device with a humidifier refer to the Quickstart Guide included with your device or the instructions included with your humidifier for details on how to power the device and humidifier 3 4 1 USING AC POWER Complete the following steps to operate the device using AC power 1 Plug the socket end of the AC power cord into the po...

Page 28: ...1001956 can be used to operate this device in a stationary recreational vehicle boat or motor home The Respironics DC Battery Adapter Cable Reorder Number 532209 when used with the DC Power Cord enables the device to be operated from a 12 VDC free standing battery Caution When DC power is obtained from a vehicle battery the device should not be used while the vehicle s engine is running Damage to ...

Page 29: ...d and power applied to the device FIGURE 3 7 FINAL ASSEMBLY EXAMPLE SHOWN WITH OPTIONAL ACCESSORY MODULE Figure 3 8 shows an example of how you should route your tubing and situate your device on your nightstand for the best setup possible This will help prevent the device from falling off your nightstand or table FIGURE 3 8 RECOMMENDED DEVICE AND TUBING PLACEMENT ...

Page 30: ...3 8 REMSTAR PRO M SERIES USER MANUAL ...

Page 31: ...FTWARE VERSION SCREEN Note Version 1 0 shown in Figure 4 1 is an example Your device may have a different software version installed 2 The next screen to appear is the Standby or Inactive screen shown in Figure 4 2 You can access the FOSQ questionnaire or patient settings and data from this screen See Section 4 3 for instructions on how to navigate the display screens FOSQ Setup FIGURE 4 2 STANDBY ...

Page 32: ...tton The ramp symbol displays on the Active Display screen when the ramp function is active Mask Leak Mask Leak Alert This flashing text displays on the Active Display screen if the Mask Alert setting is enabled and the device detects an excessive mask leak Auto Off Auto Off This flashing text displays on the Standby screen if the Auto Off setting is enabled and the device detects a mask disconnect Sm...

Page 33: ... the instructions included with the mask 4 2 USING THE RAMP AND C FLEX FEATURES You can press the Ramp button to activate the Ramp feature or the C Flex button to change the C Flex setting if your provider has enabled these features 4 2 1 RAMP FEATURE The device is equipped with an optional ramp feature that your home care provider can enable or disable This feature reduces the air pressure when y...

Page 34: ...an arrow above the current C Flex setting 1 2 3 C FLEX FIGURE 4 4 C FLEX SETTING SCREEN The setting of 1 provides a small amount of pressure relief with higher numbers providing ad ditional relief To change the pressure relief press the or buttons to increase or decrease the setting Note You can also view and change the C Flex setting by navigating to the C Flex Set ting screen from the Patient Se...

Page 35: ...usage hours Number of sessions greater than 4 hours System leak if enabled by your home care provider Apnea Hypopnea Index if enabled by your home care provider Additionally you can view and modify the following settings on the Patient Setup screens C Flex if enabled by your home care provider Ramp starting pressure if enabled by your home care provider Mask alert enable disable Auto off enable dis...

Page 36: ...ENT DATA SCREENS Figure 4 6 shows how to navigate the Patient Data screens 7 Day Avg 0 0 30 Day Avg 0 0 Apn Hyp Index Press Press FOSQ Setup Therapy Usage 7 Day Avg 5 00 30 Day Avg 8 00 Hrs Night 7 Days 5 Sessions 30 Days 8 Sessions Sessions 4 System Leak L min 7 Day Avg AHI 0 0 30 Day Avg AHI 0 0 FIGURE 4 6 NAVIGATING THE PATIENT DATA SCREENS Press the button to scroll forward through the data sc...

Page 37: ...day periods The maximum value for the 7 day period is 35 sessions while the maximum value for the 30 day period is 150 sessions Note This screen is only for reference Your home care provider may periodically ask you for this information 7 Day Avg 0 0 30 Day Avg 0 0 System Leak L min 4 System Leak Screen This screen displays a 7 day and 30 day average of the leak history for the device in liters pe...

Page 38: ... MODIFYING PATIENT SETUP SCREENS Figure 4 7 shows how to navigate the Patient Setup screens 4 0 cmH2O 1 2 3 Press Press Press FOSQ Setup C Flex Setting Ramp Start Pres Mask Alert Feature ON Auto Off Feature ON FIGURE 4 7 NAVIGATING THE PATIENT SETUP SCREENS ...

Page 39: ...es a small amount of pres sure relief with higher numbers providing additional relief Press the or buttons to increase or decrease the setting If your provider has disabled C Flex you cannot enable or ad just the setting The screen shown at left displays to indicate that C Flex is disabled 4 0 cmH2O Ramp Start Pres 3 Ramp Starting Pressure Screen You can increase or decrease the ramp starting pres...

Page 40: ... this feature is en abled then the words Auto Off appear on the Standby screen if the device detects that you have removed your mask The airflow shuts off and the Auto Off message continues to appear on the Standby screen until the condition is corrected After you have finished modifying the Patient Setup screens press the button to return to the Standby screen Note The Setup menu automatically times o...

Page 41: ...e sure a SmartCard or modem is installed before answering the questions The FOSQ screens will not display if a SmartCard or modem is not present and able to store data To answer the FOSQ questionnaire complete the following steps 1 Make sure that the SmartCard or modem is properly installed Answers to the questionnaire are saved onto the SmartCard or sent to the health care professional via a wire...

Page 42: ...Active Display to the Standby state if the period of time specified by your provider has expired You can acknowledge the message by pressing any of the display buttons or If you do not acknowledge the message within six minutes of it appearing on the screen it will time out and disappear The message will continue to display for three consecutive days whenever the device transitions from Active to S...

Page 43: ... a continuous two beep pattern indicated in the following table as Additionally the backlights on the buttons will provide a high priority flashing pattern consisting of a continuous bright to off two flash pattern indicated in the following table as Medium Priority These alerts require prompt operator response The alert signal consists of a medium priority sound which is a continuous one beep patter...

Page 44: ...back into the device s power inlet to restore power If the alert continues to occur contact your home care provider SmartCard Error Backlights Screen displays the following flashing error symbol The device continues to operate and provide therapy but data logging is un available and FOSQ is deactivated A problem exists with the Smart Card inserted in the accessory slot The card may be improperly in...

Page 45: ...ting that a mask disconnect has been detected The airflow shuts off and the device enters the Standby state approximately 45 60 seconds after detection The mask has been removed Put your mask back on and press the button to turn the airflow on and resume therapy Patient Reminder None Backlights Screen displays a customized reminder message whenever the de vice transitions from the Active state to the...

Page 46: ...If you are using DC power make sure your DC power cord and battery adaptor cable con nections are secure Check your battery It may need recharged or replaced If the problem persists check the DC cord s fuse following the instructions supplied with your DC cord The fuse may need to be replaced If the problem still occurs contact your home care provider If you are using a humidifier make sure you fol...

Page 47: ...ith troubleshooting software that automatically monitors perfor mance Such a reset poses no danger to the patient and assures that the patient receives prescribed therapy throughout the night If there is a pos sibility of damage to the device the device will shut down permanently The product will then display the following system error alert symbol to indicate that the device be returned to the ho...

Page 48: ...lly get knocked off the table If you are using a humidifier with the device make sure that the device and humidifier are placed below your head and mask so that any condensation in the tubing drains back into the water chamber If the device and humidifier fall and water gets into the device drain all water out of the device and make sure it is completely dry before reap plying power If the placement o...

Page 49: ...ice The air outlet port is not installed cor rectly and doesn t seal properly Remove the port and reattach it to make sure it s properly installed To remove the port a Put your thumb underneath the port and insert your index finger into the port open ing b Pivoting from the bottom unsnap the port and pull it away from the device To properly reattach the port a Make sure it is correctly oriented wit...

Page 50: ...ignificant air leakage around the mask or you experience other mask related issues This could be due to improper head gear adjustment or improper mask fitting etc If you experience any issues with your mask refer to your mask instructions for information on proper fitting etc If the problem continues contact your home care provider You have a runny nose This is caused by a nasal reaction to the airflo...

Page 51: ...ailable from your home care provider A humidifier may reduce nasal dryness and irritation by adding moisture and heat if applicable to the airflow Figure 6 1 shows the humidifier by itself and attached to the REMstar Pro M Series device Caution For safe operation the humidifier must always be positioned below the breathing circuit connection at the mask and the air outlet on the device The humidifier m...

Page 52: ...omply with local regulations for medical oxygen When using oxygen with this system a Respironics Pressure Valve Part number 302418 must be placed in line with the patient circuit Failure to use the pressure valve could result in a fire hazard Oxygen accelerates fires Keep the device and the oxygen container away from heat open flames any oily substance or other sources of ignition Do not smoke in the...

Page 53: ... after cleaning Replace any damaged parts 7 2 CLEANING OR REPLACING THE FILTERS Caution Operating the device with a dirty filter may keep the system from working properly and may damage the device Under normal usage you should clean the gray foam filter at least once every two weeks and replace it with a new one every six months The white ultra fine filter is disposable and should be replaced after 30...

Page 54: ...ied filters should be used as replacement filters 5 If the white ultra fine filter is dirty or torn replace it 6 Reinstall the filters inserting the white ultra fine filter first if applicable as shown in Figure 7 2 Filter Area Disposable Ultra Fine Filter optional Reusable Gray Foam Filter required FIGURE 7 2 REINSTALLING THE FILTERS Caution Never install a wet filter into the device It is recommended tha...

Page 55: ...ent Rinse thoroughly Air dry 7 4 SERVICE The REMstar Pro M Series device does not require routine servicing Warning If you notice unexplained changes in the performance of this device if it is making unusual or harsh sounds if the device or power supply have been dropped or mishandled if the enclosure is broken or if water has entered the device discontinue use and contact your home care provider ...

Page 56: ...e sure you attach the air outlet port to your M Series device when you remove the humidi fier from the device You need the port to connect the tubing directly to your device Figure 7 3 illustrates how to remove the humidifier from the device and attach the air outlet port Attach Air Outlet Port to the Device Remove the Device From the Humidifier FIGURE 7 3 ATTACHING THE AIR OUTLET PORT TO THE DEVICE...

Page 57: ...standards IEC 60601 1 General Requirements for Safety of Medical Electrical Equipment EN ISO 17510 1 Sleep Apnea Breathing Therapy Devices ELECTRICAL AC Power Consumption 100 240 VAC 50 60 Hz 1 0 A max DC Power Consumption 12 VDC 3 0 A max Type of Protection Against Electric Shock Class II Equipment Degree of Protection Against Electric Shock Type BF Applied Part Degree of Protection against Ingre...

Page 58: ...red in accordance with EN ISO 17510 1 1 3 2 3 and Pmax with BPM set to 10 15 and 20 BPM 20 C 5 C 50 RH 5 and an atmospheric pressure of 101 54 kPascals Maximum Flow 35 LPM Measured in accordance with EN ISO 17510 1 1 3 2 3 and Pmax with BPM set to 10 15 and 20 BPM 23 C 2 C 50 RH 5 and an atmospheric pressure of 101 54 kPascals DISPOSAL Dispose of the device in accordance with local regulations ...

Page 59: ...NETIC ENVIRONMENT GUID ANCE RF emissions CISPR 11 Group 1 The device uses RF energy only for its internal function Therefore its RF emissions are very low and are not likely to cause any interference in nearby electronic equipment RF emissions CISPR 11 Class B The device is suitable for use in all establishments including domestic establishments and those directly connected to the public low volta...

Page 60: ...ower quality should be that of a typical home or hos pital environment Surge IEC 61000 4 5 1 kV differential mode 2 kV common mode 1 kV differential mode 2 kV for common mode Mains power quality should be that of a typical home or hos pital environment Voltage dips short interruptions and voltage variations on power supply input lines IEC 61000 4 11 5 UT 95 dip in UT for 0 5 cycle 40 UT 60 dip in UT...

Page 61: ...ter manufacturer and d is the recom mended separation distance in meters m Field strengths from fixed RF transmitters as determined by an electromagnetic site surveya should be less than the compliance level in each frequency range b Interference may occur in the vicinity of equip ment marked with the following symbol NOTE 1 At 80 MHz and 800 MHz the higher frequency range applies NOTE 2 These guid...

Page 62: ...TTER W SEPARATION DISTANCE ACCORDING TO FREQUENCY OF TRANSMITTER M 150 KHZ TO 80 MHZ d 1 2 P 80 MHZ TO 800 MHZ d 1 2 P 800 MHZ TO 2 5 GHZ d 2 3 P 0 01 0 12 0 12 0 23 0 1 0 38 0 38 0 73 1 1 2 1 2 2 3 10 3 8 3 8 7 3 100 12 12 23 For transmitters rated at a maximum output power not listed above the recommended separation distance d in meters m can be estimated using the equation applicable to the fre...

Page 63: ...ic loss loss of profits overhead or consequen tial damages which may be claimed to arise from any sale or use of this product Some states do not allow the exclusion or limitation of incidental or consequential damages so the above limita tion or exclusion may not apply to you This warranty is given in lieu of all other express warranties In addition any implied warranties including any warranty of ...

Page 64: ......

Reviews: