Owner‘s Manual Crimping Machine CM 25-3.4
Rev.: 2020-06-24
19 / 20
14. Technical Documentation
Page 1: ...Owner s Manual Crimping Machine CM 25 3 4 Rev 2020 06 24 1 20 Before starting any work please read the operating instructions Owner s Manual Crimping Machine CM 25 3 4...
Page 2: ...eneral Information 10 10 2 Functional Operation 11 10 3 Crimping Process 12 10 4 Exchange of Locator 12 10 5 Exchange of Batteries 12 10 6 Process Safety during Operation 13 10 7 Testing with Plug Gau...
Page 3: ...g turned contacts with the specified cross sections in the designated crimping units and are constructed in such a way The machine is also used for the crimping of insulated and non insulated ferrules...
Page 4: ...nsmission Ele ment for the Crimping Units 1 8 Pneumatic Con nection with Pressure reducing Gauge and shut off Valve 1 3 Safety Fixture for Impact and Transmission Element 1 9 Crimping Unit exchangable...
Page 5: ...Machine CM 25 3 4 Rev 2020 06 24 5 20 2 2 Shut off Valve 2 3 Plug Nipple for Quick connect 2 4 Pressure Gauge 2 5 Pressure Display Manometer 2 6 Lock Nuts 2 7 Foot 2 1 Square Counter Bearing 3 2 2 Bac...
Page 6: ...Button 3 4 MODE Button 3 5 Digital Display 3 7 Upper Adapter 3 8 Locking Pin 3 9 Shaft Cover 3 10 Crimp Opening 3 6 Stop Pin 3 12 Adapter Intake 3 7 Clamping Screw 3 11 Lower Adapter Fig 3 4 1 Positio...
Page 7: ...e parts which are not approved by the manufacturer 6 Requirements for Site Set up Minimum load capacity of work bench 45 kg Total space requirement for the machine H x W x D 500 x 500 x 400 mm Area fo...
Page 8: ...f valve 2 2 Note When the shut off valve is in the open position the hand lever is in a horizontal position Push the RESET button 2 8 to release the remaining air Loosen the shaft cover on both sides...
Page 9: ...screws 4 8 of the shaft cover with an Allen wrench SW 3 0 and lift the shaft cover 4 7 to the front to remove it Remove the locking pin 4 6 from the shaft with an appropriate tool i e a pin punch Loo...
Page 10: ...on remove the crimped cable check if the connection of the ferrule has a tight fit 10 Set up of Crimping Parameters Operation with the 4 8 Indent Crimping unit 10 1 General Information The 4 8 Indent...
Page 11: ...tting for the particular contact from the setting matrix provided with the tool from the crimp processing guidelines of the contact manufacturer or directly from Rennsteig Werkzeuge Change the crimp i...
Page 12: ...ine move into the starting position Remove the crimped contact NEVER crimp onto the gauge or any similar objects to avoid damage to the crimping unit NEVER crimp onto the gauge or any similar objects...
Page 13: ...wear limit is reached at about 50 000 to 200 000 cycles depending upon the intensity of use The prompt to calibrate or recalibrate will be visible on the digital display as follows After the battery...
Page 14: ...g unit depending upon the quantity of crimps and the preset crimping measurement prompting the user to recalibrate the unit REC in display The recalibration should only be executed by authorized perso...
Page 15: ...uge value is reached Please note that the selected value needs to be set by always dialing down from a larger value to the desired value for example to set the tool to crimp value 2 0 mm dial up to 2...
Page 16: ...ounter Mechanism The Crimping machine CM 25 3 4 has two electronic counting mechanisms The upper counter mechanism is a permanent counter which cannot be set back by the operator The lower counter can...
Page 17: ...turer of the crimping units 11 4 Maintenance of the ferrule crimping unit The ferrule crimping unit is maintenance free Before starting any job dirt and debris needs to be cleaned off the crimping uni...
Page 18: ...imp again Ferrule and cable are not conforming to DIN requirements Only crimp conform components Crimping profile is dirty or displaced A Ferrule was crimped without the cable inserted pieces of the c...
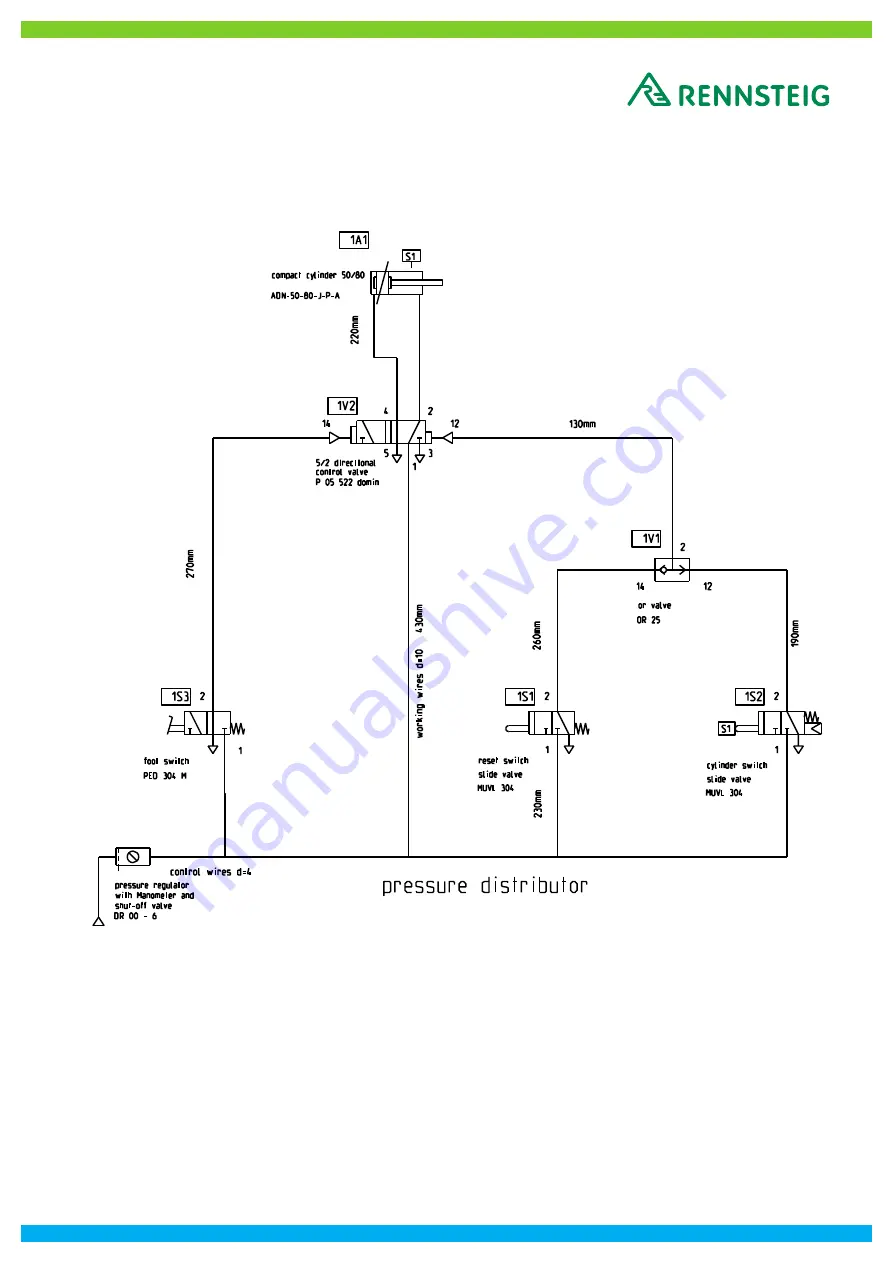
Page 19: ...Owner s Manual Crimping Machine CM 25 3 4 Rev 2020 06 24 19 20 14 Technical Documentation...
Page 20: ...ine 2011 65 EU DIN EN 12100 2010 Safety of Machines General Principles of Design Risk Assessment and Risk Reduction DIN EN ISO 13857 2008 Safety of Machines Safety distances to prevent upper and lower...