9
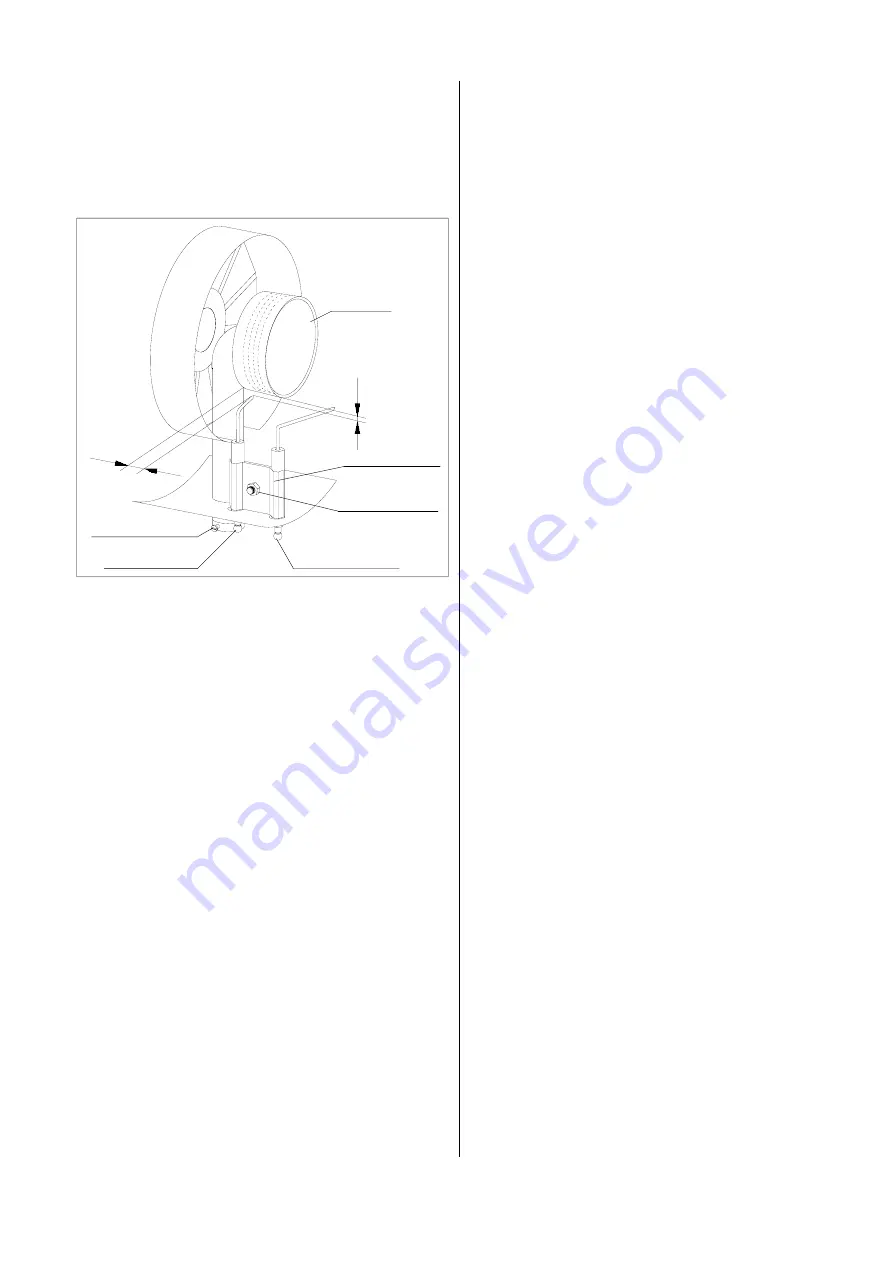
Dimension B
3 mm
ionisation electrode
igniton electrode
gas burner
clamping screw A
electrode holder
clamping screw B
Dimension A
15 mm
Cleaning of the burner
After the unit is disassembled, all components are
freely accessible for cleaning and maintenance work.
Perform the following steps.
1. Clean the burner using a steel brush and com-
pressed air.
2. If necessary, carefully clean the gas nozzle.
3. Carefully remove any deposits from the ignition and
the ionisation electrodes.
4. Remove deposits and dirt from the unit base.
5. Assemble all other parts in the reverse order.
6. Adjust the ignition electrode in accordance with the
figure above.
Dimension A = Distance 15 mm from the tip of the
ignition electrode to the bottom of the burner.
Dimension B = Distance 3 mm from the tip of the igni-
tion electrode to the back edge of the burner.
7. Test the entire unit to ensure that it is functioning
properly; make sure that all gas supply hoses are
impermeable using either a soap solution or a leak
detection spray.
3. Loosen the clamping screw on the nozzle holder.
4. Loosen the ignition cable on the ignition electrode.
5. Loosen the cable on the ionisation electrode.
Pay attention to the union nut and the spring ring.
Proper Use
These devices have been designed and equipped exclu-
sively to be used for heating and ventilation for industrial
and commercial purposes.
The manufacturer is not liable for any damage resulting
from non-adherence to manufacturer specifications, le-
gal requirements or any modifications to the units.
*
An operation/use other than indicated in these in-
structions is prohibited!
In the case of non-compliance, we assume no li-
ability and our guarantee becomes null and void.
Service and Guarantee
For the guarantee to be valid, the customer must com-
pletely fill out the “guarantee certificate” enclosed with
all heating units and send it back to REMKO GmbH &
Co. KG in a timely manner after purchasing of the unit
and putting it into operation.
The units have undergone testing at the factory to ensure
proper functioning. If there are still malfunctions that
cannot be fixed by the operator using the troubleshoot-
ing instructions, please contact your dealer or contract
partner.
6. Loosen the clamping screw B on the electrode
holder and remove the ignition electrode and the
ionisation electrode.
7. Remove the burner fastening screws and pull the
burner out of the unit.


