background image

Prepare and Commission

21

© ERNST REINER GmbH & Co. KG

Originalanleitung

4.2

Insert print cartridge

Different seals are required depending on the type of ink used 
(refer to "

Replacing the seal

").

Use seal of the enclosed print cartridge.

Damage to health caused by ingestion of ink.

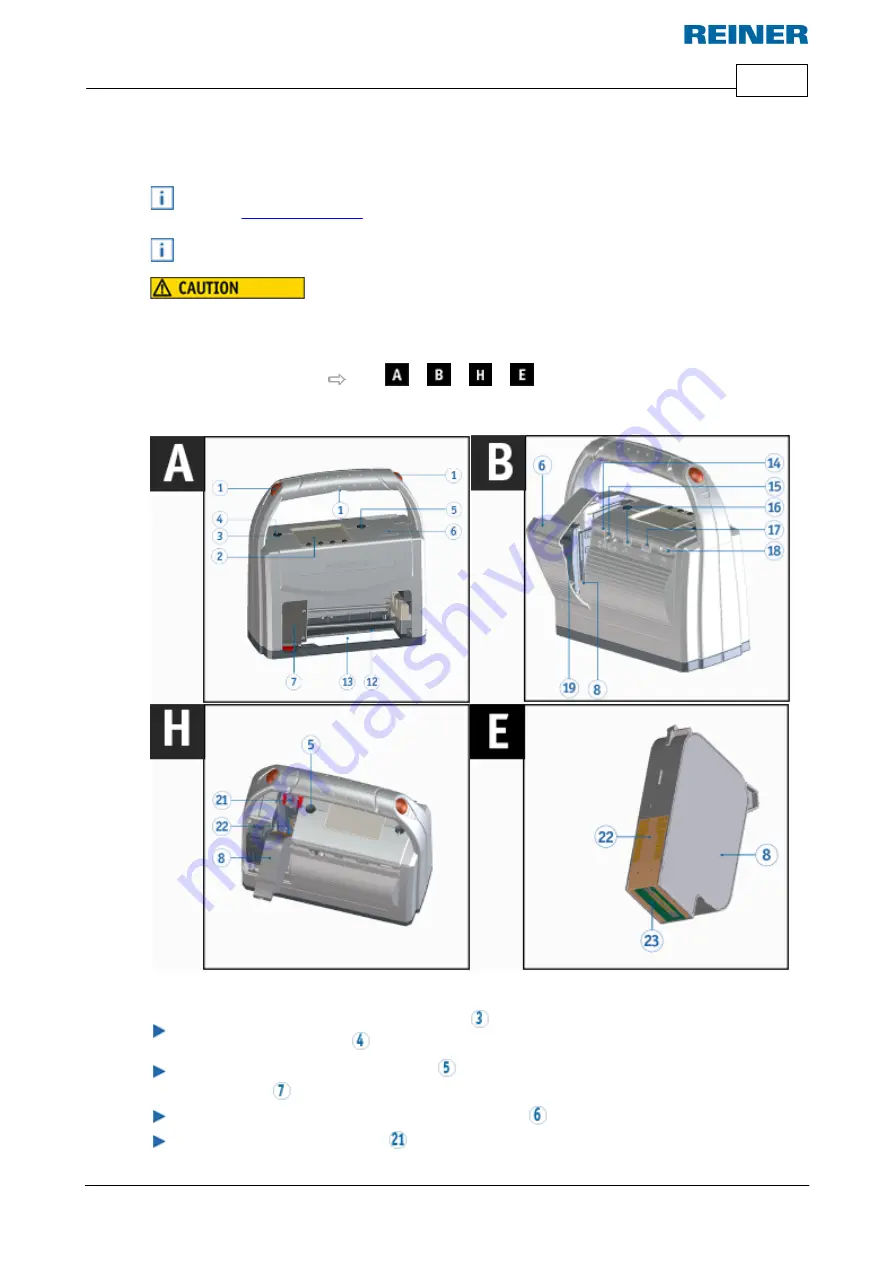
Insert print cartridge 


Fig. 


+


 +


 + 

Switch on the device via the ON/OFF button 

.

The operating status LED 


lights up green.

Press function button


for print cartridge 

.

Print carriage 


moves to the right into the change position. 

Open flap for battery and print cartridge compartment 

.

Push the print cartridge locking 

 slightly upwards and open it.

Summary of Contents for jetStamp 1025

Page 1: ......

Page 2: ...argeable batteries 14 2 2 Micro SD card III Your Safety 15 15 3 1 Safety Description 16 3 2 Safety notes on rechargeable batteries 17 3 3 Safety notes 17 3 4 Safe handling of print cartridges IV Prepare and Commission 18 18 4 1 Commissioning 19 Insert rechargeable batteries 4 1 1 20 Charge rechargeable batteries 4 1 2 21 4 2 Insert print cartridge 22 4 3 Execute test print 23 4 4 Saved print image...

Page 3: ...eview in Windows Explorer 43 5 5 Establish Bluetooth connection 44 5 6 Example workflow Generate print image 44 Configure print image 5 6 1 45 Transfer print image to jetStamp 1025 5 6 2 45 Replace print image 5 6 2 1 46 Print the print image 5 6 3 47 Number of imprints 5 6 4 48 5 7 Objects settings 48 Text 5 7 1 49 Presettings 5 7 1 1 49 Context menu text object 5 7 1 2 51 Generate graphic 5 7 1 ...

Page 4: ... of the print cartridge 69 6 3 Clean nozzles 70 Manual nozzle cleaning 6 3 1 71 6 4 Clean seal 71 6 5 Replacing the seal 72 6 6 Clean housing VII Recognising and Removing Interferences 73 73 7 1 jetStamp 1025 without function 74 7 2 Causes for uncharged batteries 74 7 3 Warning messages 75 7 4 Correctable error messages 75 7 5 Device error messages VIII Technical Data and Accessories 76 76 8 1 Typ...

Page 5: ...Your jetStamp 1025 5 ERNST REINER GmbH Co KG Originalanleitung 1 Your jetStamp 1025 ...

Page 6: ...PCset graphic Hilfe jetStamp 1025 6 ERNST REINER GmbH Co KG Originalanleitung 1 1 Operating elements ...

Page 7: ...Your jetStamp 1025 7 ERNST REINER GmbH Co KG Originalanleitung ...

Page 8: ... Jack socket for external triggering Flap for battery and print cartridge compartment Micro USB socket Print carriage Micro SD card slot Print cartridge Battery compartment Seal Locking mechanism battery compartment Seal retaining clip Locking mechanism print cartridge Seal tip Print cartridge contacts Nozzles print cartridge Operating status LED Description Permanently lit green Device is active ...

Page 9: ...d The display is structured according to the following sections A Header Ink level USB connection available 001 015 001 number of the set print image 015 number of stored print images Bluetooth active Mains adapter connected Battery level Battery is charging B Set print image C Menu bar with menu items and commands Home Access to the main menu Next page Forward back through print images or menu ...

Page 10: ...ung Back Returns to the previous display submenu main menu exit from main menu Selection Enters the selected menu Confirms entries and completes function settings D Four push buttons Each button is always assigned to the menu item or command displayed in the menu bar above it ...

Page 11: ...1025 executes the last executed imprint again Reset numb machine By selecting the jetStamp 1025 resets the numbering machine 1 3 2 Lock device By selecting the device lock is activated or deactivated by entering a password Also refer to the software application PCset graphic Device safety 1 3 3 Activate Bluetooth By selecting Bluetooth is activated deactivated Also refer to the software applicatio...

Page 12: ...gs 1 3 6 1 Signals Warning sounds By selecting the jetStamp 1025 switches the acoustic signals on off in case of warnings Error sounds By selecting the jetStamp 1025 switches the acoustic signals on off in case of device errors Button sounds By selecting the jetStamp 1025 switches the button sounds on off 1 3 6 2 Print Intensity Choice between economical or normal print intensity Alignment Selecti...

Page 13: ...evice after Setting the time after which the jetStamp 1025 is locked again 1 3 6 4 Date Time Change clock Setting the time of the jetStamp 1025 Summertime Setting the summer time 1 3 6 5 Factory settings Reset By selecting the jetStamp 1025 is reset to the delivery state ...

Page 14: ...ies The charging of the batteries is electronically controlled This ensures that the battery cells are charged optimally and carefully Recharging Fully charge rechargeable batteries before first use Duration approx three hours After the first full charge the batteries do not yet reach full capacity You must expect that the normal service times will be undercut Reaching full capacity Full capacity ...

Page 15: ... of dangers that lead to death or severe injury directly if not observed Warnings of dangers that may lead to death or severe injury if not observed Warnings of dangers that may lead to injury if not observed Warnings of dangers that may lead to property damage if not observed You are asked to perform actions here Notes and advice to make handling your jetStamp 1025 even easier Notes on instructio...

Page 16: ... unsuitable rechargeable batteries or non rechargeable batteries Only use the batteries intended for the device Type usage Use only the supplied mains adapter or a PC USB port to charge the batteries Only use rechargeable batteries four each of the type nickel metal hydride REINER item number 946 192 000 of the type AA Always replace all flat rechargeable batteries at once Unauthorised batteries m...

Page 17: ...rt Only use packaging that provides protection from impact and shock for the device Damage to the device by dewing Before commissioning wait until the device has reached room temperature and is completely dry 3 4 Safe handling of print cartridges Possible blindness due to eye contact with ink Do not point the jetStamp 1025 nozzles against people s faces Damage to health caused by ingestion of ink ...

Page 18: ...only Commissioning Insert print cartridge Execute test print Saved print images Activate Bluetooth Install PCset graphic software Firmware update 4 1 Commissioning The device may only be switched off via the ON OFF button Switching off by removing the rechargeable battery can lead to data loss Insert rechargeable batteries Charge rechargeable batteries ...

Page 19: ...es are charged when the green charging indicator is off Always replace all flat rechargeable batteries at once When the batteries are removed the date time and counter reading of the numbering machines are maintained Open flap for battery and print cartridge compartment Push the battery compartment locking upwards until the locking can be opened Open battery compartment Ensure correct polarity and...

Page 20: ...h the installation of the PCset graphic software the required USB drivers are installed If a connection is established between the PC and the device the USB drivers are automatically detected and loaded If the device is connected without installing the PCset graphic software the installation of the device drivers fails Connect the mains adapter of the device to the connection socket provided for t...

Page 21: ...the enclosed print cartridge Damage to health caused by ingestion of ink Insert print cartridge Fig Switch on the device via the ON OFF button The operating status LED lights up green Press function button for print cartridge Print carriage moves to the right into the change position Open flap for battery and print cartridge compartment Push the print cartridge locking slightly upwards and open it...

Page 22: ...g clip of the seal in place Insert seal tip into the notch Press the seal slightly down until it snaps into place in the holder Press function button for print cartridge The print carriage returns to the basic position The change position can also be selected via the display menu In the basic position the seal prevents the ink from drying out refer to Clean nozzles 4 3 Execute test print Possible ...

Page 23: ...f the set print image is shown at the top of the display Ex 001 015 number of active print image number of saved print images 4 5 Activate Bluetooth Bluetooth cannot be activated while an USB connection is active If Bluetooth is active the battery runtime reduces since Bluetooth is active in standby mode as well To activate Bluetooth press the Home button select Bluetooth on display in the menu Bl...

Page 24: ...n 200 MB free hard disk space 1 free USB interface or Bluetooth Supported operating systems Windows 7 Windows 7 64 Bit Windows 8 Windows 8 64 Bit Windows 10 Windows 10 64 Bit 4 6 2 Install software Administrator rights on the PC are required for the installation Connect the PCset graphic USB stick to the PC If the installation program does not start automatically start the file Setup_PCsetgraphic ...

Page 25: ...d While the firmware update is being installed the jetStamp 1025 must not be switched off or removed from the supply voltage Connect the mains socket to the supply voltage via the power supply unit Connect the micro USB socket to the PC via the USB cable To turn on the device press the ON OFF button The operating status LED lights up green Unpack Firmware update and start jetStamp1025_Firmware_010...

Page 26: ...th connection Example workflow Generate print image Objects settings External print triggering Supported REINER devices jetStamp 1025 jetStamp graphic 970 REINER 940 5 1 Get jetStamp 1025 ready for PCset graphic Get jetStamp 1025 ready for PCset graphic Fig The PCset graphic software must first be installed so that the device can be recognised correctly by the PC Connect the micro USB socket to th...

Page 27: ...he software Double click the REINER PCset graphic icon The PCset graphic software is started 5 3 Operating interface The operating interface is divided into four sections Menu bar with both Windows typical and PCset graphic specific functions Toolbar Section for the design of the print image Bar with various status indications Menu bar Online offline Toolbar Transfer process Print image Device mes...

Page 28: ...Open File selection menu for loading previously saved print images Save Save the displayed print image as XML file Save as The dialogue for saving the print images appears Device settings Configure print settings signal function and font Transfer print image The displayed print images are transferred to the device Upload print image Load the active print image in the device for editing Print image...

Page 29: ... Zoom 50 100 200 Display lock in toolbar Show or hide device safety button REINER 940 Operating interface REINER 940 appears jetStamp graphic 970 Operating interface jetStamp graphic 970 appears jetStamp 1025 Operating interface JetStamp 1025 appears 5 3 1 4 Presettings Function Description Text Settings for text objects can be configured Date Time Settings for date time objects can be configured ...

Page 30: ...e If the jetStamp 1025 is connected information on model serial number firmware version and device options are also displayed 5 3 2 Toolbar Toolbar Menu command Description New Reset the display Delete the displayed draft Font Displays the font Open File selection menu for loading previously saved print images Save Save the displayed print image as an RPSG file Grid Activates the grid for aligning...

Page 31: ...s Upload Load the current print image of the jetStamp 1025 for editing 5 3 2 1 Grid The print area is divided into the selected raster size Units Grid ruler mouse position object size are displayed in the selected unit Unit Description mm Ruler is subdivided into mm inch Ruler is subdivided into inch Pixels Ruler is subdivided into pixels 5 3 2 2 Selection Activate Selection Hold down the left mou...

Page 32: ...nt and font style depend on the text format you have selected A double click on the text terminates the text input mode Press Ctrl Enter to jump to the next line Text can also be pasted via the Windows clipboard The font size is automatically adjusted to the grid height when the grid is enabled Date Time Font font style font size and format can be set individually refer to Font and Presettings Num...

Page 33: ...he menu bar by clicking the tab Extras Device safety or in the toolbar via the buttons Three functions can be selected 1 Device safety is deactivated 2 Device safety is activated Print images cannot be transmitted and printed without entering a password 3 Device safety is activated Print images can be transmitted and printed without entering a password Set password Disable password protection Forg...

Page 34: ...sword The password may contain a maximum of 4 characters The following characters can be used 0 9 To activate the device safety click on the Set password button In the toolbar the symbol changes from to and in the status indicator appears the symbol 5 3 4 1 2 Disable passw ord protection Deactivate password protection deactivates device safety To ensure the safety of the device deactivate in the m...

Page 35: ...igger button for approx 10 seconds When the password is reset a warning signal is emitted 5 3 4 2 Unlock device Print images can be transmitted and printed without entering a password To unlock the device select the Extras tab in the menu bar and click Device safety Unlock device or click the button Enter password and click Unlock In the status indicator and in the toolbar the symbol changes from ...

Page 36: ...tor and in the toolbar the symbol changes from to 5 3 5 Device settings The device settings can only be selected when a jetStamp 1025 is connected to the PC Click on the symbol The device settings are opened Print settings Signals Capping station 5 3 5 1 Print settings Function alignment Description ...

Page 37: ...Normal ink consumption Economical Reduction of ink consumption 5 3 5 2 Signals Activation or deactivation of acoustic signals for various events refer to Acoustic signals 5 3 5 3 Capping station Function capping station Description Without capping station The print cartridge never moves onto the seal Time after the print cartridge enters the capping station Depending on the time set the print cart...

Page 38: ...which the device is Device safety is activated Print images cannot be transmitted and printed without entering a password Device safety is deactivated Print images can be transmitted and printed without entering a password Connection Indicates whether the connection is established via USB or Bluetooth Connection is established via USB Connection is established via Bluetooth Ink level indicator Ind...

Page 39: ...epends on the unit set under grid Object position size Position and size of the active selected object Online offline Indicates whether the device is connected to the software Online USB Device is connected via the USB cable Online Bluetooth Device is connected via Bluetooth Offline Device not switched on USB cable not plugged in Rechargeable battery empty Device messages Here you will find hints ...

Page 40: ...artridge Please insert a new print cartridge Print cartridge almost empty Insert new print cartridge Warnings for which an imprint is no longer possible Warnings Cause Correction Please insert print cartridge No or defective print cartridge Incorrect print cartridge Insert print cartridge Please remove the print cartridge and re insert it Print cartridge not inserted correctly Insert print cartrid...

Page 41: ...o SD card was encrypted with a different password than the one set in the device The print image is invalid because the device was switched off during access Change device password or delete print images from micro SD card Please delete invalid files on micro SD card The print image on the micro SD card has an invalid file name Delete the print image on the micro SD card Please insert the micro SD...

Page 42: ...entered 7 characters required 12 characters required 5 4 Enable print image preview in Windows Explorer The Windows Explorer offers the possibility to preview files The following illustrations show how the preview can be switched on Figure 1 Print image preview in Windows Explorer Figure 2 Print image preview in the Open dialogue ...

Page 43: ... devices that have already been connected to the PCset graphic are displayed with model and serial number If the jetStamp 1025 is not found a new search run can be started with the Search again button To establish the Bluetooth connection select the corresponding device in the list and click Connect A pop up menu Connection via Bluetooth device opens in the Windows status bar After a short time th...

Page 44: ... uploaded to the software in advance and saved as RPSG files Menu commands Configure print image Transfer print image to jetStamp 1025 Print the print image Number of imprints 5 6 1 Configure print image Insert text and date time To create a text object use the left mouse button to drag the text symbol to line 1 print image 1 and release it at the desired position Write the desired text into the t...

Page 45: ... stored in the jetStamp 1025 and can be printed 5 6 2 1 Replace print image Click on the transfer icon If a file with the same file name already exists on the device the following dialogue window appears Confirm the dialogue window with Yes to replace the printed image on the device Confirm the dialogue window with No to not replace the printed image on the device Instead a new print image is crea...

Page 46: ...the jetStamp 1025 and can be printed 5 6 3 Print the print image Possible blindness due to eye contact with ink Print the print image Fig Switch on the device via the ON OFF button The operating status LED lights up green Place the device on a surface to be printed Press any trigger button The print image shown on the display is printed ...

Page 47: ...oftware application 47 ERNST REINER GmbH Co KG Originalanleitung 5 6 4 Number of imprints The number of possible imprints with a full print cartridge is displayed by positioning the mouse pointer on the print image number ...

Page 48: ...b or via the context menu The active object is framed in red in the print area Text Date Time Numbering machine Barcode Graphic 5 7 1 Text Creates text fields The object can be positioned exactly by using the grid If the grid is enabled the font size is adjusted Example If a grid of 40 pixels is set the text object has a height of 40 pixels Presettings Context menu text object Generate graphic ...

Page 49: ...t Font style Font size Script Format Settings Text Function Description Font Selection of the possible fonts Font style Selection of the desired font style standard bold italic or bold italic Font size Select or enter the font size in points Script Displays a list of available language scripts for the specified font 5 7 1 2 Context menu text object If a text object is inserted Objects the configur...

Page 50: ...elected area Insert If there is a text in the clipboard it will be pasted Delete Deletes the selected area Select all Marks the entire text Text format To change the font font style font size Generate graphic Converts the text to a graphic and fixes it at the current position Note the text cannot be processed anymore after conversion Delete object Deletes the object Press Ctrl Enter to jump to the...

Page 51: ...can be converted into graphics Graphics are fixed and can no longer be moved Limited editing is possible via the additional function Selection Click the object with the right mouse button Select Generate graphic The object has been converted to a graphic 5 7 2 Date Time Font font style font size and format can be set The date time format can be globally pre set Additionally deviating settings can ...

Page 52: ... Presettings Changed presettings apply to all future date time objects In the menu bar select the Presettings tab and click Date time The configuration window for date and time appears The tab Date and time is divided into two sections Format for date and time Font Tab date and time Font ...

Page 53: ... abbreviation can be used once Additional characters also spaces are inserted by being included in simple apostrophes For verification purposes whether or not the entered format is OK is displayed above the input field Current Preview of the selected format with the current system date Example for time offset Inactive offset Example for a shelf life of 1 year the entry is made with 0365 The set va...

Page 54: ...igits 00 to 23 hh Hour with two digits 01 to 12 mm Minutes with two digits 00 to 59 ss Seconds with two digits 00 to 59 t One character for twelve hour format with the letters A or P tt Two characters for twelve hour format with the letters AM or PM 5 7 2 1 2 Font Selection option between Figure style1 and Figure style 2 Font 1 and Font 2 are in the toolbar via the button ...

Page 55: ... 5 7 3 Numbering machine The numbering machine is used for consecutive numbering Starting value repetitions step and step direction as well as font font style and font size can be set The numbering machines format can be pre set Additionally deviating settings can be performed for every single numbering machine object Context menu numbering machine object A maximum of five numbering machine object...

Page 56: ...ings tab and click Numbering machine The configuration window for numbering machines appears The configuration window for numbering machines is divided into three sections Numbering machine range Number circle Font Numbering machine range Number circle 5 7 3 1 1 Numbering machine range Function Description Step Indicates the interval at which the numbering machine counts on e g 1 4 7 in steps of 3...

Page 57: ...circle defines the value range in which a numbering machine counts When the maximum or minimum value is reached for upwards or downwards counting numbering machine the count is continued at the respective other end of the scale Function Description Minimum This value marks the lower limit of the number circle Maximum This value marks the upper limit of the number circle Numbering machine status Th...

Page 58: ...er circle can only be made here when the selected numbering machine is linked to the dedicated number circle Delete object Deletes the object 5 7 4 Barcode The PCset graphic can be used to generate different barcode formats Barcode type character sequence parameters and barcode size can be set The barcode object format can be globally pre set Presettings Consecutive numbering dating Context menu b...

Page 59: ...sired barcode type can be selected from the dropdown list Character sequence The desired character sequence can be entered Plain text preview Indicates the character sequence without control characters Parameter Function Description Display plain text Inserts plain text below the barcode The plain text is the character sequence that has been entered into the barcode object ...

Page 60: ...and Stop characters Start and stop characters from A D for the barcode type coda bar Barcode size Function Description Height mm Barcode height Adjustable from 5 1 26 mm Module height Height of the narrowest element in pixels stroke or gap Only for 2D barcodes Module width pixels Width of the narrowest element in pixels stroke or gap Module ratio X 1 Ratio of wide to narrow element in calculation ...

Page 61: ... objects are loaded To generate a barcode object left click the barcode symbol and pull it into a line to the desired position Push right mouse button select context menu Barcode Format The configuration window for barcode appears To insert the numbering machine pull it into the character sequence by drag drop The line Character sequence shows N for numbering machine To make the settings for the n...

Page 62: ...as in the following figure Function Description Copy Copies the object Barcode format Changes the barcode format Generate graphic Fixes the barcode in the current position Note the barcode cannot be processed anymore after fastening Delete object Deletes the object 5 7 4 4 Generate graphic Text and barcode objects can be converted into graphics Graphics are fixed and can no longer be moved Limited...

Page 63: ...ue Imported colour and greyscale images are converted to a black white image when loaded within the application The use of black and white images is recommended Only graphics of the file type BMP JPG TIF or GIF can be loaded The graphics should have a resolution of 300 dpi so that the imprint can be produced in optimal quality For a distortion free printout in optimal quality a graphic should not ...

Page 64: ...raphic Fixes the graphic at the current position Note the graphic cannot be processed anymore after fixing Delete object Deletes the object 5 7 5 3 Generate graphic Text and barcode objects can be converted into graphics Graphics are fixed and can no longer be moved Limited editing is possible via the additional function Selection Click the object with the right mouse button Select Generate graphi...

Page 65: ...s are available for external trigger types Triggering via external switch 5 8 1 Triggering via external switch For triggering via an external switch the contacts in the jack socket must be short circuited Connect the REINER trigger cable with the jack socket Prepare the device for an imprint Close contact The desired print image is printed ...

Page 66: ...n seal Replacing the seal Clean housing 6 1 Replace print cartridge The ink level of the print cartridge is can be read in the status indicator of the PCset graphic software Different seals are required depending on the type of ink used refer to Replacing the seal Use seal of the enclosed print cartridge Damage to health caused by ingestion of ink Changing the print cartridge Fig ...

Page 67: ...sert the new print cartridge as shown in the figure Make sure it slides all the way down Close the print cartridge locking Close flap for battery and print cartridge compartment Remove the old seal from the device lifting the retaining clip of the seal upwards Remove the seal tip from the notch First insert the new seal with the seal tip into the notch Press the seal slightly down until it snaps i...

Page 68: ...use incorrect printing results Place the device on a firm surface Press function button for print cartridge Print carriage moves to the right into the change position Open flap for battery and print cartridge compartment Push the print cartridge locking slightly upwards and open it Remove the print cartridge from the device Clean the contacts on the print cartridge with a soft cloth slightly soake...

Page 69: ... the way down Close the print cartridge locking Press function button for print cartridge The print carriage returns to the basic position 6 3 Clean nozzles If there are streaks in the imprint or problems with the print quality the ink may have dried on the nozzles Imprint without streaking Imprint with streaking Manual nozzle cleaning ...

Page 70: ...osition in the main menu The print carriage moves into the cleaning position Turn the device upside down To dissolve the dried ink press a soft cloth slightly soaked in ethanol spirit against the nozzles for about three seconds Wipe off dissolved ink and dry nozzles For further information also refer to Cleaning the contacts of the print cartridge ...

Page 71: ...erting the seal first insert the seal tip into the notch and slightly press down on the retaining clip of the seal until it snaps into place in the holder Press function button for print cartridge The print carriage returns to the basic position Clean the seal at regular intervals Replace if heavily soiled or damaged refer to Replacing the seal 6 5 Replacing the seal Replacing the seal Fig Differe...

Page 72: ...f the seal upwards Remove the seal tip from the notch First insert the new seal with the seal tip into the notch Press the seal slightly down until it snaps into the holder Press function button for print cartridge The print carriage returns to the basic position 6 6 Clean housing If liquids come into contact with the inside of the device it may cause an electric shock Cleaning agents that are too...

Page 73: ...ions Causes for uncharged batteries Optical signals LED Acoustic signals 7 1 jetStamp 1025 without function Troubleshooting Fig Disconnect mains cable from jetStamp 1025 Open the battery compartment locking Wait about 3 seconds Close the battery compartment again Connecting the mains cable to the jetStamp 1025 Start PCset graphic Check charge indicator ...

Page 74: ...s are subject to wear A longer service life than six months cannot be guaranteed 7 3 Warning messages Message Eliminate message by Remark Print cartridge almost empty Confirm Reappears the next time the device is switched on The print cartridge is almost empty and will have to be replaced soon Rechargeable battery almost empty Confirm Reappears the next time the device is switched on The rechargea...

Page 75: ...e Please reinsert micro SD card micro SD card read write error Insert the micro SD card again Please reinsert micro SD card micro SD card access error Insert the micro SD card again Print image not released password or invalid print image Change device password or delete print images on the micro SD card Please delete invalid print image on micro SD card Delete the print image on the micro SD card...

Page 76: ...1025 has the CE mark according to the currently valid low voltage and EMC directive jetStamp 1025 is in accordance with the following standards or standardised documents FCC 47 CFR Ch 1 Part 15 Bluetooth FCC R7TAMB2300 Safety of Information Technology Equipment jetStamp 1025 is manufactured according to the safety standards IEC EN 60950 1 do not point the jetStamp 1025 nozzles against people s fac...

Page 77: ...ng 2 5 Interleaved Code 39 Code 128 B QR DataMatrix PDF 417 AZTEC Graphic BMP JPG TIFF GIF Ambience temperature for operation 10 C 40 C Recommended ambient temperature for operation 16 C 32 C Humidity for operation 8 80 relative humidity Recommended humidity for operation 10 70 relative humidity Storage temperature With standard print cartridges With MP print cartridges 1 C 43 C 10 C 20 C Storage ...

Page 78: ...Disposal Transport Damage to the device at improper transport Only use packaging that provides protection from impact and shock for the device Disposal Defective or used batteries Used batteries or rechargeable batteries must not be disposed of with household waste Waste electrical and electronic devices Old devices must not be disposed of in the common household waste but in a specified acceptanc...

Page 79: ...x 49 7723 657 200 E mail reiner reiner de www reiner de 2019 Ernst Reiner GmbH Co KG All rights reserved Translation reprint and other reproduction of these operating instructions even in parts and no matter the form shall require our express written consent We reserve the right to make content changes to these operating instructions without notice ...

Page 80: ...PCset graphic Hilfe jetStamp 1025 80 ERNST REINER GmbH Co KG Originalanleitung 10 Operating instructions ...

Page 81: ...e 35 Device security change password 12 lock device after 12 Disable password protection 34 Display and button functions 9 Disposal 78 E Establish Bluetooth connection 43 Example workflow Generate print image 44 Configure print image 44 Print the print image 46 Replace print image 45 Transfer print image 45 Execute test print 22 External print triggering 65 F Factory settings Reset 13 Firmware upd...

Page 82: ...eable batteries 14 Repeat print image 11 Replace print image 45 Replacing the seal 71 Reset numbering machine 11 S Safe handling of print cartridges 17 Safety notes 17 Safety notes on rechargeable batteries 16 Safety Description 15 Saved print images 23 Set password 34 Settings 12 Date Time 13 Device security 12 Factory settings 13 Print 12 Signals 12 Signals 37 All Acoustic Signal 12 Button sound...

Page 83: ...w w w reiner de REINER 1030088 101 A V6 10 Build 0001 I 05 2019 ...

Reviews: