


X-IP-SERIES USER MANUAL
2
TECH SUPPORT COMMENT:
It is important to configure software settings to the camera orientation
(Basic Configuration > Mounting Orientation) i.e. is the Camera hanging down or upright?
‘hanging down’ would be using one of the following bracket types :
•
swan [RVIP-SWAN] ,
•
pendant [RVIP-PNDT]
•
or wall [RVIP-WALL] - NOT SUITABLE FOR UPRIGHT MOUNTING
‘Upright’ would be using the pedestal bracket [RVIP-PED]
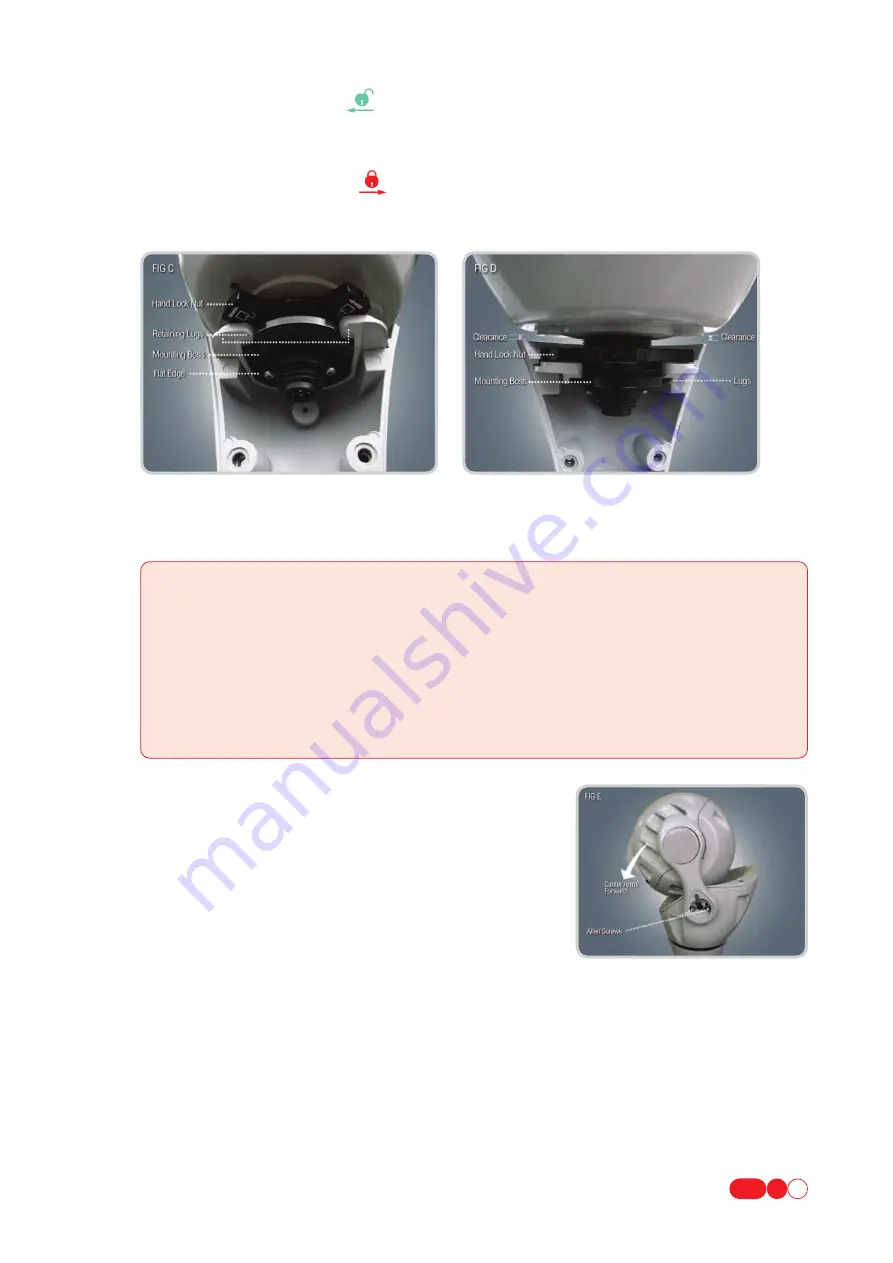
ATTACHING CAMERA TO THE BRACKET:
See Fig C & D below
1. Remove Mount Cover Plate.
2. Fully unscrew Hand Lock Nut.
3. Offer Camera to Bracket. The Mounting Boss orientation is important and should match the picture in FIG C & D below.
i.e The Flat Edge should be positioned to the rear and the Retaining Lugs engaged in the Boss Cut Outs.
4. If RVIP-PED (Pedestal) is being used support the Camera with hand when tightening the Hand Lock Nut - ensure the
Hand Lock Nut is fully tightened.
5. Ensure the Clearance is even throughout 360° rotation and the Camera is free moving.
6. Replace Mount Cover Plates.
1.3
BRACKET TYPES
RVIP-SWAN (Swan mount), RVIP-WALL (Wall mount), RVIP-PNDT (Pendant mount), RVIP-PED (Pedestal for mast/tower mount).
1.4
HOW TO CANTILEVER ARMS FORWARD
1. Remove pear shaped badge on each arm using small flat head screw driver.
2. Slightly loosen by one turn (BUT DO NOT REMOVE) the allen screws.
3. Cantilever the Ball Arms forward to ‘STOP’ position.
4. Tighten allen screws.
5. Replace badges (spares are provided).
6. See Section 6.5.1.2 and from the SET UP MENU select either ‘UPRIGHT
ARMS OUT’ or ‘HANGING ARMS OUT’
2
HOW TO CONFIGURE THE CAMERA INTERFACE
NO HARDWARE CONFIGURATION OF THE CAMERA IS REQUIRED.
ALL OPTIONS ARE SET VIA THE IP INTERFACE WHEN THE CAMERA IS COMMISSIONED.