background image

10

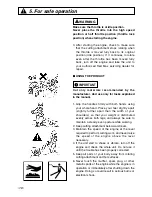
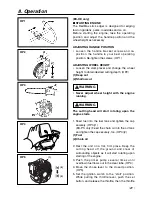
Make sure the throttle is at idle position.
Never place the throttle into the high speed
position or half throttle position (throttle lock
position) when starting the engine.

3. After starting the engine, check to make sure

that the cutting attachment stops rotating when
the throttle is moved fully back to its original
position (idle position). If it continues to rotate
even after the throttle has been moved fully
back, turn off the engine and take the unit to
your authorized Red Max servicing dealer for
repair.

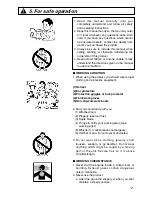
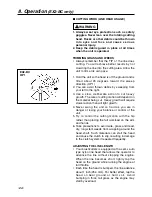
USING THE PRODUCT

Cut only materials recommended by the
manufacturer. And use only for tasks explained
in the manual. 

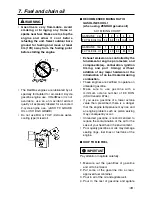
1. Grip the handles firmly with both hands using

your whole hand. Place your feet slightly apart
(slightly further apart than the width of your
shoulders) so that your weight is distributed
evenly across both legs, and always be sure to
maintain a steady, even posture while working.

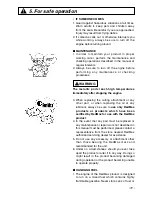
2. Keep cutting attachment below waist level. 
3. Maintain the speed of the engine at the level

required to perform cutting work, and never raise
the speed of the engine above the level
necessary.

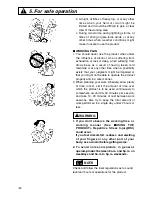
4. If the unit start to shake or vibrate, turn off the

engine and check the whole unit. Do not use it
until the trouble has been properly corrected.

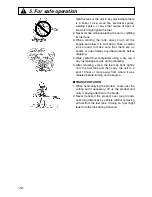
5. Keep all parts of your body away from rotating

cutting attachment and hot surfaces.

6. Never touch the muffler, spark plug, or other

metallic parts of the engine while the engine is in
operation or immediately after shutting down the
engine. Doing so could result in serious burns or
electrical shock.

IMPORTANT

WARNING

5. For safe operation

Summary of Contents for EXtreme EX-HE

Page 1: ...th defects or other reproductive harm WARNING Before using our products please read this manual carefully to understand the proper use of your unit WARNING EXZ PU 60300000 and up EX2 BC 50200000 and u...

Page 2: ...must be followed in order to prevent accidents which could lead to serious bodily injury or death This mark indicates instructions which must be followed or it leads to mechanical failure breakdown or...

Page 3: ...on switch 4 Throttle cable 5 Throttle lever 6 Throttle set button 7 Drive shaft housing 8 Knob bolt 9 Spark arrester 10 Starter knob 11 Fuel tank 12 Primer pump 13 Choke lever 14 Air cleaner cover 15...

Page 4: ...4 lbs 6 1kg Transmission Centrifugal clutch Rigid driveshaft Reduction ratio 4 0 Cutting head Type Reciprocating Double blade Tooth 28teeth Pitch 30 Effective cut width 16 in 40cm Angle adjust range 9...

Page 5: ...ng label peel off or become soiled and impossible to read you should contact the dealer from which you purchased the product to order new labels and affix them in the required location s Never modify...

Page 6: ...GEAR CASE 4 Symbols on the machine IMPORTANT ENGINE INFORMATION THIS ENGINE MEETS U S EPA PH2 AND 2006 CALIFORNIA EMISSION REGULATIONS FOR SI SORE s COMPLIANCE PERIOD CATEGORY A ENGINE FAMILY 6KZXS 02...

Page 7: ...t you should wear proper clothing and protective equipment 1 Helmet 2 Ear protectors 3 Protection goggles or face protector 4 Thick work gloves 5 Non slip sole work boots 2 And you should carry with y...

Page 8: ...the product properly and in a safe manner 2 When planning your work schedule allow plenty of time to rest Limit the amount of time over which the product is to be used continuously to somewhere aroun...

Page 9: ...entire unit for loose fasteners and fuel leakage Make sure that the cutting attachment is properly installed and securely fastened 4 Be sure the debris guard is firmly attached in place 5 Always use t...

Page 10: ...nd Place your feet slightly apart slightly further apart than the width of your shoulders so that your weight is distributed evenly across both legs and always be sure to maintain a steady even postur...

Page 11: ...her part or when replacing the oil or any lubricant always be sure to use only RedMax products or products which have been certified by RedMax for use with the RedMax product 4 In the event that any p...

Page 12: ...ere nearby before refueling 4 Wipe spilled fuel completely using a dry rag if any fuel spillage occurs during refueling 5 After refueling screw the fuel cap back tightly onto the fuel tank and then ca...

Page 13: ...ire to the joint on the top of the carburetor SE2 CONNECTING SWITCH WIRES SE3 Connect the switch wires between the engine and the main unit Pair the wires of the same color Bind switchwires to throttl...

Page 14: ...king the gear shaft by inserting the supplied tool into the upper holder on the gear box loosen and remove the hexagon nut left handed 2 Then screw in the cutting head to the gear shaft over the holde...

Page 15: ...imming mechanism into which the screw is to be inserted with the hole on the main pipe and screw the screw firmly in 4 Using a wrench screw in the bolt provided to fix the trimming mechanism into plac...

Page 16: ...crew in the bolt provided to fix the mechanism into place 1 Main pipe 2 Gear case 3 Screw hole 4 Fastening bolt 5 Bolt A standard package contains the items as shown below SE2 1 Guide bar 2 Saw chain...

Page 17: ...y with the bar tip held up SE6 TORQUE 8 9 11 7 N m 90 120 kg cm Then check the chain for smooth rotation and correct tension while moving it by hand If necessary readjustment 1 Tighten It is very impo...

Page 18: ...with the provided 3 screws then clamp it to the shaft tube with 2 screws SE2 3 Place the blade between the cutter holders A and B while locking the gear shaft by putting the bar one of the tools prov...

Page 19: ...fuel tank of the engine HOW TO MIX FUEL Pay attention to agitate carefully 1 Measure out the quantities of gasoline and oil to be mixed 2 Put some of the gasoline into a clean approved fuel container...

Page 20: ...ly 2 GASOHOL It can cause deterioration of rubber and or plastic parts and disruption of engine lubrication 3 OIL FOR 4 CYCLE ENGINE USE It can cause spark plug fouling exhaust port blocking or piston...

Page 21: ...engine running The cutting head will start rotating upon the engine starts 1 Feed fuel into the fuel tank and tighten the cap securely OP3 1 EX PS only Feed the chain oil into the oil tank and tighte...

Page 22: ...tact with any obstacle when the engine starts OP8 Avoid pulling the rope to its end or returning it by releasing the knob Such actions can cause starter failures 7 Move the choke lever downward to ope...

Page 23: ...adjuster as required OP9 1 cable adjuster ADJUSTING IDLING SPEED OP10 1 When the engine tends stop frequently at idling mode turn the adjusting screw clockwise 2 When the cutting head keeps rotating...

Page 24: ...material being cut Heavy growth will require slower action than will light growth 4 Never swing the unit so hard as you are in danger of losing your balance or control of the unit 5 Try to control th...

Page 25: ...t OP2 1 Cover 3540 13283 2 Holder 6019 13250 Attachment Change to the debris guard which is suitable for the metal blade OP3 130 174 in lbs TIGHTENING TORQUE 14 7 19 6 N m 1 Guard A 5764 24000 4 Bolt...

Page 26: ...y obstacle when the engine starts OP5 CUTTING METHOD a Use the front left side cutting b Guide the blade from your right to left with it tilted slightly to your left OP6 c When mowing a wide area star...

Page 27: ...to the ground OP8 Make sure to use shoulder strap and debris guard If not it is very dangerous when you slip or lose your balance CONTROLLING BLADE THRUST Blade thrust can cause serious personal injur...

Page 28: ...se the chance of blade thrust e Avoid feeding the blade too rapidly The blade can bounce away from material being cut if the blade is fed faster than its cutting capability f Cut only from your right...

Page 29: ...en using a grinder It is recommended that filing should be done by professionals Especially regarding filing the saw blade Leave it to the professionals TRANSPORTING THE UNIT When you finish cutting i...

Page 30: ...mity with the blades Always wear work gloves made of leather or some other sturdy material when using the trimmer Always place the blade cover provided with the trimmer over the blades when not in use...

Page 31: ...te will speed oil consumption requiring more frequent checks on the oil reservoir To ensure sufficient lubrication It may be necessary to check the oil level more frequently than at fuel tank refills...

Page 32: ...rection there are three incremental settings a Clockwise decrease lubrication b Counter clockwise increase lubrication c Middle Always wear work gloves made of leather or some other sturdy material wh...

Page 33: ...djust the wheel height or try to remove anything entangled to the blade with the engine running 1 Before starting the engine adjust the wheel height for desired cutting depth See page 21 2 Before star...

Page 34: ...ooling vent clean muffler spark arrester cylinder exhaust port clean throttle lever ignition switch check operation replace if EX2 BC EX LRT cutting parts something s wrong EX HE gear case grease scre...

Page 35: ...fuel filter for blockage MA2 1 fuel filter SPARK PLUG Starting failure and mis firing are often caused by a fouled spark plug Clean the spark plug and check that the plug gap is in the correct range...

Page 36: ...MA4 1 spark arrester INTAKE AIR COOLING VENT Never touch the cylinder muffler or spark plugs with your bare hands immediately after stopping the engine The engine can become very hot when in operatio...

Page 37: ...the part of the brushcutter MA6 1 cylinder 2 intake air cooling vent back PROCEDURES TO BE PERFORMED AFTER EVERY 100 HOURS OF USE 1 Remove the muffler insert a screwdriver into the vent and wipe away...

Page 38: ...n the correct direction as indicated on the spool 5 Hook each end of the line in the slot on the edge of the spool and then put the ends through the eyelets on the housing Make sure that the spring an...

Page 39: ...ew too tightly may make it impossible for the blades to move Conversely not screwing in the screw tightly enough may make the blades of the trimmer feel dull and cause leaves and branches to become ca...

Page 40: ...t the guide bar and check the oiling port for clogging MA1 1 Oiling port GUIDE BAR Remove sawdust in the bar groove and the oiling port MA2 1 Groove 2 Oiling port Type Sprocket nose Grease the nose sp...

Page 41: ...very important for smooth and safe operation to keep the cutters always sharp Your cutters need to be sharpened when Sawdust becomes powder like You need extra force to saw in The cut way does not go...

Page 42: ...sure every cutter has the same length and edge angles as illustrated MA8 4 Cutter length 5 Filing angle 6 Side plate angle 7 Top plate cutting angle GEAR CASE The reduction gears are lubricated by mu...

Page 43: ...ease in the gear case At every 20 hours of use supply the gear case with new grease Remove the cutter holders before installing new grease to arrange for old grease to exit When removing and installin...

Page 44: ...CTION fuel tank incorrect fuel or staled fuel drain it and with correct fuel carburetor adjustment screw out of normal range adjust to normal range muffler cylinder exhaust port carbon is built up wip...

Page 45: ...ntents described in the parts list may change due to improvement 5 The parts for the machine shall be supplied seven 7 years after the machine is discontinued It is possible that some specific parts m...

Page 46: ...12 Parts list 46 Fig 1 EXZ PU S N 60300000 and up...

Page 47: ...14410 06 1 20 SPRING 6110 14410 07 1 21 SPRING 6110 14410 08 1 22 BUTTON T3032 14410 09 1 23 E RING 6110 14410 10 1 24 CORD A black T3002 12220 1 25 CORD B red T3002 12230 1 26 TUBE T3002 12240 1 27 C...

Page 48: ...12 Parts list 48 Fig 2 EX2 BC S N 50200000 and up...

Page 49: ...0 91340 1 18 BOLT TORX 4820 12350 1 19 GUARD ASSY T3195 24003 1 20 GUARD COMP T3195 24103 1 21 BLADE T3002 24121 1 22 SCREW TORX T4960 51431 1 23 NUT 3320 15310 1 24 CLAMP 3520 24120 1 25 BOLT TORX T4...

Page 50: ...Fig 3 ENGINE UNIT 60100000 and up 50 12 Parts list...

Page 51: ...58 GASKET muff 848 F08 15C1 1 59 PLATE 848 F00 15D1 1 60 BOLT TORX 4820 12350 2 Key Description Part Number Q ty 61 HOUSING ASSY 848 F00 5301 1 62 HOUSING COMP T1551 31100 1 63 HOUSING T1551 31110 1...

Page 52: ...12 Parts list 52 Fig 4 EX LRT S N 000531 and up...

Page 53: ...34 WASHER 6x15x2 0 6782 13650 1 35 BEARING 608 2RS 6598 13430 1 36 SNAP RING 04065 02212 1 37 SHAFT KIT T4008 06010 1 38 SHAFT 1 39 GEAR B 1 40 GEAR C T4008 13630 1 41 BOSS 1 42 SPRING T4008 13650 1 4...

Page 54: ...12 Parts list 54 Fig 5 EX PS S N 000000 and up...

Page 55: ...NK ASSY 848 A52 5511 1 22 COLLAR T3073 13820 2 23 VALVE T3073 13830 1 24 SCREW T3073 13860 2 25 OIL CAP ASSY T3073 13900 1 26 GASKET OIL CAP T3073 13920 1 27 GEAR SHAFT T3073 13370 1 28 BEVEL pinion T...

Page 56: ...12 Parts list 56 Fig 6 EX HE S N 000101 and up...

Page 57: ...P L 3583 14121 1 30 CAP U 3257 14192 1 31 BOLT 01252 30522 2 32 BOLT 01252 30525 4 33 GUARD ASSY 6367 24001 1 34 GUARD COMP 6367 24101 1 35 GUARD 6367 24111 1 36 PLATE 6367 24120 1 37 PLATE 6367 24131...

Page 58: ...sibilities As the small off road engine owner you are responsible for the performance of the required maintenance listed in your owner s manual KOMATSU ZENOAH recommends that you retain all receipts c...

Page 59: ...PART THAT IS EQUIVALENT IN PERFORMANCE AND DULABILITY MAY BE USED IN NON WARRANTY MAINTENANCE OR REPAIRS AND SHALL NOT REDUCE THE WARRANTY OBLIGATION OF THE COMPANY THE COMPANY IS LIABLE FOR DAMAGES T...

Page 60: ...bilit peut tre utilis e pour l entretien hors garantie ou les r parations hors garantie et ce sans r duire l obligation de garantie incombant la soci t La soci t sera tenue responsable des dommages au...

Reviews: