background image


15

5.  Drive to the spot where the processing should take place and stop the tractor. 
6.  Engage the tractor in the correct gear. 
7.  Lower the Easy Spread to the ground in a smooth movement.  
8.  Start driving the tractor and operate the hydraulic valve of the gritting cylinder/agitator so 

that it begins to grit. 

9.  Accelerate the driving speed until you achieve the desired gritting result.   


Work in straight lines; working in bends causes damage to the surface 
that should be processed. 


Stopping occurs as follows: 
 
1.  Operate the hydraulic valve so the gritting stops and the dose lid closes. 
2.  Stop the tractor. 
3.  Lift the Easy Spread. 
4.  Go to the next location and start all over again as described in this chapter. 


10.0  TRANSPORTING THE EASY SPREAD 


The user is responsible for transporting the Easy Spread in back of the tractor on public 
roads. Verify the national legislation regarding the regulations. 


On open fields while the machine is raised, the maximum permitted speed is 12 km/h (7.5 
mph) due to the weight of the Easy Spread. 


A higher speed can be dangerous for the driver and/or the public and can even damage the 
machine. 
 

   When the machine is raised off the ground, the front axle of the tractor has to 

support minimum 20% of its weight! 


Summary of Contents for Easy Spread 1000

Page 1: ...erial number Translation of the original operating instructions ATTENTION IT IS OF THE UTMOST IMPORTANCE TO READ THIS USER MANUAL CAREFULLY PRIOR TO USING THE EASY SPREAD IN ORDER TO USE THE MACHINE S...

Page 2: ...in order to deal with potential future claims This user manual lists many instructions that are numbered in sequence You should follow this sequence A is an indication of a safety instruction A means...

Page 3: ...dered professional use of this machine Inspect the area to be treated before using the Easy Spread Remove loose obstacles and avoid irregularities 2 The Easy Spread is manufactured according to the la...

Page 4: ...step off the tractor while the motor is running When carrying out maintenance adjustments and repairs it is necessary to block the Easy Spread in order to prevent it from sinking away driving off and...

Page 5: ...ly visible and legible and must be replaced if they have become damaged During operation NO persons are allowed within the danger zone of the Easy Spread because there is danger of physical injuries c...

Page 6: ...SY SPREAD WITH MACHINE NUMBER AS INDICATED ON THE MACHINE AND IN THIS MANUAL to which this declaration relates is according to the stipulation of the 2006 42 EC directive for machines as well as the f...

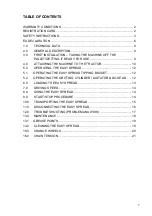
Page 7: ...OPERATING THE EASY SPREAD 12 5 1 OPERATING THE EASY SPREAD TIPPING BUCKET 12 5 2 OPERATING THE GRITTING CYLINDER AGITATOR DOSE LID 12 6 0 LOADING THE EASY SPREAD 13 7 0 DRIVING SPEED 14 8 0 USING THE...

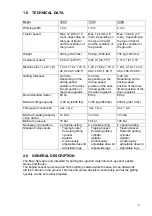
Page 8: ...on of the dose lid and position of the dose regulator Recommended tractor Minimum lifting capacity 60 hp 1100 kg 2865 lbs 60 hp 1300 kg 2865 lbs 80 hp 2000 kg 4410 lbs Three point connection Cat 1 2 C...

Page 9: ...chine Make sure that the cable crane lift can hoist minimum 2x the weight of the machine machine weight see Chapter 1 0 Technical data 2 Lift the machine so the cables come under tension 3 Remove the...

Page 10: ...ns 1 2 and the pins 3 4 2 Drive the tractor carefully backwards so that the lower connecting arms 5 can be attached to the frame Make sure that the tractor is blocked well and cannot move on its own a...

Page 11: ...should be attached to one connection these are the small hoses The hoses for regulating the gritting quantity should also be attached to one connection these are the big hoses figure 8 9 Lift the mach...

Page 12: ...the tractor 5 2 OPERATING THE GRITTING CYLINDER AGITATOR DOSE LID The hydraulic hoses for operating the gritting cylinder agitator and dose lid should be attached to the other double acting valve The...

Page 13: ...the tractor with the bucket backwards into the material to be loaded 5 When the bucket hits the material Slowly tilt the bucket upwards Lifting too much material can damage the Easy Spread 6 Load the...

Page 14: ...the attention of the driver If so the Easy Spread CANNOT be used 4 Is there danger of sinking sliding away If so postpone using the Easy Spread 5 If the soil is frozen or very wet postpone the activit...

Page 15: ...the hydraulic valve so the gritting stops and the dose lid closes 2 Stop the tractor 3 Lift the Easy Spread 4 Go to the next location and start all over again as described in this chapter 10 0 TRANSPO...

Page 16: ...d well and cannot move on its own accord Switch off the tractor before descending Make sure that the Easy Spread stands firmly on the ground and is blocked against sliding before descending from the t...

Page 17: ...lear blockade Pollution defect hydraulic system Repair or change parts The chain broke Check the chain The dose lid will not open or will not open far enough Stop bolts are screwed too loose Further s...

Page 18: ...s Tighten loose bolts nuts After every 20 working hours Check the agitator for bended pins Repair or replace the pins Check for loose bolts nuts Tighten loose bolts nuts Presence and readability of th...

Page 19: ...se should all be lubricated Fig 13 14 0 CLEANING THE EASY SPREAD Here are the cleaning instructions in order to keep the Easy Spread in tip top condition NEVER spray the bearing seals with a high pres...

Page 20: ...and can fall down make sure nobody is under the wheel set as the bolts and nuts are los loosened 3 Lower the wheel set The entire wheel set is now loose 4 To remove the wheel from the axle loosen the...

Page 21: ...move on its own accord Switch off the tractor before descending Make sure that the Easy Spread stands firmly on the ground and is blocked against sliding before descending from the tractor 2 You shoul...

Reviews: