


HAMlab, Release 1.0
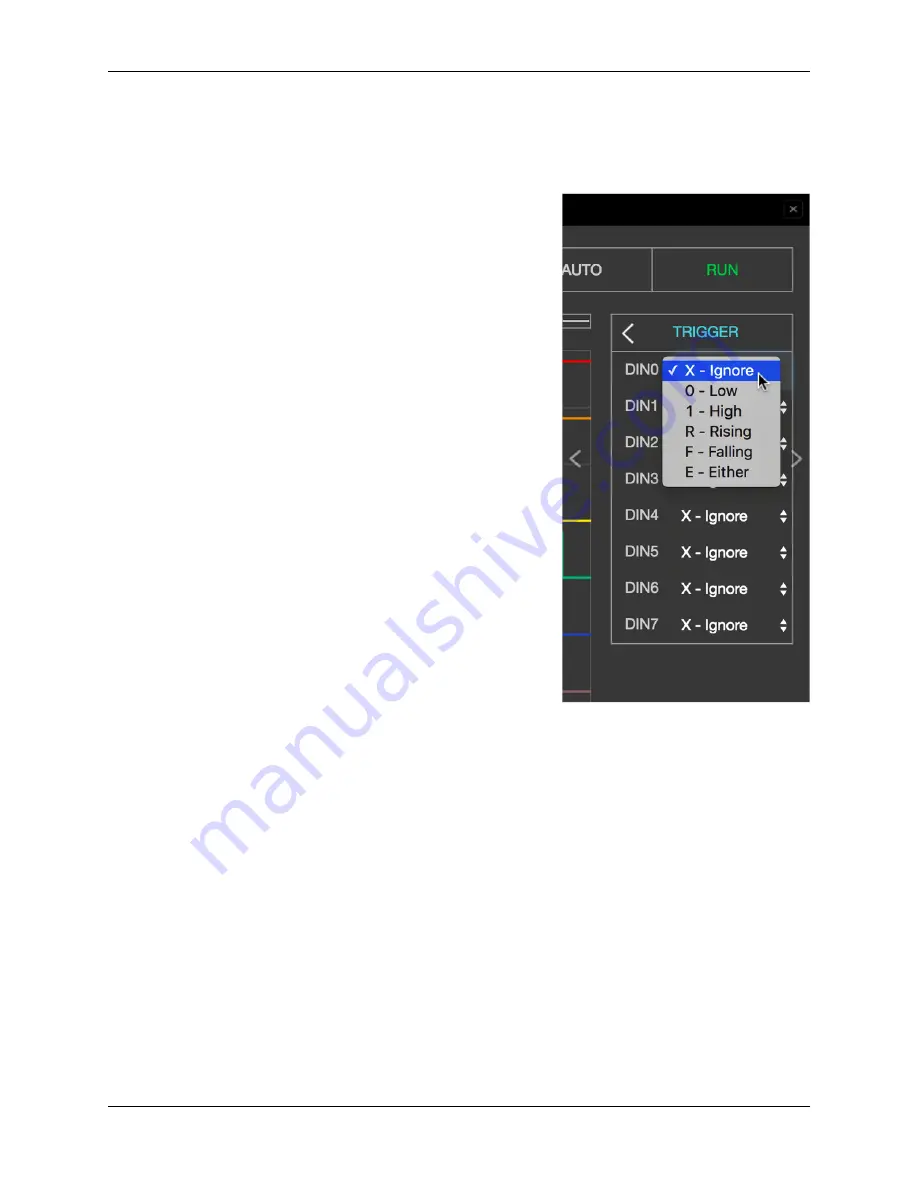
TRIGGER
By clicking the gear behind TRIG settings, the trigger menu is opened. Each channel can be set as a trigger source
with the desired condition. For acquisition to start, the Trigger source and Rising Edge needs to be defined.
The possible criteria for Trigger event are next:
• X - Ignore no event
• R - Rising rising edge
• F - Falling Falling edge
• E - Either Edge change (rising or falling edge)
By clicking the RUN button the recording is started. The status display informs you whether the process is still
running (WAITING) or has already been completed (DONE). After finishing the acquisition, the results are displayed
in a graph. Additional trigger options LOW and HIGH are used for the so called Patterned triggering. For example:
If you set the trigger source to be DIN0 – Rising edge (to have one channel defined as a trigger source with a rising
or falling edge is a mandatory condition for the acquisition to start), DIN1 to HIGH and DIN2 to LOW this will cause
such a behavior that the application logic will wait for the state where DIN0 goes from 0 to 1, DIN1 is 1 and DIN2 is
0 to start the acquisition.
DECODE BUS DATA
In the
DIGITAL
→
BUS
menu the decoding of the desired lines can be selected. Up to 4 buses can be defined. The
available decoding protocols are
I2C
,
UART
, and
SPI
. By selecting the desired protocol, the setting menu for the
3.3. Logic Analizer
63
Summary of Contents for HAMlab
Page 1: ...HAMlab Release 1 0 User Manual Sep 18 2017...
Page 2: ......
Page 8: ...HAMlab Release 1 0 4 Chapter 1 WARNING IMPORTANT NOTICE Read before operating this unit...
Page 19: ...HAMlab Release 1 0 2 4 Start using HAMlab as Radio Station SDR 15...
Page 20: ...HAMlab Release 1 0 16 Chapter 2 Quick start...
Page 21: ...HAMlab Release 1 0 2 4 Start using HAMlab as Radio Station SDR 17...
Page 37: ...HAMlab Release 1 0 2 5 Alternative networking for HAMlab 33...
Page 41: ...HAMlab Release 1 0 6 Click Write and wait for the write to complete 2 7 Prepare SD card 37...
Page 50: ...HAMlab Release 1 0 46 Chapter 2 Quick start...
Page 72: ...HAMlab Release 1 0 68 Chapter 3 Applications and Features...
Page 73: ...HAMlab Release 1 0 3 4 Power SDR 69...
Page 79: ...HAMlab Release 1 0 HAMlab application page should appear 3 4 Power SDR 75...
Page 80: ...HAMlab Release 1 0 Connecting Power SDR with HAMlab 76 Chapter 3 Applications and Features...
Page 81: ...HAMlab Release 1 0 3 4 Power SDR 77...
Page 93: ...HAMlab Release 1 0 4 7 Back panel controls and connections 89...
Page 96: ...HAMlab Release 1 0 92 Chapter 4 HAMlab 80 10 10W Specifications...
Page 106: ...HAMlab Release 1 0 102 Chapter 5 HAMlab 160 6 10W 10W Specifications...
Page 112: ...HAMlab Release 1 0 Check that audio card was recognized 108 Chapter 6 Troubleshoot...
Page 114: ...HAMlab Release 1 0 110 Chapter 6 Troubleshoot...
Page 115: ...HAMlab Release 1 0 6 3 Audio board not working 111...