


HAMlab, Release 1.0
Analyzing binary signals
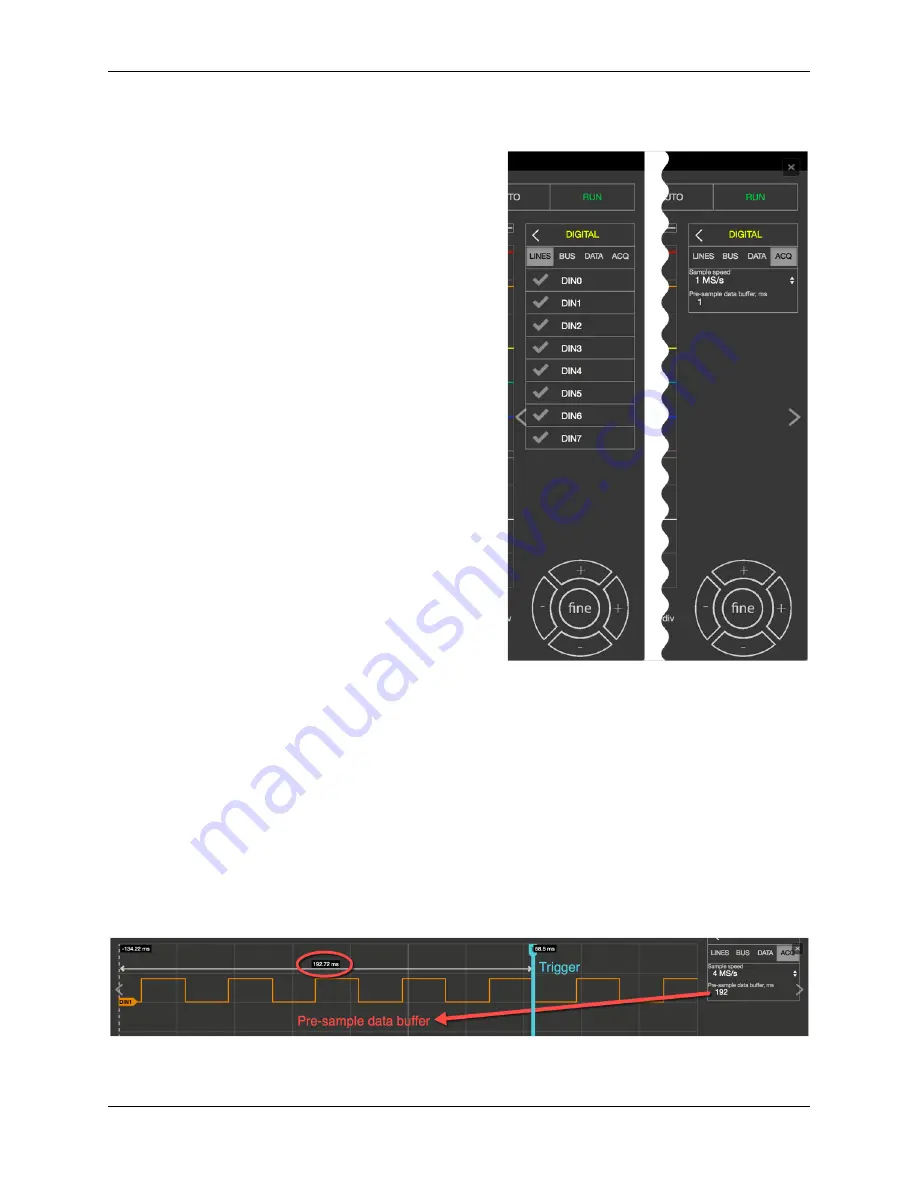
By selecting the gear button behind the DIGITAL selection field you enter the menu for the channel configuration.
In the LINES register, the channels can be activated or deactivated by simply clicking the check mark. As long as
no bus systems have been configured, the channels operate as purely digital inputs and correspondingly show the
progress. The tab ACQ opens the selection field for the Sample rate settings. When selecting the values there is one
thing to note: the sample rate has a significant influence on the time section, which can be represented. The memory
depth of the Logic Analyzer applications is 1 MS, so it can store and display 1,000,000 binary values. From this it is
clear that the sampling rate determines how many values are recorded per second. If we choose the highest sampling
rate (125MS/s), 125,000,000 values would be recorded per second. Since 1,000,000 values can be stored is the time
memory, we get a 0.008 second time window. With a sampling rate of 1MS/s, the time window of the recorded signal
will be one full second. When the Pre-sample data buffer value is set, at which point of the recording the trigger event
is located. This makes particular sense if you want to find out what happened before the defined trigger event. To
illustrate with an example: the sample rate is set to 4MS / s, the stored time segment thus amounts to approximately
0.25s = 250ms. If the Pre-sample data buffer is set to 10ms, then the recorded signal shows what has happened 10ms
before the event, and 240ms after the event.
62
Chapter 3. Applications and Features
Summary of Contents for HAMlab
Page 1: ...HAMlab Release 1 0 User Manual Sep 18 2017...
Page 2: ......
Page 8: ...HAMlab Release 1 0 4 Chapter 1 WARNING IMPORTANT NOTICE Read before operating this unit...
Page 19: ...HAMlab Release 1 0 2 4 Start using HAMlab as Radio Station SDR 15...
Page 20: ...HAMlab Release 1 0 16 Chapter 2 Quick start...
Page 21: ...HAMlab Release 1 0 2 4 Start using HAMlab as Radio Station SDR 17...
Page 37: ...HAMlab Release 1 0 2 5 Alternative networking for HAMlab 33...
Page 41: ...HAMlab Release 1 0 6 Click Write and wait for the write to complete 2 7 Prepare SD card 37...
Page 50: ...HAMlab Release 1 0 46 Chapter 2 Quick start...
Page 72: ...HAMlab Release 1 0 68 Chapter 3 Applications and Features...
Page 73: ...HAMlab Release 1 0 3 4 Power SDR 69...
Page 79: ...HAMlab Release 1 0 HAMlab application page should appear 3 4 Power SDR 75...
Page 80: ...HAMlab Release 1 0 Connecting Power SDR with HAMlab 76 Chapter 3 Applications and Features...
Page 81: ...HAMlab Release 1 0 3 4 Power SDR 77...
Page 93: ...HAMlab Release 1 0 4 7 Back panel controls and connections 89...
Page 96: ...HAMlab Release 1 0 92 Chapter 4 HAMlab 80 10 10W Specifications...
Page 106: ...HAMlab Release 1 0 102 Chapter 5 HAMlab 160 6 10W 10W Specifications...
Page 112: ...HAMlab Release 1 0 Check that audio card was recognized 108 Chapter 6 Troubleshoot...
Page 114: ...HAMlab Release 1 0 110 Chapter 6 Troubleshoot...
Page 115: ...HAMlab Release 1 0 6 3 Audio board not working 111...