background image

7

www.RedDevilEquipment.com  (PHONE) 800-221-1083 | (INTL) +1-763-533-2969 | (FAX) 763-852-1811 

1785871  Rev J

ECO 15-0051 B

December 2015

Owner’s Manual: XVL10

3. u

npaCkIng

 & I

nsTallaTIon

This machine was shipped fully assembled. 
Before plugging in the machine or attempting to 

operate it:

1.  Use a 1/2 in. combination wrench and a 1/2 

in. socket wrench to remove the shipping bolts 

at the back of the mixer (at the end of the yellow 

lanyard). To loosen, turn the bolts counter- 

clockwise until the nuts and washers have been 

removed from the bottom side of the pallet. It 

may be necessary to prop the machine up to get 

at the nuts underneath the pallet. 
2.  Slide the bolts up through the frame and out 

of the mixer. Set aside the bolts, washer, nuts, 

and yellow lanyard in case they are needed for 

future shipment of the mixer. 

3. 

Set the machine on a stable, level surface 

and plug it in an appropriately grounded outlet 

(see section 1.2, 

Safety Precaution Summary

, for 

grounding information). 

NOTE:

 If the machine needs to be shipped any 

time, contact Red Devil to obtain the appropriate 

packaging kit, part no. 6784975. See section 9, 

Ordering

, for ordering information.

Summary of Contents for XVL10

Page 1: ...www RedDevilEquipment com PHONE 800 221 1083 INTL 1 763 533 2969 FAX 763 852 1811 Owner s Manual XVL10 One Gallon Vortex Mixer ...

Page 2: ...on Labels 4 1 2 Safety Precaution Summary 5 2 Introduction 6 2 1 Application 6 2 2 Specifications 6 3 Unpacking Install 7 4 Operation 8 4 1 Control Panel 8 4 2 Install a Container 9 5 Cleaning 9 6 Troubleshooting 10 7 Wiring Diagram 11 8 Exploded Views 12 8 1 Frame Assembly 12 8 2 Enclosure Assembly 13 8 3 Drive Assembly 14 8 4 Rotating Assembly 15 9 Ordering 16 Replacement Parts 16 10 Warranty 17...

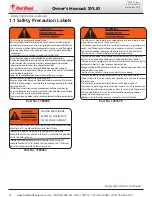
Page 3: ...tial dangers from misuse of the machine WARNING indicates a hazardous situation which if not avoided could result in death or serious injury These serious injuries could include permanent loss of function or significant disfigurement disability considerable pain and suffering amputations severe burns and loss or impairment of vision or hearing Take all necessary precautions to avoid unnecessary in...

Page 4: ...ground ing could cause electric shock and injury Disconnect power cord before servicing cleaning or removing any covers and follow lockout tagout procedures in owner s manual failure to disconnect power could cause electric shock and injury Review Owner s Manual before installing or operating La maquinaria debe ser apoyada correctamente en el suelo antes de usar el no apoyarla puede causar choque ...

Page 5: ...operly grounded Do not modify the plug provided if it won t fit in the outlet have a proper outlet installed by a qualified electrician Disconnect the power cord before servicing cleaning or removing any covers Follow the lockout tagout procedures of your company CAUTION Keep the work area free of clutter and electrical cords Avoid extension cords To minimize the risk of improper electrical ground...

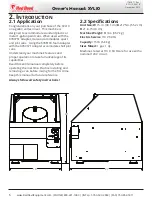
Page 6: ...ng the 6786133 foam Adapter with the 9783671 Adapter accomodates half pint cans Understand your machine s features and proper operation to take full advantage of its capabilities Read this entire manual completely before operating the machine Practice installing and removing a can before mixing for the first time Keep this manual for future reference Always follow all safety instructions Unit Size...

Page 7: ... until the nuts and washers have been removed from the bottom side of the pallet It may be necessary to prop the machine up to get at the nuts underneath the pallet 2 Slide the bolts up through the frame and out of the mixer Set aside the bolts washer nuts and yellow lanyard in case they are needed for future shipment of the mixer 3 Set the machine on a stable level surface and plug it in an appro...

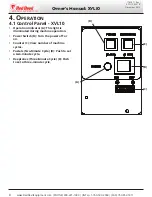
Page 8: ...December 2015 4 Operation 4 1 Control Panel XVL10 Operation Indicator A This light is illuminated during machine operation Power Switch B Turn the power off or on Counter C View number of machine cycles Pastels Two Minute Cycle D Push to set a two minute cycle Deeptones Three Minute Cycle E Push to set a three minute cycle A B E D C ...

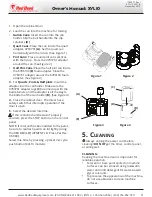
Page 9: ...ined up with the bail retainers and the adapter is all the way to the bottom of the can holder B See Figure 4 4 Close the cabinet door The mixer has a safety switch that interrupts operation if the door is open 5 Select the desired mix time If the container handle wasn t properly secured press the STOP button on the control panel NOTE If colorant has been added to the paint be sure to reattach pai...

Page 10: ...tton is activated Turn switch knob 1 4 turn clockwise to disengage Faulty controller Contact Red Devil Equipment Co Customer Care Door switch is faulty or needs adjustment Adjustthedoorswitch Forreplacement contact Red Devil Equipment Co Customer Care Worn damaged or loose drive belt Unplug power cord open mixer door and visually inspect the drive belt Excessive Vibration Pail damaged Fix or repla...

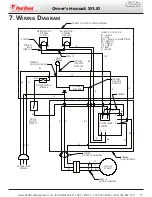
Page 11: ...782782 5 6 3 2 1 WIRE COLOR CODE BL BLACK B BLUE B W BLACK W WHITE STRIPE BR BROWN G GREEN GR GREY R RED W WHITE 5782479 LIGHT 5782448 5782479 9780542 ORANGE WIRE NUT 9780543 YELLOW WIRE NUT W BL COUNTER 5784008 POWER SWITCH 5782445 9782621 BLUE WIRE NUT GR BR B BLUE SWITCH 5782585 180 SEC GREEN SWITCH 5782584 120 SEC 9784606 JUNCTION BOX 6784557 CONTROL PANEL ASSEMBLY 5782783 CONTROL HARNESS W BL...

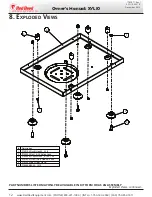
Page 12: ...15 8 Exploded Views 8 1 Frame Assembly Exploded Views continued PART NUMBERS LISTED MAY ONLY BE AVAILABLE IN KIT FORM OR AS AN ASSEMBLY 3 5 2 6 1 4 3 5 2 6 1 4 Id Description 1 9780193 Nut Nylock 3_8 16 2 9780343 Nut 1_4 20 Nylon Lock 3 9780886 SCREW HEX 3_8 16 X 1 00 4 9781929 ISOLATOR RUBBER 5300 5 9782044 Foot Floor Stand 6 9784556 BASE 1015 ...

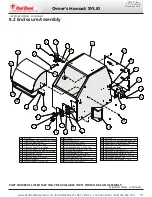
Page 13: ... TIMER 7 5783815 Switch Limit 1hp 8 5784008 Counter cycle 9 9102519 BUSHING STR RELIEF 10 9166300 GROMMET 11 9641300 WASHER FLAT 8 SAE ID Description 12 9654100 Nut 1_4 20 13 9780164 Washer 1_4 LOCK 15 9780381 Screw Hex 8 X 3_8 16 9780886 SCREW HEX 3_8 16 X 1 00 17 9781338 Screw Pan Head 8 32 X 1 00 18 9781840 Nut Keps 8 32 19 9782681 BUMPER DOOR 5300 20 9783385 Screw 10 32 SHWH Tap 21 9783503 LIM...

Page 14: ... 20 Nylon Lock 6 9780402 Washer 3_8 split lock 7 9780886 SCREW HEX 3_8 16 X 1 00 8 9781414 Washer Fender 1_4 9 9781904 WASHER SPACER 10 9782182 PULLEY BIG 1015 Id Description 11 9782537 GEAR BIG BEVEL STATIONARY 12 9783838 Retaining Ring 625 Shaft 13 9781960 Key Square 187 x 1 00 14 9784523 FRAME MIX 1015 15 9784554 SCREW SOC HD CAP 1_4 20 X 1 25 16 9784555 SCREW HEX SEMS 1_4 20 X 75 17 9784651 BE...

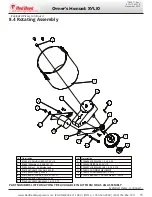
Page 15: ... 11 9 4 7 5 6 8 12 10 3 2 8 13 14 1 2 11 9 Id Description 1 6785987 CAN HOLDER ASSY XVL 10 2 9760514 Washer 1_4 SAE 281 ID 3 9780343 Nut 1_4 20 Nylon Lock 4 9781896 CLAMP COLLAR 0 625 ID 5 9781904 WASHER SPACER 6 9781960 KEY SQUARE 1875 x 1 00 LG 7 9782538 GEAR URETHANE 5300 8 9784555 SCREW HEX SEMS 1_4 20 X 75 Id Description 9 9784698 SCREW HEX 1_4 20 X 50 10 9785853 ORBIT ARM XVL10 11 9785907 SC...

Page 16: ...he Model and Serial numbers of the machine when ordering replacement parts GENERAL PARTS REPLACEMENT POLICIES While your machine is under warranty do not attempt on site repair or parts replacement without first contacting Red Devil Equipment Co to protect your warranty After the warranty expires replacement parts and recommendations for on site servicing are available from Red Devil Equipment Co ...

Page 17: ...ment Co instructions as appearing in the owners manuals This warranty does not cover and Red Devil Equipment Co shall not be liable for any malfunction damage or wear caused by faulty installation misapplication abrasion corrosion inadequate or improper maintenance negligence accident tampering or substitution of non Red Devil Equipment Co component parts modification or use for non intended purpo...

Page 18: ...18 www RedDevilEquipment com PHONE 800 221 1083 INTL 1 763 533 2969 FAX 763 852 1811 Owner s Manual XVL10 1785871 Rev J ECO 15 0051 B December 2015 Notes ...

Page 19: ...19 www RedDevilEquipment com PHONE 800 221 1083 INTL 1 763 533 2969 FAX 763 852 1811 1785871 Rev J ECO 15 0051 B December 2015 Owner s Manual XVL10 ...

Page 20: ...Telephone International Telephone Fax E mail 800 221 1083 1 763 533 2969 763 852 1811 info reddevilequipment com Copyright 2014 Red Devil Equipment Company All rights reserved Owner s Manual XVL 10 1785871 Rev J ECO 15 0051 B December 2015 For instructional How To videos please visit our youtube channel or go to www RedDevilEquipment com ...

Reviews: