


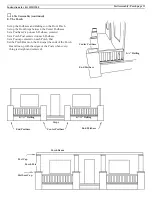

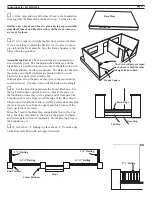


B. The Second Floor:
Tape the Mid Floor to the Walls lined up on the ends and in
back - the stair hole is closer to the back
Tape together the Top Front and Attic Endwalls; tape them
to the Mid Floor, lined up on the ends and in back. Tape
the “Handy Squares” in the back corners to hold the Attic
Endwalls straight.
Tape the Porch Triangles to the Top Front and Floor.
Option: Some builders set the Porch Triangles
1
/
8
” from
the edge for extra detail
□
6.
Test Assembly:
A.
The First Floor
Tape the Base Floor to the Foundation
Tape the Front and Side Walls together and to the Base Floor,
lined up on the edges and in back.
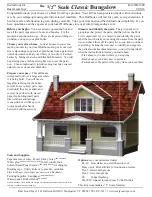
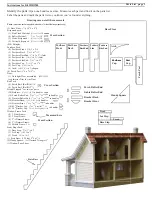
Instructions for kit #HB 1900
Dormer Front page 8
□
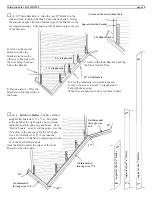
5.
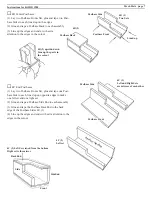
The Dormer Front:
Glue and tape together the Dormer Front set
Glue the Fronts to the Triangle, lined up on the out-
side edge (test the spacing with the Dormer Base)
Glue the Dormer Base to the Dormer Fronts, lined
up on the outside edge.
Lined up on the inside
Bevel faces back
Clapboard faces outward
Dormer Front Set
view from the side
Dormer Triangle
Dormer
Front
Dormer Base
Dormer
Front
Lined up
Lined up in back
Lined up
on the edges
Front
Base Floor
Side
Handy Square
Attic Endwall
Porch Triangle
Mid Floor
Top Front
Detail of Top Front
Attic Endwall
Porch Triangle
Note: the sharp point of a triangle is a notoriously
fi
ckle
“edge” to line things up with - it is always a little bit
rounded which makes it look shorter than the way the
parts actually
fi
t (the extended roof-line). Use the Dor-
mer Base to establish the width of the Dormer Fronts,
then glue on the triangle centered over them
The point of a triangel is
always a little rounded
The way the parts
fi
t
The way the parts
fi
t
follows the roo
fl
ine
follows the roo
fl
ine