


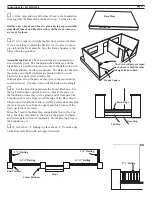


Base Floor
(1) Base Floor: (
1
/
4
) 15
1
/
8
x 9
3
/
4
Stripwood pack:
(1) StairTread Material: (
1
/
16 x 5
/
16
) 18
(4) Rafter Material: (
1
/
8 x 3
/
16
) 18
(5) Horiz. Stripwood: (
3
/
32 x 1
/
4
) 18
(2) Vertical Stripwood: (
3
/
32 x 13
/
32
)18
(950) Shingles:
Postbase Pack:
(4) Postbase Front: (
1
/
8
) 1
x 2
1
/
2
(2) Postbase Back: (
1
/
8
) 1
x 1
9
/
32
(2) Postbase BackEnd: (
1
/
8
) 1
x 2
1
/
2
Inlet
(6) Postbase Side: (
1
/
4
)
3
/
4
x 2
1
/
2
Inlet
(2) Postbase SideEnd: (
1
/
4
)
3
/
4
x 2
1
/
2
(4) Postbase Cap: (
3
/
16
) 1
1
/
8
x 1
1
/
8
(4) Post Cap: (
1
/
8
)
3
/
4
x
3
/
4
(6) Arch: (
1
/
8
) 1
13
/
16
x 1, shaped.
(4) Porch Post: (
5
/
8
x
5
/
8
) 2
1
/
2
Door:
(1) Oval light Door, assembled : (#H-1119)
(set) Interior Trim for the Door
Rail Pack:
(4) Porch Rail: (RailH) 4
17
/
32
(4) Porch Rail: (RailH) 2
1
/
4
StretchWrapped “cut-to-size” parts:
(38) Baluster: (
1
/
16 x 3
/
16
) 1 in bundles
(16) Porch Rafter End: (
1
/
8 x 3
/
16
)
11
/
16 angled
in bundles
(4) Dormer Rafter End: (
1
/
8 x 3
/
16
)
9
/
16 angled
in bundles
(14) Bracket Back: (
3
/
32 x 1
/
4
)
3
/
4
in bundles
(14) Bracket Strut: (
3
/
32 x 1
/
4
)
13
/
16 angled
in bundles
(10) 45
o
Bracket Cap: (
1
/
4 x 1
/
4 angled
)
13
/
16
(4) 30
o
Bracket Cap: (
3
/
16 x 3
/
16 angled
)
13
/
16
Window Frame Pack
(8) 3
Front Frame:
(8) 2
Front Frame:
(4) 3
3
/
4
Dormer Frame:
(4) 2
1
/
2
Dormer Frame:
(2) Middle Frame: 2
1
/
8
Front Steps Pack
(1) Base Step: (
1
/
4
) 1
1
/
4
x 3
(1) 2
nd
Step: (
3
/
8
)
5
/
8
x 3
(2) Tread: (
3
/
32
x
3
/
4
) 3
(1) Stair Base: (12 Step) 5
5
/
8
x 1
1
/
8
(2) Handy Square: (
1
/
4
) Unsized Triangle ±3”
(1) Window Pane Sheet
Parts List page 2
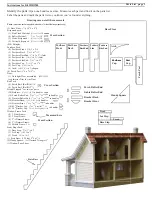
Instructions for Kit #HB1900
Identify the parts:
Open one bundle at-a-time. Measure each part and fi nd it on the parts list.
Label the parts and mark the parts list so you know you’ve found everything.
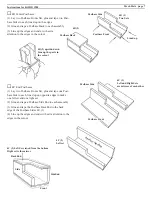
Postbase
Front
Postbase
Back
Postbase
BackEnd
Postbase
Postbase
Cap
Post
Post
Cap
Arch
Postbase
Side
Postbase
SideEnd
Por
ch Post
Porch Rafter End
Gable Rafter End
Bracket Back
Bracket Strut
Base Step
2
nd
Step
Tread
Tread
Stair Base
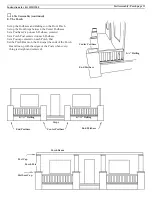
Cross Section
Cross Section
Parts
:
(measurements are approximate and are for identifi cation purposes only)
Drawings are not all the same scale
Cross Section
in bundles
Measured here
Handy Square
Handy Square