background image

EC9100i and EC9600i Series Scanner User Guide 

Setting up your scanner


©2016 RDM Corporation 


Page 21 

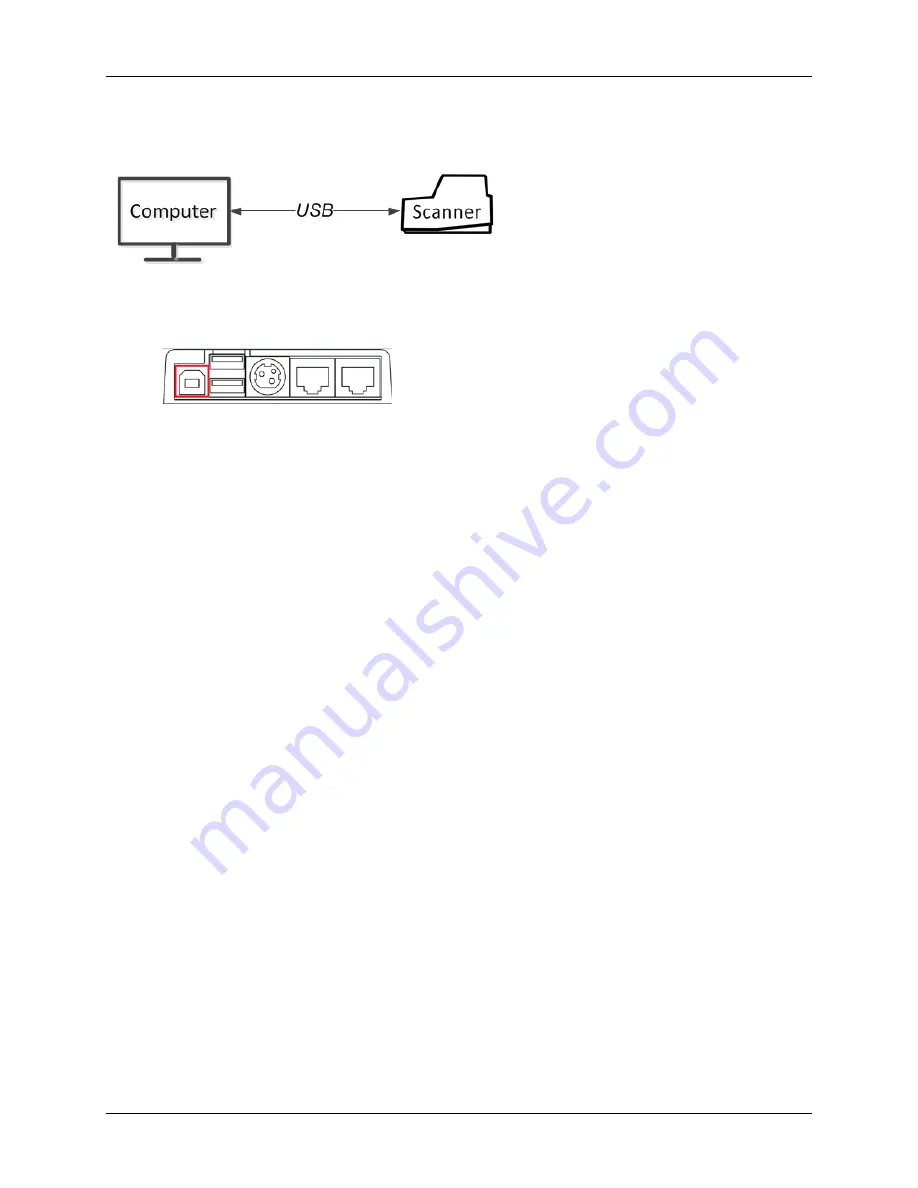
Option 3: Scanner is connected to the computer using USB 


To hook up: 

1.


Plug the USB cable (included) into the square USB port on the back of the scanner (marked in 

red below). 


2.


Plug the other end into a USB port on your computer. 


When you connect via USB, you can use the scanner only with the computer it is connected to. 

Summary of Contents for EC9100i series

Page 1: ...EC9100i and EC9600i Series Scanner User Guide January 2016...

Page 2: ...ademarks of RDM Corporation All other brands and their products are trademarks or registered trademarks of their respective holders and should be noted as such Disclaimer RDM Corporation makes no warr...

Page 3: ...harmful interference to radio communications Operation of this equipment in a residential area is likely to cause harmful interference in which case the user will be required to correct the interfere...

Page 4: ...00i series scanner with printer 12 Internal components 13 Inside the front cover side view 13 Inside the front cover back view 14 Inside the front cover and endorsement printer cover top view 15 Conne...

Page 5: ...ker and endorser inkjet cartridges 27 Installing the franker cartridge 28 Installing the endorser inkjet cartridge 28 Replacing the inkjet blotter 29 Replacing the paper roll for the printer 30 Cleani...

Page 6: ...EC9100i and EC9600i Series Scanner User Guide Contents 2016 RDM Corporation Page 6 Additional parts 41 Warranty Information 42 LIMITED WARRANTY 42 WARRANTY SPECIFICS 43...

Page 7: ...ity and increased connectivity options Embedded software enables easy one time web based configuration eliminating the need for installation on a PC The EC9600i network scanner can be used as a shared...

Page 8: ...l box and packing material Reuse them if the unit must be shipped to a new location or returned for service Position the unit so that the operator has easy access to the document path and a clear view...

Page 9: ...of models options and part numbers can be found in the Part Numbers section at the back of this guide Model Description EC9103f Auto feed scanner with endorser 30dpm and 90dpm models available EC9104f...

Page 10: ...n is located on the front right of the scanner The light indicates the status of the scanner For more information see Light signals and beeps on page 24 Third party applications can configure the appl...

Page 11: ...de Models and features 2016 RDM Corporation Page 11 EC9100i and EC9600i series scanner most models Exit pocket Exit extension Insertion extension Endorsement printer cover Front cover Application butt...

Page 12: ...es 2016 RDM Corporation Page 12 EC9100i and EC9600i series scanner with printer Application button and scanner status LED Front cover Endorsement printer cover Exit pocket Insertion hopper Printer doo...

Page 13: ...d EC9600i Series Scanner User Guide Models and features 2016 RDM Corporation Page 13 Internal components Inside the front cover side view Document feeder Insertion hopper Image sensor closed ID card e...

Page 14: ...Series Scanner User Guide Models and features 2016 RDM Corporation Page 14 Inside the front cover back view Franker cartridge latch Franker cartridge Metal Plate aligns with slot in franker cartridge...

Page 15: ...ront cover and endorsement printer cover top view Exit pocket Magnetic stripe reader MSR Document track Franker Back Front extensions retracted Insertion hopper Image sensor and panels closed ID card...

Page 16: ...Mb s Use this port to connect to a computer You must use the USB A to B cable Power Connect the power adapter to this port K Slot The K Slot or Kensington Security Lock lets you secure the unit with a...

Page 17: ...for the scanner operator Offers adequate ventilation and protection from elements such as heat dust oil or moisture Is close to the application computer Depending on your scanner model a USB 2 0 high...

Page 18: ...being pulled out of the unit accidently 1 Hold the unit in place with one hand to prevent the unit from falling 2 With your other hand slide the power cord security sleeve back and pull the power cord...

Page 19: ...e scanning application For more information about EC9600i setup requirements see your scanning application s documentation Connecting the EC9600i network scanner The EC9600i network scanner can connec...

Page 20: ...03f EC9604f EC9607f and EC9608f scanners In this setup you connect the scanner to the network You then connect your computer to the network through the scanner To hook up 1 Disconnect the Ethernet cab...

Page 21: ...3 Scanner is connected to the computer using USB To hook up 1 Plug the USB cable included into the square USB port on the back of the scanner marked in red below 2 Plug the other end into a USB port o...

Page 22: ...feed SF models or in a batch with auto feed AF models Make sure that you place the documents into the feeder with the MICR line at the bottom and facing towards the outside of the scanner Caution Adj...

Page 23: ...push documents past the check icon on the right side of the insertion hopper 2 If you are required to do so start the scanning process For example click Scan on your scanning application Swiping magne...

Page 24: ...nner s status is shown through a single multistate LED light emitting diode which is the light on the top front right hand side of the unit The tables below describe typical status signals and their m...

Page 25: ...flashing cycle Long green and short red flashing cycle The scanner does not detect an Ethernet or USB connection Long green and short green flashing cycle The scanner is ready and idle Note The idle s...

Page 26: ...ver 4 Gently pull the cover upwards until it detaches from the scanner To replace the front cover Caution Before you replace the front cover make sure the insertion extensions are pulled forward Other...

Page 27: ...EC9600i scanners are capable of endorsing checks but the cartridges are not included with scanners With your scanning application the endorser inkjet printer places user defined text on the rear of th...

Page 28: ...cartridge as pictured 6 Secure the franker cartridge a Push the metal plate towards the body of the scanner pushing in the franker cartridge b Lowering the blue latch over the franker cartridge until...

Page 29: ...the cartridge snaps into place Once installed the inkjet cartridge sits on a slight angle with the back of the cartridge lower than the front 7 Make sure there is no gap between the inkjet cartridge a...

Page 30: ...et blotter into the slot Replacing the paper roll for the printer If your scanner has a printer the following steps describe how to replace the paper roll 1 Press the printer door release button and c...

Page 31: ...he outside cabinetry Use a damp cloth and mild soap Cleaning the inside of the scanner unit 1 Remove the front cover and the endorsement printer cover 2 Use a dusting brush designed for use with elect...

Page 32: ...card properly The black magnetic stripe on the back of the card must face downward and towards the body of the scanner 2 Try using another card to ensure the first card was not defective 3 If the pro...

Page 33: ...try connecting the scanner to another connection Try to access the network scanner dashboard 1 Open a browser 2 In the URL bar enter the scanner dashboard address On Windows enter https rd scannerseri...

Page 34: ...hboard You can use the network scanner dashboard to troubleshoot and configure the scanner To access the network scanner dashboard 1 Open a browser 2 In the URL bar enter the scanner dashboard address...

Page 35: ...sword Test Scanner Allows you to test the features of the network scanner These tests can be useful if you need to troubleshoot the scanner or a specific feature of the scanner Help Lists detailed inf...

Page 36: ...river s license Read MSR stripe Tests the scanner s ability to read a card with a magnetic stripe After the test the information contained in the magnetic stripe displays Print sample receipt Tests th...

Page 37: ...h Minimum 101 6mm 4 Maximum 228 60mm 9 Preferred Paper Weight 20 to 32 lb Single feeder capacity EC9111f EC9112f EC9611f EC9612f Single document Auto feeder capacity most models Auto feeder with doubl...

Page 38: ...m 3 39 H with 200 V 400 H DPI resolution OCR Font Recognition optional license Under application control Alphanumeric OCR A and B font recognition of OCR code lines for applications such as bill payme...

Page 39: ...32 64 bit Supported browsers Ethernet connected EC9600i series network scanners Internet Explorer 11 Currently released version of Google Chrome Mozilla Firefox Safari System environments Ethernet co...

Page 40: ...printer 6000 9107 3000 EC9107f auto feed 30 DPM endorser receipt printer OCR licensed 6000 9107 300R EC9108f auto feed 30 DPM MSR endorser receipt printer 6000 9108 3000 EC9108f auto feed 30 DPM MSR...

Page 41: ...MSR endorser receipt printer OCR licensed 6000 9608 300R EC9600i SF series network scanners Note EC9600i single feed scanners cannot automatically pull documents into the scanner EC9611f single feed...

Page 42: ...ailure of the RDM EC9100i and EC9600i has resulted from accident abuse or misapplication Any replacement RDM EC9100i and EC9600i will be warranted for the remainder of the original warranty period The...

Page 43: ...ood lightning power surge or static electricity water damage fall theft or vandalism o Spillage of liquid or objects that have fallen into the equipment o Equipment that has been exposed to excessive...

Reviews: