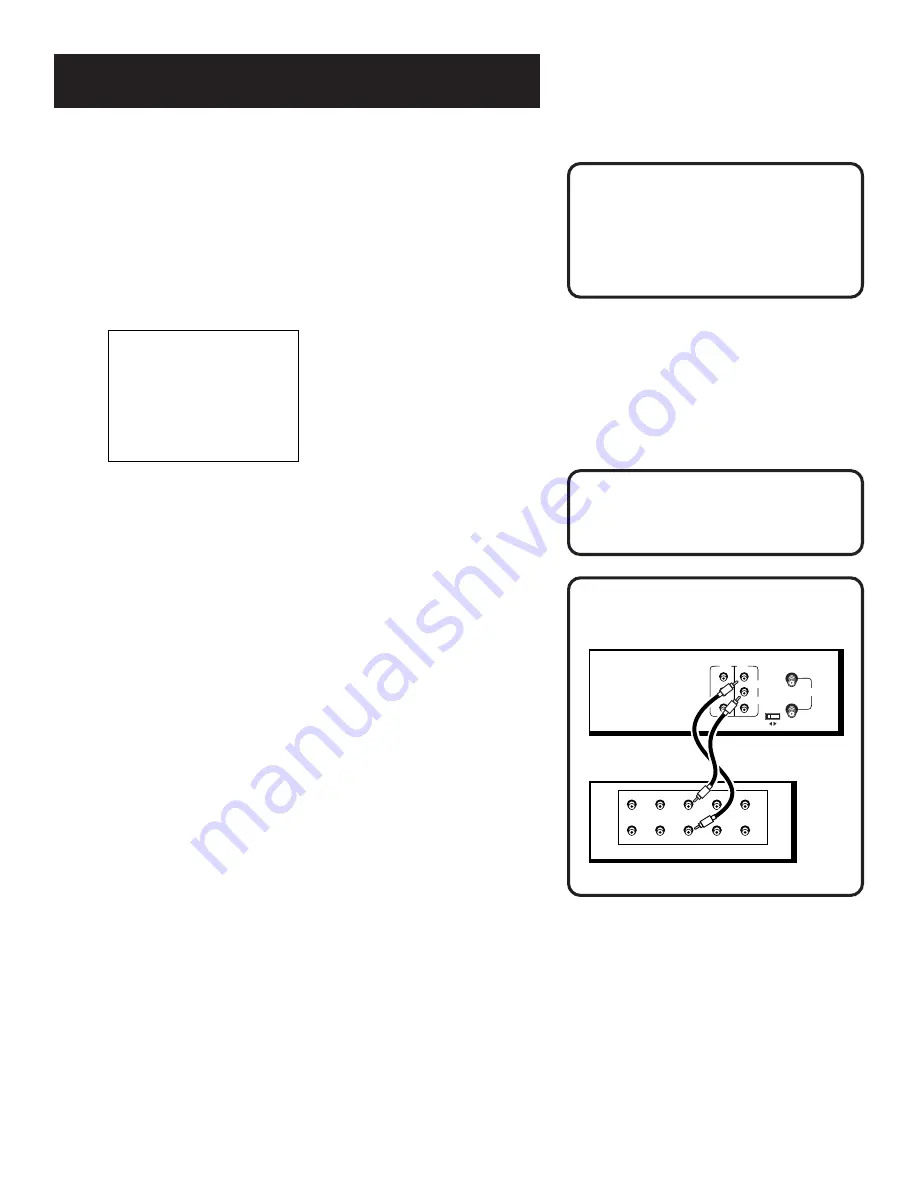
background image

29

RECORDING

PHONO

TUNER

TAPE

OUT

IN

AUX

LEFT

RIGHT

IN

(FROM ANT.)

OUT 

(TO TV)

VIDEO

AUDIO

RF

LINE
OUT

LINE 

IN1

R

L

CH

3 4 

BACK OF VCR 

BACK OF AMPLIFIER / RECEIVER 

Audio Connection

Recording audio only will erase
anything that was previously
recorded on the tape.

Video Input Channel

For more information about selecting
video line input, see “How to Find
Your TV’s Video Input Channel” in the

References 

chapter of this manual.

4. Use the SPEED button on the remote to select a

recording speed. The tape speed indicator appears on
the TV screen.

5. Select the channel or line input to be recorded.

6. Set the reception: select STEREO/MONO/SAP feature for

the type of audio you want to record. See the chapter

Other Features s

ection.

         AUDIO

1 Reception:     STEREO
2 Tape Playback: HI-FI

0 Exit

7. Press RECORD to start recording.

8. Press STOP when finished.

Recording Audio Only

You can record audio only from another audio source
connected to the AUDIO IN (R and L) jacks on the back of
the VCR.

1. Press the INPUT button on the remote to select the line

input (LINE). The VCR will record audio from the audio
equipment connected to the AUDIO IN jacks.

2. Use SPEED on the remote to set the recording speed.

3. Start the external audio source playing then press

RECORD (REC on the remote) to begin recording.

4. Press STOP when finished.

Playing Back Audio Only

To get stereo sound, connect the AUDIO OUT jacks of the
VCR to the appropriate input on an amplifier or receiver.
Do not use the phono input. Refer to your amplifier or
receiver 

User’s Guide

.

Summary of Contents for VR623HF

Page 1: ...cassetterecordervideoca ssetterecordervideocassetterecor dervideocassetterecordervideocas setterecordervideocassetterecord ervideocassetterecordervideocass etterecordervideocassetterecorde rvideocassetterecordervideocasse tterecordervideocassetterecorder videocassetterecordervideocasset terecordervideocassetterecorderv ideocassetterecordervideocassett erecordervideocassetterecordervi deocassettere...

Page 2: ...s for proper grounding and in particular specifies that the cable ground shall be connected to the grounding system of the building as close to the point of cable entry as practical Care and Cleaning Use a soft cloth or the dusting attachment of your vacuum cleaner to dust your VCR Remove dust from both top and bottom ventilation holes Plastic surfaces are easily scratched and can be marred by alc...

Page 3: ...mote VCR1 VCR2 Option 14 Auto Play 15 Auto TV VCR 15 EnergySaver 16 Front Panel Brightness 16 Preferred Tape Speed 16 Set Auto Repeat 16 VCR Basics 19 Remote Buttons 20 Component Buttons 20 VCR Function Buttons 20 TV Function Buttons 21 Playing a Tape 22 Automatic Rewind 22 Tape Eject 22 Recording 23 Check the Safety Tab 23 Recording 25 Recording Features 26 Express Recording XPR 26 Timer Recordin...

Page 4: ...back 36 Connections 37 Connecting Your VCR 38 Jacks and Cables 38 RF Jacks and Coaxial Cables F type 38 Audio Video Jacks and Cables RCA type 38 Choosing a VCR Connection 39 Advantages of A V Cable Connections 39 TV with RF Jack Only 40 TV with A V Jacks 41 TV with A V Jacks and Cable Box 42 Reference 43 Front Panel 44 Display Panel 45 Back Panel 46 Troubleshooting Tips 47 Specifications 51 Cleani...

Page 5: ...ith channels and basic video tape operations are essential to get all you can out of theVCR Once you are comfortable with these features feel free to refer to other sections because they cover more detailed information What Remains The final sections of this manual contain playback and recording information a detailed Connections section for various set ups and a Reference section that has trouble...

Page 6: ...DIO VIDEO jacks use the jacks for a better connection See the Connections chapter in this manual for additional connection options STEP 4 PLUG IN THE VCR Your VCR s power cord has a plastic band strung through the blades Remove plastic band before plugging the cord into the power outlet To remove band cut with a pair of scissors and pull it free of the blades Once the plastic is removed match the ...

Page 7: ...The first on screen menu during the initial set up asks which language you prefer to use for your VCR Use the remote control s number buttons to select options Select a language Seleccione un idioma Choisissez une langue 1 English 2 Espanol 3 Francais 1 Press 1 for English 2 for Español Spanish or 3 for Français French The remaining menus throughout the set up will appear in the chosen language Ju...

Page 8: ...rences For example to select a different preferred on screen language than the one you selected during the initial set up do the following 1 Press MENU to display the VCR MAIN MENU VCR MAIN MENU 1 Timer Recordings 2 Time 3 Channels 4 Setup 5 Preferences 6 Audio 7 Language 0 Exit 2 Press 7 to display the LANGUAGE menu LANGUAGE Select a language 1 English 2 Español 3 Français Press MENU to continue ...

Page 9: ... List Auto Channel Search Auto Clock Set Feature Daylight Saving Time Time Zone Setting Time and Date Manually RemoteVCR1 VCR2 Feature Auto Play Feature EnergySaver Feature Front Panel Brightness Feature PreferredTape Speed Feature Feature not set during the first time QuickSet Guide and must be set manually Setting Up the VCR 2 First things first 1 Recording 3 VCR Basics 4 Connections 7 6 REFEREN...

Page 10: ...AIN MENU VCR MAIN MENU 1 Timer Recordings 2 Time 3 Channels 4 Setup 5 Preferences 6 Audio 7 Language 0 Exit 2 Press 7 to select the LANGUAGE menu LANGUAGE Select a language 1 English 2 Español 3 Français Press MENU to continue 3 Select English Español Spanish or Français French by pressing the appropriate number on the remote control s key pad Cable Box Setup This setup applies only when all chann...

Page 11: ...CABLE BOX SETUP On what channel does the VCR receive signals from the cable box usually 3 4 or video 04 Press CLEAR to correct Press MENU to continue 5 Once you complete the setup the VCR confirms that the VCR will now receive all signals on the designated channel For example CABLE BOX SETUP The VCR will now receive all signals from the cable box on channel 04 Press MENU to continue Cable Box Setu...

Page 12: ...NEL SEARCH menu AUTO CHANNEL SEARCH What type of signal are you using 1 Cable TV 2 Antenna 3 Detect Automatically 0 Cancel 4 Select one of the three AUTO CHANNEL SEARCH options Cable TV searches for cable channels Antenna searches for local broadcast stations Detect Automatically will make this decision for you AUTO CHANNEL SEARCH Now scanning channel 14 Press any key to cancel The VCR begins scan...

Page 13: ...e VCR MAIN MENU 2 Press 3 to display the CHANNELS menu 3 Press 2 to display the ADD REMOVE CHANNELS screen Use the CHAN up or down keys on the remote or number buttons to go to the channels you want to remove or add ADD REMOVE CHANNELS Channel 115 is presently ADDED Press CLEAR to remove Press MENU to exit ADD REMOVE CHANNELS Channel 115 is presently REMOVED Press INFO to add Press MENU to exit 4 ...

Page 14: ...ea Auto Clock Set The Auto Clock Set feature is set to ON at the factory In the ON setting the VCR looks for a channel carrying XDS time information XDS data automatically updates the clock using Coordinated Universal Time To use this feature certain steps are required such as auto channel search setting the time zone and setting the daylight saving feature before the Auto Clock feature works Sett...

Page 15: ...ually If auto clock set was unsuccessful set the clock through the TIME menu option The auto clock set feature is set to OFF automatically when you set the clock this way 1 Press MENU to display the VCR MAIN MENU 2 Press 2 to display the TIME menu TIME 1 Set Time and Date 2 Auto Clock Set ON 3 Set Time Zone 4 Set Daylight Savings Time Data was not found 0 Exit 3 Press 1 to display the SET TIME AND...

Page 16: ...ERENCES menu 1 Press MENU to display the VCR MAIN MENU 2 Press 5 to display the PREFERENCES menu PREFERENCES 1 Remote Control VCR1 2 Auto Play ON 3 Auto TV VCR ON 4 EnergySaver 2 00 5 Front Panel AUTO 6 Tape Speed SLP 7 Set Auto Repeat 0 Exit Now you are ready to select an item from the menu to set up Remote VCR1 VCR2 Option If you own a compatible RCA GE or Proscan remote that has a VCR2 VCR2 LD ...

Page 17: ...mote control Auto Play This feature allows the VCR to automatically start playing a tape when inserting a tape with the safety tab removed In the PREFERENCES menu press 2 to switch between ON and OFF Select ON if you want a tape with its safety tab removed to start playing automatically when inserted in the VCR Select OFF if you do not want a tape with its safety tab removed to start playing autom...

Page 18: ...mes Preferred Tape Speed You can set the preferred tape speed between Standard Play SP and Super Long Play SLP In the PREFERENCES menu press 6 to switch between the options SP sets the preferred recording speed to SP SLP sets the preferred recording speed to SLP Set Auto Repeat A tape can be set to play the same segment over and over in a repeating loop with the Set Auto Repeat feature Set Auto Re...

Page 19: ...y resetting the dialog box by cassette ejecting or insertion by powering off the VCR by power interruption or by recording start When a duration time has been set The VCR will automatically switch to rewind if the counter meets or goes past the Auto Repeat set duration The VCR will automatically switch to playback during rewind if the counter equals or is less than 0 00 The Auto Repeat may be adju...

Page 20: ...18 ...

Page 21: ...dr ecordingapr ogramshoulddojustthat ThissectionshowsyouthebasicsofusingyourVCR It discussesthingslikeusingther emotecontr ol playingatape andr ecordingpr ograms VCR Basics tells you what you need to know in order to watch a movie or tape your favorite show 5 Setting Up the VCR 2 First things first 1 Recording 3 VCR Basics 4 Connections 7 6 REFERENCE 5 5 OTHER FEATURES ...

Page 22: ...arches forward through a tape during playback Starts slow motion during play pause and increases slow motion speed GO BACK Switches between two channels Select one channel and then select another using the number buttons Press GO BACK to switch between the two channels In menu mode press to go back to a previous menu INFO Shows the status displays on the TV screen INPUT Selects between the VCR s l...

Page 23: ...nction Buttons CHAN Up or Down Selects next higher or lower channel in the TV s channel memory CLEAR Removes menus or status displays from the screen GO BACK Switches between two channels Select one channel and then select another using the number buttons Press GO BACK to switch between the two channels INFO Shows the TV s status displays on the TV screen INPUT Selects between the TV s input chann...

Page 24: ... TRACKING up or down on the VCR Tracking or on the remote to remove any streaks from the picture if necessary Press STOP EJECT on the VCR STOP on the remote control to stop playback Automatic Rewind The VCR automatically rewinds the tape if it reaches the end of the tape during playback While rewinding you can press POWER on the VCR ON OFF on remote and the VCR will turn off after rewinding Tape E...

Page 25: ...CR and that the tape s safety tab is in place You cannot record on a tape with the safety tab removed If the safety tab is removed and you want to record over it simply cover the hole with vinyl tape Safety Tab Tape Speeds SP Standard Play Gives the best quality recording but fewer programs can be recorded on the tape Special effects such as pause slow motion picture search and frame advance work ...

Page 26: ...24 ...

Page 27: ...ing features available to suit your needs Recording Features on yourVCR include Recording explained in theVCR Basics section Express Recording XPR Timer Recording Broadcast Stereo or Second Audio Program SAP Audio Only Recording Copying and Editing Tapes Setting Up the VCR 2 First things first 1 Recording 3 VCR Basics 4 Connections 7 6 REFERENCE OTHER FEATURES 5 ...

Page 28: ...d the remaining portion of the program you are watching 1 Set the tape speed to SP or SLP by pressing the SPEED button on the remote control 2 Press the RECORD button REC on the remote to begin recording 3 Repeatedly press the RECORD button to set up the recording time duration REC CH 36 Record Length 0 00 Press REC to set length REC CH 36 Record Length 1 30 Press REC to set length Each time you p...

Page 29: ...rd 1 One time 2 Daily every day 3 Weekdays M F 4 Weekly once per week 0 Cancel 4 Select how often you want the program to record Program 1 One time Channel Start Time End Time Start Date Tape Speed SLP Press MENU to cancel 5 Enter the data for the program with the number buttons The data includes the channel number press INPUT to select the line input start time and end time including AM or PM The...

Page 30: ...m 2 Review Existing Progs 0 Exit 2 Press 2 to display the REVIEW EXISTING PROGS screen Program 1 One Time Channel 104 Cable Start Time 08 00 PM End Time 09 30 PM Start Date 11 16 00 THU Tape Speed SLP Press CLEAR to erase Press MENU to save 3 Press CLEAR to erase or MENU to see the next program Recording Broadcast Stereo Programs Or SAP Second Audio Program Some TV programs are broadcast with ster...

Page 31: ...dio you want to record See the chapter Other Features section AUDIO 1 Reception STEREO 2 Tape Playback HI FI 0 Exit 7 Press RECORD to start recording 8 Press STOP when finished Recording Audio Only You can record audio only from another audio source connected to the AUDIO IN R and L jacks on the back of the VCR 1 Press the INPUT button on the remote to select the line input LINE The VCR will recor...

Page 32: ...as the playback VCR and the other as the recording VCR 1 Connect the VCRs using the diagram provided 2 Turn on both VCRs and TV 3 Tune the TV to the VCR viewing channel either 3 4 or TV s video input See How to Find Your TV s Video Input Channel in the References section of this manual for detailed information 4 If you are using coaxial cables for the connection tune recording VCR to channel 3 or ...

Page 33: ...VCR Operation Picture Search Options Tracking Pro Tect Plus Locking Time Counter On screen Displays Audio Reception Audio Playback Setting Up the VCR 2 First things first 1 Recording 3 VCR Basics 4 Other Features 6 5 Connections 7 REFERENCE ...

Page 34: ...g play or play pause using slow motion Slow motion works well for tapes recorded at the SP or SLP speed 1 During playback press PAUSE and then FWD or REV to begin slow motion playback 2 Press FWD to increase or REV to decrease the speed of the search 3 Use TRACK up or down to remove any streaks from the picture 4 Press PLAY to return to normal playback The VCR switches automatically from slow moti...

Page 35: ... 5 Press STOP to end index searching Some index marks may be missed by the VCR if A mark is too close to the current location on the tape The mark at the beginning of a recorded segment of five minutes or less The first index mark on the tape is at the beginning of the tape Zero Search The zero search feature enables the VCR to quickly return to a counter reading of 0 00 00 anywhere on the tape Th...

Page 36: ...ing back on press both CHANNEL TRACKING buttons TRACK on the remote at the same time or eject the tape and reinsert it Tracking has no effect during recording only playback Pro Tect Plus Locking Feature To disable the usage of the VCR or to protect your timer recordings you can lock the VCR so that the buttons on the VCR or remote won t work To Lock Press and hold the POWER button on the remote co...

Page 37: ...e On screen Displays The INFO button shows the status of the VCR STOP PLAY RECORD etc channel number time counter date time and tape speed on the TV screen The date and time must be set before they can be displayed 1 Press INFO to see the on screen displays 2 Press INFO again to have only the time counter remain on the screen 3 Press INFO again to have no displays appear on the TV screen This is u...

Page 38: ...i Fi and linear tracks on the tape Hi Fi sound is recorded on a separate left and right stereo channels Monaural sound is recorded on the linear track Press 2 to switch between tape playback HI FI LINEAR and MIX To enjoy Hi Fi sound connect your VCR to a stereo television or amplifier receiver using the audio video jacks The tape playback feature lets you select which audio you use during playback...

Page 39: ...s Try not to coil any twin lead cables and keep them away from the audio video cables as much as possible Make sure all antennas and cables are properly grounded Refer to the Safety Tips sheet packed with your unit Protect Components from Overheating Do not block ventilation holes in any of the components Arrange the components so that air can circulate freely Do not stack components Allow adequat...

Page 40: ... connect the VCR s RF OUT jack and your TV s antenna input Audio Video Jacks and Cables RCA type The AUDIO VIDEO jacks provide very good picture quality and mono sound and can be used if your TV has audio video input jacks For more information about video line input see How to Find Your TV s Video Input Channel in the References section of this manual These jacks are used for most audio video conn...

Page 41: ...connect additional components not shown in the diagrams here and are unsure of how to connect them refer to the instruction manual that came with that particular component Advantages of Audio Video Cable Connections Using a simple coaxial cable connection gives you good picture quality If your television has audio video jacks though it is highly recommended that you use them to get even better pic...

Page 42: ...ox To connect 1 Connect cables as shown 2 Return to the First Things First chapter in this manual and follow the connection steps Using This Connection Tune your TV to channel 3 or 4 whichever one you selected with the 3 CH 4 switch on the back of the VCR To play a tape 1 Insert a tape 2 If necessary press PLAY To record one program and watch another 1 Begin recording a program using one of the re...

Page 43: ...n to the First Things First chapter in this manual and follow the connection steps Using This Connection Tune your TV to its video input channel see How to Find Your TV s Video Input Channel in the References chapter of this manual for more information Use of TV VCR button is not required To play a tape 1 Insert a tape 2 If necessary press PLAY To record one program and watch another 1 Begin recor...

Page 44: ...Things First chapter in this manual and follow the connection steps Using This Connection Tune your TV to its video input channel see page 62 for more information Use of TV VCR button is not required To play a tape 1 Insert a tape 2 If necessary press PLAY To record a scrambled or unscrambled program and watch another unscrambled program 1 Begin recording a scrambled or unscrambled program through...

Page 45: ...ntrols and displays You will also find TroubleshootingTips specifications and an index in this appendix These areas might help resolve some of those simple problems Finally this section of the manual also contains your warranty information Setting Up the VCR 2 First things first 1 Recording 3 VCR Basics 4 OTHER FEATURES 6 5 Connections 7 REFERENCE ...

Page 46: ...g during playback Pauses recording to prevent recording of unwanted scenes POWER Turns the VCR on or off RECORD Starts VCR recording Used for express recording Remote Sensor Receives signals from the remote control Aim the remote at this sensor REV Rewinds the tape when the VCR is stopped Searches the picture in reverse during playback Starts slow motion during play pause and decreases slow motion...

Page 47: ...ack a segment of a recorded tape This counter helps locate the beginning or end of programs taped TIMER INDICATOR Lights during an express or timer recording or when the VCR is set for a timer recording and the VCR is turned off Flashes when the clock is not set Flashes when the timer recording is set and there is no tape in the VCR VCR INDICATOR Applies only if the VCR Viewing Channel is 3 or 4 P...

Page 48: ...nd L and VIDEO IN jacks Receives signals from another component like a VCR or camcorder when it is connected to these jacks Use INPUT on the remote to select L1 to record from these jacks AUDIO R and L and VIDEO OUT jacks Sends signals from VCR to another component like a TV or VCR when it is connected to these jacks ANT IN jack Receives a signal from an antenna or cable system when attached RF OU...

Page 49: ... are secure and correct Snowy or no picture during playback Press TV VCR to turn VCR indicator on Check TV channel selected 3 or 4 to make sure it matches the channel selected with 3 CH 4 switch on back of VCR Check to make sure the TV s fine tuning is correct for the channel you have selected Check video cable connections between VCR and TV monitor Check to make sure the TV monitor is set to vide...

Page 50: ...heck to make sure the VCR is not in pause mode Press PAUSE or PLAY to return to normal playback Check the Pro Tect Plus feature Rewind does not operate Check to make sure the tape is not already rewound Will not record Check to make sure the safety tab is intact Check to make sure the VCR is not in the line mode Press INPUT on the remote Clock shows incorrect time or date Power interruption Check ...

Page 51: ...e selected if Signal Type CABLE ANTENNA feature is set to CABLE Cassette with safety tab removed does not start to play automatically Check to make sure the AUTO PLAY ON OFF feature is set to ON TIMER indicator flashes The clock is not set Check to make sure there is a cassette in the VCR when a timer recording is set TIMER and RECORD indicators flash when the Pro Tect PlusTM Locking feature is ac...

Page 52: ...ereo audio too noisy Stereo signal is weak Set reception STEREO SAP MONO feature to MONO Press one of the TRACKING up or down buttons to minimize the noise Index and Zero search features do not operate Check to see if Movie Advance feature is activated ...

Page 53: ...hes deep 240 mm Weight 6 1 pounds 2 8 kg Storage Temperature 22 F to 149 F Range 30 C to 65 C Operating 41 F to 104 F Temperature Range 5 C to 40 C Check your cable company s compatibility requirements Cleaning the VCR Use a soft cloth or dusting attachment of your vacuum cleaner to dust your VCR Remove dust from the ventilation holes on the top back sides and bottom of the cabinet Plastic surface...

Page 54: ...s You might access the Video Input Channel by pressing a button on the remote see table below selecting the channel from the TV s menu system see table below tuning directly to the channel by selecting a specific channel number see table below going through all the channels in the channel list by pressing the channel up or down buttons on the TV Some common scenarios are listed in the Video Input ...

Page 55: ...y describes how to install adjust and operate your VCR Any additional information should be obtained from your Dealer Installation and related adjustments Signal reception problems not caused by your VCR Damage from misuse or neglect Cleaning of video audio heads Batteries A VCR that has been modified or incorporated into other products or is used for institutional or other commercial purposes A V...

Page 56: ...ySaver 15 Express Recording XPR 26 F F ADV button 20 Forward and Reverse Search 32 Forward button 22 44 Frame Advance 32 Front panel brightness 16 17 Front Panel Diagram 44 A V jacks IN 44 channel tracking button 44 FWD button 44 PLAY PAUSE button 44 POWER button 44 RECORD button 44 remote sensor 44 REV button 44 SPEED button 44 STOP EJECT button 44 TV VCR button 44 FWD button 22 G GO BACK button ...

Page 57: ...10 SET DAYLIGHT SAVINGS menu 13 Signal Type changing 11 Slow Motion 32 Specifications 51 SPEED button 21 23 44 STOP button remote control 21 STOP EJECT button VCR 22 44 T Tape copying and editing 30 eject 22 playback 36 playing 22 recording playback speeds 16 23 TAPE SPEED button 23 Time and Date 12 auto clock set 12 setting daylight saving time 13 setting manually 13 setting time zone 12 Time Cou...

Page 58: ...Notes 56 ...

Page 59: ...Notes 57 ...

Page 60: ...e please contact your dealer or the nearest service center from the yellow pages Please do not send any products to the Indianapolis address listed in this manual or on the carton This will only add delays in service for your product As an ENERGY STAR Partner Thomson Consumer Electronics has determined that this product or product model meets the ENERGY STAR guidelines for energy efficiency ...

Reviews: