background image

Using the TV’s Features

Chapter 4

25

Graphics contained within this publication are for representation only.

Tip

To change all V-Chip movie or TV ratings to
View, press the 0 number button.

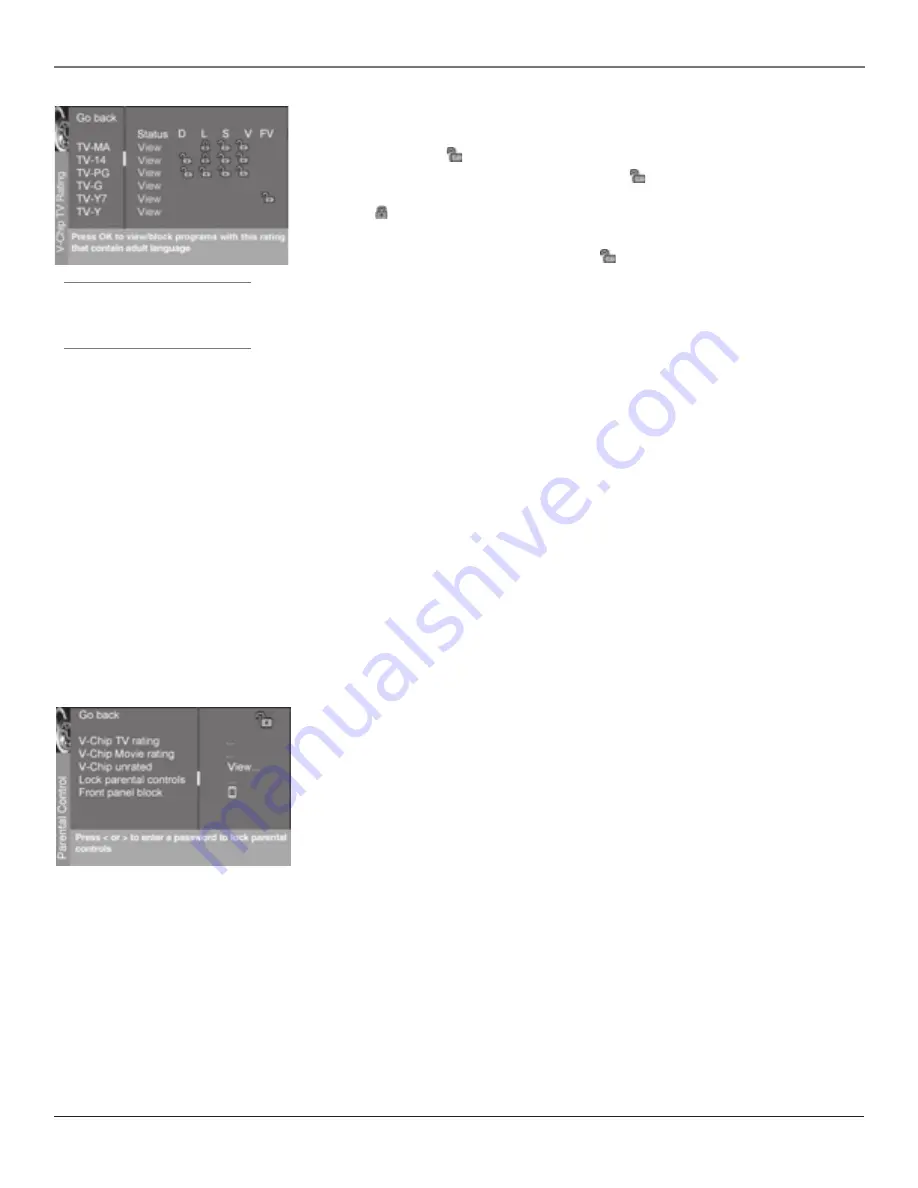
Viewing Specific Content Themes

If you block specific content themes, you have the option of going back and changing some of the
content themes back to 

(

View

:

1. Determine the content themes you want to change to 

(

View

.

2. Press the down arrow button to scroll to the rating whose content theme you want to change,

such as 

 under language (L) corresponding with TV-14.

3. Press the right arrow button to move the yellow highlight to a particular content theme status.

4. Press the OK button to change the status back to 

. Your child would then be able to watch

programs with the TV-14 adult language content, but not programs with TV-MA language content.

Note:  Only the content theme status corresponding to TV-14  (L) language changes to (V) View. Higher rated content
themes, such as that for TV-MA language, do not change.

V-Chip Movie Rating Limit

Set movie rating limits by blocking movies rated above a specified level.

To change menu:

1. Press MENU on the remote control (the 

TV MAIN MENU


appears).

2. Select 

Parental Control

.

3. Select 

V-Chip movie rating

.

Blocking Movie Ratings

Once you are in the Movie Ratings menu, follow the same steps described for blocking TV ratings.

V-Chip Unrated Program Block

This option lets you decide if programs that the V-Chip recognizes as “unrated” can be viewed. “Unrated” TV
programs may include news, sports, political, religious, local and weather programs, emergency bulletins, public
announcements, and programs without ratings.

View


All unrated programs are available.

Block


All unrated programs are not available.

Note: You must remember to lock Parental Controls for rating limits to take effect.

Press the down arrow to highlight V-Chip unrated. Then press the right arrow to switch between Block and View.

Lock/Unlock Parental Controls

Selecting this option lets you lock and unlock parental controls settings using a password.

If you do not lock parental controls, none of the settings for V-Chip, Channel Block, or Front Panel
Block will take effect.

If you forget your password, press the MENU button, then select 

Parental Control

 (the password entry

screen appears). Simultaneously press and hold CH+ and VOL+ on the television for 3 seconds.
Parental Controls unlock and the 

Parental Control

 menu appears so you can enter a new password.

Front Panel Block

Selecting this option lets you block (disable) or unblock (enable) the TV/DVD’s front panel. The remote
still tunes to any channel. When using this as a Parental Control method, remove access to any
remote that is capable of operating the television while you have the front panel blocked.

Don’t forget to lock parental controls after you change the status. If you don’t, the front panel block
will not take effect.

Summary of Contents for SCENIUM L37WD14

Page 1: ...HDTV DVD MonitorUser sGuide ...

Page 2: ...damage is not covered by your warranty Press any button to unfreeze the picture at any time Product Registration Please fill out the product registration card packed separately and return it immediately or register on line at rca com Returning the card allows us to contact you if needed Product Information Keep your sales receipt to obtain warranty parts and service and for proof of purchase Attac...

Page 3: ...used use caution when moving the cart apparatus combination to avoid injury from tip over 13 Unplug this apparatus during lightning storms or when unused for long periods of time 14 Refer all servicing to qualified service personnel Servicing is required when the apparatus has been damaged in any way such as power supply cord or plug is damaged liquid has been spilled or objects have fallen into t...

Page 4: ... the left side of the screen the main picture and the other on the right Requirements Press the PIP button to bring up the PIP window Press again to bring up POP Chapter 4 has detailed instructions on how to use the PIP and POP features DVI HDTV L MONO R Dolby is a trademark of Dolby Laboratories POP example PIP example MP3 Audio Disc Playback Description Your DVD player can play back compatible M...

Page 5: ...e Remote to Operate Other Components 15 Find Out If You Need to Program the Remote 15 Programming the Remote 15 How to Use the Remote After You ve Programmed It 16 Remote Control Codes 16 Chapter 3 Playing DVDs Regional Coding 18 Using Different Menus 18 Loading and Playing Discs 18 To Load and Play a Disc 18 Using a Disc Menu 18 Using the On Screen Info Display 18 Time Display 19 Selecting a Titl...

Page 6: ...33 Channel Guide Menu 34 Time Menu 34 Parental Control Menu 34 PIP Menu 34 Setup Menu 35 Chapter 7 Information Displays Using the Info Display 36 Audio CD Info Display 36 MP3 Info Display 36 Video CD Info Display 36 Using the Time Display 36 Selecting a Specific Track 36 Selecting a Specific Index 37 Selecting a Play Mode 37 Using the Program Play Feature 37 Editing a Playlist 38 Using the Repeat ...

Page 7: ...ence Insert each cable firmly into the designated jack If you place components above the TV route all cables down the side of the back of the TV instead of straight down the middle of the TV If your antenna uses 300 ohm twin lead cables do not coil the cables Also keep the twin lead cables away from audio video cables Important Stand and Base Safety Information Choose the location for your TV care...

Page 8: ...to determine which connection is best for you Proceed to the appropriate page and connect your TV DVD Note If you prefer we can provide you with the name of an Authorized Service Representative who will visit your home for a fee to install your electronic entertainment system and to instruct you in its operation For details about this service call 1 888 206 3359 or visit rcascenium com HD Receiver...

Page 9: ...na input B Connect the audio white and red cables to the Audio Output jacks on the HD Receiver and to the Audio Input jacks on the VCR C Connect the video cable to the Video Output jack on the HD Receiver and to the Video Input jack on the VCR 4 Connect your VCR to your TV DVD A Connect a coaxial cable to the VCR s antenna output and to the ANTENNA CABLE Input jack on the TV DVD B Connect the audi...

Page 10: ...io jacks on the back of the TV DVD and to the Audio Output jacks on the Satellite Receiver B Connect the video cable to the VID1 V Video jack on the back of the TV DVD and to the Video Output jack on the Satellite Receiver C If your Satellite Receiver has an S Video jack connect an S Video cable instead of the video cable in step B to the S VIDEO jack on the TV DVD and to the S VIDEO jack on the s...

Page 11: ...LE OFF AIR ANTENNA O R L TV DVD VCR 1 Connect your VCR to your TV DVD A Connect a coaxial cable to the VCR s antenna output and to the ANTENNA CABLE Input jack on the TV DVD B Connect the audio white and red cables to the VID2 L MONO and R Audio jacks on the back of the TV DVD and to the Audio Output jacks on the VCR C Connect the video cable to the VID2 V Video jack on the back of the TV DVD and ...

Page 12: ...s and to the Audio Inputs on the A V receiver FIXED provides fixed level audio output from the TV DVD This audio output is ideal for connecting to an A V receiver that has its own volume control VARIABLE provides variable level audio output Volume levels can be controlled by the volume controls on the TV DVD and TV remote control OR 2 Use speaker wire to connect the TV DVD to external speakers The...

Page 13: ... using CMP2 Y PB PR make sure you connect the left and right audio cables to the CMP2 Audio jacks COMPOSITE INPUTS Lets you connect another component such as a VCR DVD player or laserdisc player Its AUDIO jacks are the same as described for CMP1 above VID1 S VIDEO Provides better picture quality than the video jacks VID1 and 2 Video because the color part of the signal is separated from the black ...

Page 14: ...ate your remote you can use the front panel buttons of your TV DVD to operate many of the TV DVD s features OPEN CLOSE Press to open and close disc tray STOP Stops disc play PLAY PAUSE Begins disc play Pauses disc play while a disc is playing TV DVD Puts the TV DVD in TV mode If in TV mode puts in DVD mode DISC MENU Accesses the DVD disc menu DVD OK When in the DVD menu system selects highlighted ...

Page 15: ... search is complete press OK to access the List Labels screen Changing Lists and Labels The List Labels part of the setup lets you edit your channel list and choose or create a personal six character label for each channel Note Changing List and Labels can be time consuming You can change these at a later time by accessing the Setup menu 1 Press the left or right arrow to scroll through the availa...

Page 16: ...e when programming the remote to control components INFO In TV mode brings up TV status display press again to clear the screen In DVD mode brings up the Info Display INPUT Press to toggle through the available input sources VID1 VID2 FRNT CMP1 CMP2 and DVI Press the CH or CH button to resume TV viewing MENU In TV mode brings up the TV Main menu In DVD mode brings up a reduced TV Menu MUTE Reduces...

Page 17: ...brands of an additional remote controllable component Note The TV button can t be programmed on this remote Find Out If You Need to Program the Remote To determine whether the universal remote needs to be programmed for your component turn the component ON For example to program the remote for a VCR turn on the VCR Point the remote at the VCR and press the VCR1 button Then press ON OFF or CH chann...

Page 18: ...your component If you keep pressing buttons and nothing happens the remote is probably in the wrong mode You must press the component button that matches the component you want to operate i e if you want to operate the VCR press VCR1 on the remote control to put the remote in VCR mode Remote Control Codes VCR Codes Programmable for VCR1 VCR2 and AUX buttons Admiral 2132 Adventura 2026 Aiko 2027 Ai...

Page 19: ...21 2023 2048 2049 2050 2051 2055 2056 2107 2118 Sharp 2017 2029 2094 2095 2096 2097 2132 Shintom 2004 2056 2061 2098 Shogun 2013 Signature 2132 Singer 2021 2061 2128 Sony 2004 2098 2099 2119 STS 2021 2107 Sylvania 2021 2022 2026 2062 2063 2065 2124 Symphonic 2026 Tandy 2011 Tashiko 2014 Tatung 2111 TEAC 2026 2085 2111 Technics 2021 2109 Teknika 2014 2021 2026 2100 2129 TMK 2013 2024 2047 Toshiba 2...

Page 20: ...three things happens depending on how the disc was programmed The disc starts playing The disc menu appears on the screen One of the options will start disc play Highlight that option and press OK on the remote The DVD s main menu appears on the screen Highlight the Play option and press OK on the remote When you stop playing a disc the unit remembers where you stopped When you start playing the d...

Page 21: ...disc is playing press INFO on the remote to bring up the Info Display 2 Press the left right arrow buttons to highlight the Chapter icon 3 Use the number buttons on the remote to enter the number of the chapter you want to play or press the up down arrow buttons to go to the next previous title 4 Press OK on the remote Notes The Chapter feature won t work if the disc isn t formatted with separate ...

Page 22: ...laying press INFO on the remote to bring up the Info Display 2 Highlight the Repeat icon The text in the text box below the icons will read Repeat Mode Off 3 Press the up down arrow buttons to scroll through the Repeat options until the Repeat option you want is displayed in the text box 4 Press OK The selected repeat option will loop repeatedly until you turn Repeat off Repeat is turned off by co...

Page 23: ...from the screen press INFO on the remote Clearing a Bookmark The bookmarks are cleared each time a disc is removed from the disc tray or when the power is turned off If you want to clear a bookmark while the disc is playing 1 Press INFO on the remote 2 Highlight the Bookmark icon and press OK 3 Highlight the trash can icon next to the bookmark you want to clear Press OK 4 The bookmark is cleared a...

Page 24: ...our remote control 3 Highlight Autotuning and press OK 4 Choose which channel you would like to set Set VCR 1 Channel Lets you set up the channel the TV tunes to when you press the VCR1 button Set VCR 2 Channel Lets you set up the channel the TV tunes to when you press the VCR2 button Set SAT Cable Channel Lets you set up the channel the TV tunes to when you press the SAT CABLE button on an RCA sa...

Page 25: ...ls by accessing the Lock parental controls menu The following sections give you more details about how to change the status of TV program limits Mature Audience Only Specifically designed to be viewed by adults and may be unsuitable for children under 17 It contains one or more of the following content themes crude indecent language L explicit sexual activity S or graphic violence V Parents Strong...

Page 26: ...the left and all higher ratings automatically changes to Block and 3 Press the up or down arrow button to highlight Go back and press OK 4 Select Lock Parental Controls from the Parental Control menu for rating limits to take effect Viewing Age Based Ratings After you block age based ratings you can change some of the ratings back to View 1 Press the up or down arrow button to select the rating wi...

Page 27: ...ing TV ratings V Chip Unrated Program Block This option lets you decide if programs that the V Chip recognizes as unrated can be viewed Unrated TV programs may include news sports political religious local and weather programs emergency bulletins public announcements and programs without ratings View All unrated programs are available Block All unrated programs are not available Note You must reme...

Page 28: ... ANT 1 2 3 4 5 6 7 8 9 0 INPUT VCR1 VCR2 OK RECORD PIP ZOOM ZOOM FREEZE Arrow buttons PIP example POP example PIP and POP Buttons There are several remote buttons that control the way the PIP window works PIP Brings up the PIP window Press again to bring up POP Press again to remove the window Up and down arrow buttons Let you move the PIP window to different corners of the screen Up arrow moves P...

Page 29: ...andom Play plays the chapters of each title in random order Program Play Plays the chapters on the disc in the order you have programmed you must select Edit Program and set up the order in which you want the tracks on the disc to play How to Create a Program To use the Program Play option you must create a program list to set the order in which you want titles and chapters on a DVD video disc to ...

Page 30: ... OK to insert the chapter in the playlist 7 When you are finished rearranging the playlist highlight Done and press OK AutoPlay You can set the AutoPlay option to play your disc automatically after you close the disc tray 1 From the DVD s main menu in DVD mode no disc playing highlight the Play Mode option and press OK 2 The Play Mode selections appear Highlight the AutoPlay option and press OK to...

Page 31: ...ovie ratings It works with DVD discs that have been assigned a rating This helps you control the types of DVDs that your family watches Note When in DVD mode the TV DVD alerts you when you try to play a movie with a rating that exceeds the limit you ve set Some discs include a rating override feature When you play a disc with this feature the message Override Limit or Cancel Selection appears on t...

Page 32: ...un from the System Test menu If a problem is found the text will appear in light gray 1 Highlight System Test within the Lock menu 2 Press OK to display the System Test Results screen 3 Press the left arrow key to return to the main menu The Display Menu The Display menu contains the settings that affect how disc content looks on your TV DVD TV Image The TV Image menu adjusts the way a movie appea...

Page 33: ... main menu highlight Sound and press OK the Sound menu appears 2 Highlight the Sound Logic option and press OK 3 Press the left arrow button to return to the main menu Note The performance of the Sound Logic feature varies depending on the type of equipment you have connected to your TV DVD and the audio format of the disc you re playing The Languages Menu The Languages menu enables you to choose ...

Page 34: ...r 6665 Basque 6985 Bengali Bangla 6678 Bhutani 6890 Bihari 6672 Bislama 6673 Breton 6682 Bulgarian 6671 Burmese 7789 Byelorussian 6669 Cambodian 7577 Catalan 6765 Chinese 9072 Corsican 6779 Croatian 7282 Czech 6783 Danish 6865 Dutch 7876 English 6978 Esperanto 6979 Estonian 6984 Faroese 7079 Fiji 7074 Finnish 7073 French 7082 Frisian 7089 Galician 7176 Georgian 7565 German 6869 Greek 6976 Greenlan...

Page 35: ...e TV DVD displays the word SAP when you tune to a program that is broadcast with SAP information SAP audio is broadcast in mono SAP is also used to broadcast a program s audio with descriptions of the video for the visually impaired Automatic sound level Reduces the annoying blasts in volume during commercial breaks and also amplifies softer sounds in program material Eliminates the need to consta...

Page 36: ...uzzy Color Warmth Displays a choice list that lets you set one of three automatic color adjustments Cool for a more blue palette of picture colors Normal and Warm for a more red palette of picture colors The warm setting corresponds to the NTSC standard of 6500 K Tint Adjusts the balance between the red and green levels Note Tint not available for DVI CMP1 and CMP2 inputs When you change any of th...

Page 37: ...V is switched on or off Blue screen The screen appears blue when the TV receives no signal Special features Auto on switches your TV on after a power outage Auto channel tunes the TV to the channel you specify as the Initial channel when Auto on is enabled Auto volume tunes the TV to the volume you set in Initial volume when Auto on is enabled Closed Caption Many programs are encoded with closed c...

Page 38: ... clear the Info Display from the screen press INFO on the remote control Play Mode Repeat Bookmarks IntroScan Play Mode Repeat IntroScan Index Audio Repeat Audio CD Info Display MP3 Info Display Video CD Info Display Using the Time Display The Clock part of the Info Display shows the current disc time To see the current disc time 1 Press INFO on the remote the Info Display appears 2 Highlight the ...

Page 39: ...e and press OK the Play Mode menu appears 3 Highlight Edit Program and press OK the Edit Program screen appears 4 The Track box is highlighted Use the number buttons on the remote to enter the track you want to play first The track number you entered appears in the Track box and the cursor highlights Add 5 Press OK to add that track to the Program List The cursor jumps to the next spot in the Prog...

Page 40: ... selecting the Off option A B Repeat Available only on Audio CDs A B Repeat lets you define a specific segment on the disc that you want to repeat 1 Find the spot on the disc that is a few seconds before the beginning of the part you want to repeat this gives you time to access the Info Display and the Repeat feature 2 Press INFO on the remote and select the Repeat icon from the Info Display 3 Pre...

Page 41: ...t is activated through the DVD s Play menu To use Dub Assist when you re recording a CD onto an audio cassette 1 Press STOP if a CD is playing the DVD s main menu appears 2 Highlight Play Mode and press OK the Play Mode options appear 3 Highlight Dub Assist and press OK the Dub Assist screen appears 4 The highlight should be in the Play Order window Choose Standard Optimized or Program Standard Th...

Page 42: ...ropriate jacks You may need to readjust the Digital Output settings from the Sound menu see Chapter 5 Sound is muted during still frame advance or slow motion play If you connected an audio or audio video receiver to your TV DVD make sure you chose the correct input setting on the receiver Can t advance through a movie You can t advance through the opening credits and warning information that appe...

Page 43: ... take up to 15 seconds to read the disc You won t be able to eject the disc during this time Wait 15 seconds and try again I don t remember my password and I want to unlock the DVD If you forget your password simultaneously press and hold OPEN CLOSE and STOP on the TV DVD s front panel for 3 seconds Enter a new password via the Lock menu TV Problems TV won t turn on Press the TV button Make sure t...

Page 44: ...ose mono sound No picture blue screen no sound but TV is on Maybe the cable air function is set to the wrong position Go to page 35 for detailed instructions The channel might be blank change channels If you re watching your VCR and it s connected with coaxial cable to the CABLE ANTENNA jack tune the TV to channel 3 or 4 whichever channel is selected on the 3 4 switch on the back of your VCR Also ...

Page 45: ...ree cloth as well Take care not to scratch or mar the screen If necessary you may use a cloth dampened with warm water Never use strong cleaning agents such as ammonia based cleaners or abrasive powder These types of cleaners will damage the TV DVD While cleaning do not spray liquid directly on the screen or allow liquid to run down the screen and inside the TV DVD Also avoid placing drinks or vas...

Page 46: ...r neglect Batteries Damage from images burnt onto the screen A unit that has been modified or incorporated into other products A unit purchased or serviced outside the U S A Acts of nature such as but not limited to lightning damage Product registration Please complete and mail the Product Registration Card packed with your unit It will make it easier to contact you should it ever be necessary The...

Page 47: ...C R2 OK RECO RD PIP ZOOM ZO OM F REEZE HOW TO ORDER BY PHONE To place your order by phone have your Visa MasterCard or Discover Card ready and call 1 800 338 0376 Use this number only to place an order for accessory items listed on this order form BY MAIL mail money order or check in US currency made payable to Thomson multimedia Inc to the following address Video Accessories PO Box 8419 Ronks PA ...

Page 48: ...timedia Inc Trademark s Registered Marca s Registrada s Printed in USA TOCOM 15891700 Please do not send any products to the Indianapolis address listed in this manual or on the carton This will only add delays in service for your product Visit the RCA Scenium website at www rcascenium com ...

Reviews: