EN-3
AUX IN
DC IN 12V
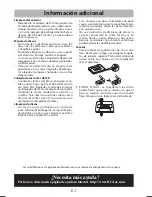
Using the AC Adapter
Using an AC adapter other than the one supplied
with the unit may damage the unit. This AC
adapter operates on AC 120V~ 60Hz.
to AC outlet
AC adapter
• The included AC adapter is for use with this
unit only. Do not use it with other equipment.
• If you are not going to use the unit for a long
time, disconnect the AC adapter from the wall
outlet.
• Whenever the AC adapter is plugged in to a
wall outlet, electricity is running through the
unit, even when the power switch is turned off.
Battery Power
You can insert 6 D-sized alkaline batteries (not
supplied) and can take your stereo just about
anywhere. Open the battery compartment door
on the bottom of the unit by pressing down
on the arrow and pulling out the cover. Insert
batteries in the battery compartment. Make
sure that you match the + and – symbols on
the batteries with the + and – symbols in the
battery compartment.
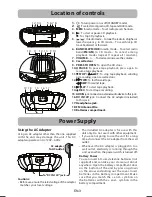
to “DC In 12V” jack
1.
:
To turn power on or off (STANDBY mode).
2
.
:
To select among radio, CD, tape and AUX mode.
3. MeM:
In radio mode – To set radio preset channels.
4.
: To start or pause CD playback.
: To stop CD playback.
5.
/
:
In radio mode – to tune the radio to a higher or
lower frequency. In CD mode – To search/skip CD
track backward or forward.
6. BAnD/PLAy MoDe
:
In radio mode – To select radio
band(
fM
/
AM
).In CD mode – To select among
playback modes (repeat 1/ repeat all / random).
7. VoLUMe:
- /+ – To decrease/increase the volume.
8. Cassette door
9. PReSS to oPen
: To open the CD door.
10.
PAUSe
: To pause tape playback, press again to
resume tape playback.
11.
StoP / eJeCt:
To stop tape playback, winding
or recording, open cassette door.
12.
fWD:
To fast forward tape.
ReW:
To rewind tape.
13.
PLAy
: To start tape playback.
14.
ReC:
To start tape recording.
15
.
AUX In
jack: Connect an external audio device to this jack.
16
.
DV In 12V
jack: Connect the AC adapter (included)
to this jack.
17: Headphone jack.
18: fM Antenna Wire.
19. Batteries compartment.
AUX IN
DC IN 12V
15 16 17
18
19
9
11 12 13
14
1 2 3 4
5 6 7 8
Cautions:
• Before use, ensure the rated voltage of the adapter
matches your local voltage.
Power Supply
Location of controls


