background image

EN-5

Playing a tape

1.  When the unit is on, press 

 until TAPE 

mode is selected. The tape indicator “ 

 ” 

appears on the display.

2.  Press   

StoP

/

   eJeCt  

to open the tape deck 

door.

3.  Insert a tape into the door and push the door 

closed.

note: 

Be sure to slide the cassette into the tape 

slot on the door. Do not place the tape directly 

onto the tape mechanism. 

4.  Press 


ReW 

or 


fWD 

to wind the tape to 

the desired starting position. Press   

StoP 

  eJeCt 

to stop winding.

5.  Press   

PLAy

 to start playback.

•  Press   

PAUSe

 to pause playback, press again 

to release the button to resume playback.

•  Press   

StoP 

/

    eJeCt 

to stop playback.

note: 

For better recording quality, use normal 

bias tape (Type I) only.

Recording to tape

from radio

1.  Insert a tape into the deck.

2.  Press 

 until RADIO mode is selected.

1.   Connect the auxiliary device to the 

AUX In 

jack 

       with an audio cable (not provided).

2.   Press 

 until the indicator “ 

 ” lights on 

      the display.

3.   Start playback from the auxiliary device.

4.   Adjust the auxiliary device to mid-range volume 

•   The total number of tracks on the disc can be 

     read from display.

•  In stop mode, press    to begin CD playback.

Pause Playback

1.  During CD playback, press   to pause playback. 

Press again to resume.

Skip and search

1.  During CD playback, press   /    to skip to the 

previous or next track respectively.

2.  Press and hold   /   to search quickly current 

track backward or forward respectively.

Play mode

During CD playback, press 

BAnD/PLAy MoDe


to select among playback mode (repeat current 

track / repeat all / random). Selection made is 

indicated by icons on display.

•  Playback capability for CD-RW discs may vary 

due to variations in the quality of the CD-RW 

disc and the recorder used to create the disc.

Selecting CD mode

When the unit is on, press 

 until CD mode is selected.

Play CD:

1.  Press the 

PReSS to oPen

 area on the CD door 

to open the lid.

2.  Place a disc on the disc tray with the label side 

facing up.

3.  Press the 

PReSS to oPen

 area on the CD door 

to close it. 

•    Playback begins automatically and stops when 

finished. 

Stop playback

1.  During CD playback, press   to stop playback.

3.  Press 

BAnD/PLAy MoDe

 to access the desired 

radio band.

4.  Press   /   to tune to the station to be recorded.

5.  Press 

 ReC 

 and   

PLAy

 together to begin 

recording.

6.  Press   

PAUSe

 or   

StoP

 to pause or stop 

the recording respectively.

from CD

1.  Insert a tape into the deck.

2.  Press 

 until CD mode is selected.

3.  Insert the disc to be recorded.

4.  Select the track to be recorded.

5.  Press 

 ReC 

 and   

PLAy

 together to begin 

recording.

6.  Press    

PAUSe

 or   

StoP 

 to pause or stop 

the recording respectively.

from auxiliary input

1.  Insert a tape into the deck.

2.  Press


 until the indicator “ 

 ”appears on 

the display.

3.  Start playback from the auxiliary device.

4.  Press 

  ReC 

and   

PLAy

 together to begin 

recording.

5.  Press   

PAUSe

 or 

 StoP 

to pause or stop 

the recording respectively.

     and adjust the master volume by pressing 


VoLUMe

-/+.

•    Do not turn the volume of the auxiliary device 

      too high as this may affect the sound quality.

•   For other playback operations, control them 

      on your auxiliary device.

Auxiliary input

Tape player

CD Playback

Summary of Contents for RCD378D

Page 1: ...o read this instruction prior to using your new product for the first time Manual del usuario Es importante que lea este libro de instrucciones antes de usar su nuevo producto por primera vez Scan for more user manual details Lea para obtener más detalles sobre el manual del usuario ...

Page 2: ...to federal state and local regulations Portable Cart Warning Precautions Never open the cabinet under any circumstances Any repairs or internal adjustments should be made only by a trained technician Do not touch the player with wet hands If any liquid enters the player cabinet take the player to a trained technician for inspection This compact disc player uses a laser to read the music on the dis...

Page 3: ...rantee that interference will not occur in a particular installation If this equipment does cause harmful interference to radio or television reception which can be determined by turning the equipment off and on the user is encouraged to try to correct the interference by one or more of the following measures Reorient or relocate the receiving antenna Increase the separation between the equipment ...

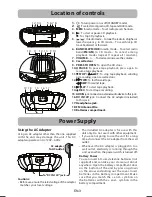
Page 4: ...rn power on or off STANDBY mode 2 Toselectamongradio CD tapeandAUXmode 3 MEM In radio mode To set radio preset channels 4 To start or pause CD playback To stop CD playback 5 In radio mode to tune the radio to a higher or lower frequency In CD mode To search skip CD track backward or forward 6 BAND PLAY MODE In radio mode To select radio band FM AM In CD mode To select among playback modes repeat 1...

Page 5: ...o automatically tune to the next or previous station 3 Press and hold MEM Preset Number flashes 4 Press button to select the preset number 5 Press MEM to confirm Memory icon stops flashing 6 Repeat steps 2 to 5 to set additional preset stations Note There are 10 preset locations for FM band and 10 preset locations for AM band on this unit Using presets 1 Press BAND PLAYMODE to select between bands...

Page 6: ... select among playback mode repeat current track repeat all random Selection made is indicated by icons on display Playback capability for CD RW discs may vary due to variations in the quality of the CD RW disc and the recorder used to create the disc Selecting CD mode Whentheunitison press untilCDmodeisselected Play CD 1 Press the PRESS TO OPEN area on the CD door to open the lid 2 Place a disc o...

Page 7: ... the lens cleaner Cleaning CDs Dirty CDs can cause poor sound quality Always keep CDs clean by wiping them gently with a soft cloth from the inner edge toward the outer perimeter If a CD becomes dirty wet a soft cloth in water wring it out well wipe the dirt away gently and then remove any water drops with a dry cloth Do not use record cleaning sprays or antistatic agents on CDs Also never clean C...

Page 8: ...per operation or maintenance or use in violation of instructions provided with the product or to product which has been altered or modified without authorization of AVC or to products or parts thereof which have had the serial number removed or changed Out of Warranty In the event your product requires repair after the limited warranty period has expired please contact our Customer Support Center ...

Page 9: ...nes importantes para la batería Cualquier batería puede presentar un riesgo de fuego explosión o quemadura química si es mal tratada No trate de cargar una batería que no esté diseñada para ser recargada no incinere y no perfore Baterías no recargables tales como las bat erías alcalinas pueden tener fugas si son dejadas en su producto por un largo periodo de tiempo Retire las baterías del producto...

Page 10: ...ubiertas y no efectúe reparaciones usted mismo Refiera el servicio a personal calificado PRODUCTO LASER DE CLASE 1 Denna apparat är försedd med en laserenhet med låg effekt terminar encendiendo y apagando el equipo le sugerimos al usuario que intente corregir dicha interferencia adoptando una o más de las si guientes medidas Reoriente o ubique en otro lugar la antena de recepción Aumente la distan...

Page 11: ...a de auriculares 18 Antena FM 19 Compartimiento de las pilasI AUX IN DC IN 12V 15 16 17 18 19 9 11 12 13 14 1 2 3 4 5 6 7 8 Uso del adaptador de CA Al usar un adaptador para CA que sea diferente al que se incluye con este aparato es posible que se dañe la unidad Este adaptador de CA funciona con CA de 120V 60Hz al enchufe de CA de la pared adaptador de CA El adaptador de CA que se incluye con esta...

Page 12: ...ogramación manual de las estaciones preprogramadas 1 En modo radio presione BAND PLAY MODE para seleccionar la banda de radio 2 Presione para sintonizar el radio a una frecuencia superior o inferior Presione y sostenga para sintonizar au tomáticamente la pista previa o a la siguiente estación 3 Presione y sostenga MEM El ícono MEMORY parpadea 4 Presione repetidamente para asignar el número de esta...

Page 13: ... y la grabadora utilizada para crear el disco Selección del modo CD Cuando la unidad esté enciende presione hasta que quede seleccionado el modo CD Reproducir CD 1 Presione el área PRESS TO OPEN en la puerta del CD para abrir la cubierta 2 Coloque un disco en la bandeja del disco con el lado de la etiqueta hacia arriba 3 Presione el área PRESS TO OPEN en la puerta del CD para cerrarla CD R RW Repr...

Page 14: ...emente reinicie el pro ducto puede ser necesario desconectar y volver a conectar la fuente de alimentación para volver a un funcionamiento normal 1 Conecte el dispositivo auxiliar al receptáculo AUX IN con un cable de audio no suminis trado 2 Presione hasta que quede el indicador se ilumina en la pantalla 3 Inicie la reproducción desde el dispositivo auxiliar Del CD 1 Coloque una cinta en el compa...

Page 15: ...s sobre cómo limpiar las lentes del CD consulte las que acompañan al limpiador de lentes Limpieza de discos Los discos sucios producirán un sonido de poca calidad Manténgalos siempre limpios pasándoles un paño suave desde el extremo interior hasta el perímetro exterior Si se ensuciase un disco humedezca un paño suave escúrralo bien páselo suavemente reti rando la suciedad y seque las gotas restant...

Page 16: ...rucciones que acompañan este producto o de haber modificado o alterado el producto sin la autorización de AVC o de haber quitado o cambiado el número de serie de las piezas o del producto Fuera de la Garantía En caso que su producto necesite ser reparado y que el período de garantía ya haya expirado sírvase contactarse con el Centro de Ayuda al Cliente en el fono 1 877 252 6873 o www RCAav com Hor...

Reviews: