39
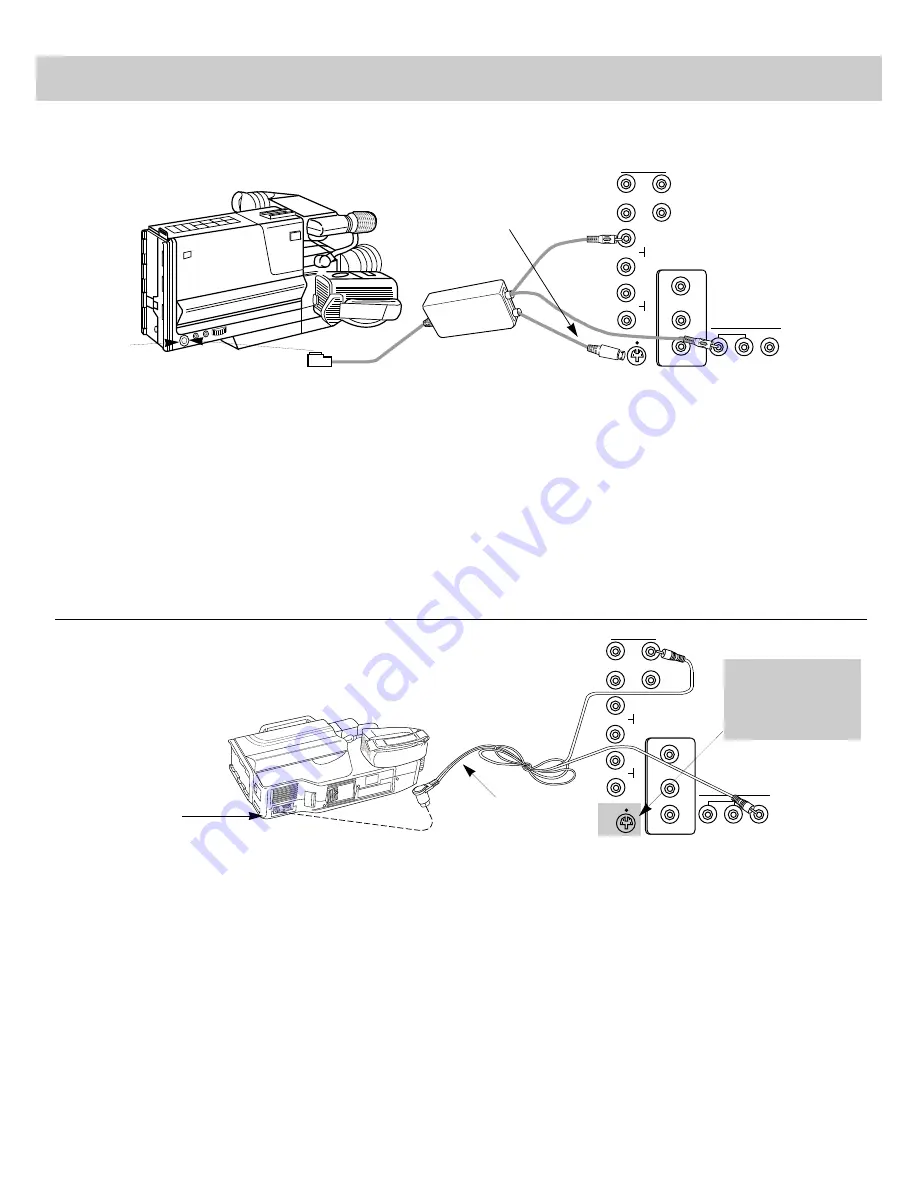
Camcorder Connections
CONVERTER
ANT B
ANT A
CABLE ANTENNA
HI-FI OUT SELECT OUT
R/
MONO
R/
MONO
R/
MONO
L
L
L
INPUT 1
INPUT 2
VIDEO
OUT
1
2
S-
VIDEO
INPUT
SELECT
AUDIO
S-VHS or Standard VHS Camcorder
(This connection allows you to play back tapes in the camcorder and watch them on the TV.)
Back of TV
Output
Adapter
(Usually Supplied
with Camcorder)
AV OUT
Jack
(Audio/Video Out)
An S-VHS or standard camcorder can be connected directly to
your TV. If you have an S-VHS camcorder, connect the S-VHS
video cable to the S-VIDEO connector on your TV. If you have
a standard VHS camcorder, connect the video cable to the
VIDEO INPUT 1 jack on the back of your TV. With either
video connection, attach the audio cable to the INPUT 1
R/MONO audio jack.
Notes: When the adapter’s S-VHS Cable is connected to the S-VIDEO
connector, the video plug does not have to be connected. However, you
may prefer to plug it in anyway to keep it out of the way. The S-VHS
video will automatically override the VIDEO INPUT 1 signal when you
select Channel 90. Be sure to connect the video cable, however, for
picture-in-picture viewing or if you plan to use the SELECT OUT jacks
for recording. When recording from the SELECT OUT jacks, tune to
channel 91 to see the signal from the camcorder. When displaying
picture-in-picture, the TV automatically minimizes any annoying
differences in tint between the small and large picture by electronically
coupling the S-VIDEO input to the VIDEO 1 input.
Operation:
• If the camcorder is connected to the VIDEO INPUT 1 jack
(instead of the S-VIDEO connector), select channel 91 on the
TV to view whatever the camcorder is playing.
• If the camcorder is connected to the S-VIDEO connector and
INPUT 1 audio jack, select channel 90 on the TV to view
whatever the camcorder is playing.
S-VHS or Standard VHS Camcorder
(This connection allows you to record onto the camcorder
whatever is currently being displayed on the TV screen.)
CONVERTER
ANT B
ANT A
CABLE ANTENNA
HI-FI OUT SELECT OUT
R/
MONO
R/
MONO
R/
MONO
L
L
L
INPUT 1
INPUT 2
VIDEO
OUT
1
2
S-
VIDEO
INPUT
SELECT
AUDIO
Audio/Video Input Cable
(usually supplied with
camcorder)
Audio
No connection
necessary. To record in
S-VHS, put camcorder in
S-VHS recording mode
and insert S-VHS tape
.
Back of TV
Video
AV IN
Jack
(Audio/Video In)
This connection will let you record onto the camcorder
whatever is being displayed on the screen such as a TV
program. You’ll also be able to record signals from a VCR (or
similar device) that is connected to the TV’s INPUT 1 or 2
jacks.
Note: You will not be able to record the picture-in-picture inset
picture or any menus or status displays.
The TV must remain turned on during recording. If you change
channels on the TV, the channel change will be recorded on the
camcorder tape unless you pause the camcorder during
recording.
You may also want to use this connection to dub or edit VCR
tapes with two or three camcorders (or VCRs). By connecting
one camcorder (or VCR) to the INPUT 1 jacks and another
camcorder (or VCR) to the INPUT 2 jacks, you’ll be able to
selectively edit and record whatever is playing on the TV
screen onto a third camcorder (or VCR) connected as shown
here to the SELECT OUT jacks.
If you connect a surveillance system to your monitor, you’ll be
able to record what the camera is displaying on the TV screen
by connecting a camcorder (or VCR ) to the SELECT OUT
jacks as shown here.
To see the signal from a device connected to the INPUT 1
jacks, select channel 91. Select channel 92 to see the signal
from a device connected to the INPUT 2 jacks.
Note: Signals from the S-VIDEO connector do not come thru the
SELECT OUT jacks. To record from an S-VHS component, remember
to also connect its regular video cable to the VIDEO INPUT 1 jack and
then tune the TV to channel 91.
S-VHS Cable
(sometimes a separate cable
that attaches directly to camcorder)
Summary of Contents for P60100
Page 3: ...C O L O R T V USER S GUIDE...


