background image

8

MENU

CH

VOL

POWER

+

VOL

CH

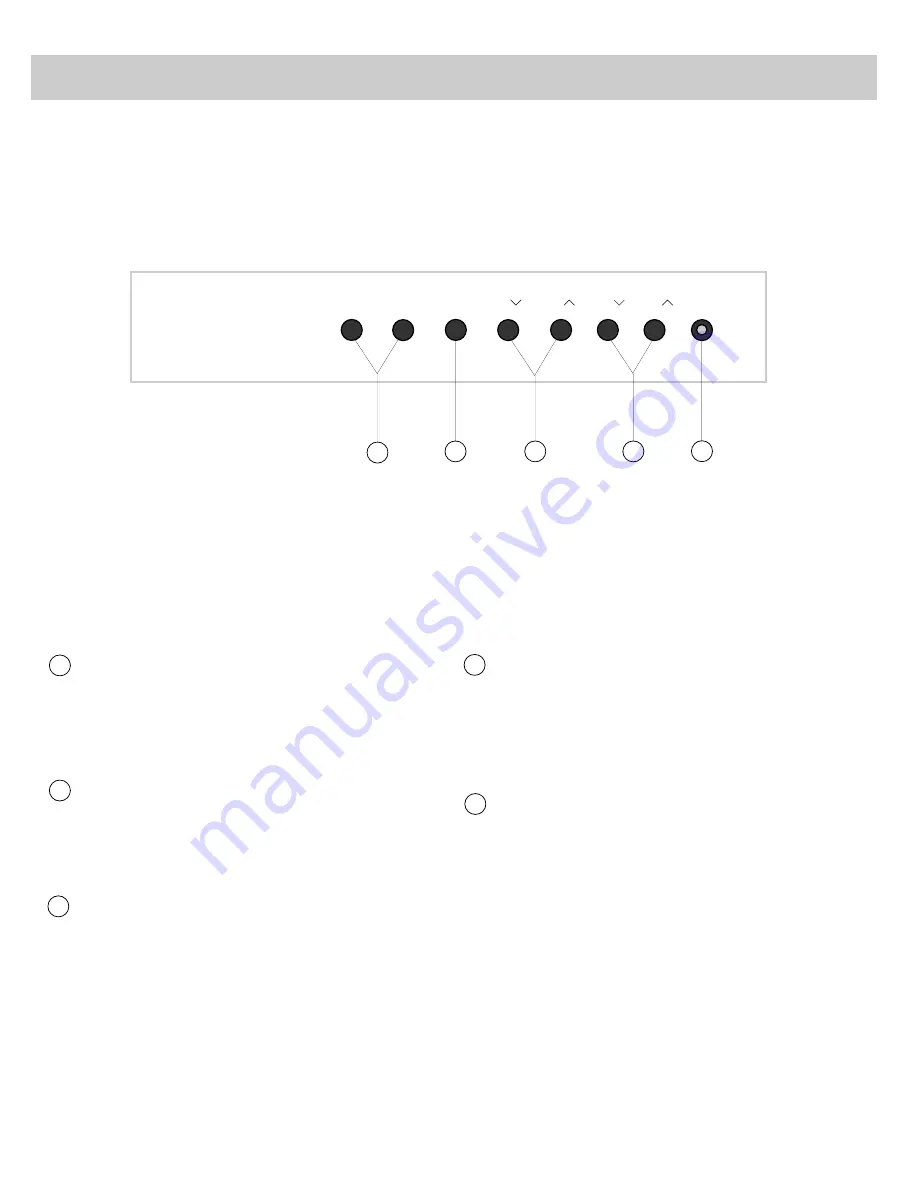
MENU Button
• Press repeatedly until the menu you want to display is

selected, then press + or –.  Next press MENU repeatedly to
select the function you want to adjust and then press + or –
to adjust the setting.

• Details about using each function begin on page 14.

– and + Buttons

Use these buttons after you have pressed the MENU button
to enter or adjust functions.  

POWER Button

• Press once to turn on TV.

• Press again to turn off TV.

• On some models, an indicator on the POWER button will

light whenever the TV is turned on.

VOL (Volume) Buttons
• Press VOL up to increase volume, or press VOL down to

decrease volume.

• The volume display will automatically appear on the

screen when you press the VOL buttons.

CH (Channel) Buttons

• Press CH up to see the next higher channel in memory.
• Press CH down to see the next lower channel in memory.
• You can add or erase channels in memory as desired.

Details are on page 24.

1

2

3

4

5

Front Panel Controls

Shown here is the front panel control.  You
can use either the front panel controls or the
remote control to operate the TV.  When using
the remote control, point it toward the screen.

1

2

3

4

5

Summary of Contents for P60100

Page 1: ...hase your television is warranted one year for labor char ges and one year for parts Warranty Information Revised Warranty The warranty information in your User s Manual has changed After its pur chas...

Page 2: ...an pour les r parations et pour les pi ces d tach es Renseignements sur la Garantie TOCOM 15140100 Modification de la Garantie Les renseignements concernant la garantie qui se tr ouvent dans votre Gu...

Page 3: ...C O L O R T V USER S GUIDE...

Page 4: ...ription for identification Model Serial Purchase Date Dealer Name Address Phone Product Registration WARNING To reduce the risk of fire or shock hazard do not expose this TV to rain or moisture CAUTIO...

Page 5: ...Channel 27 Detailed Connections Tips to Read Before Connecting Components 28 Monitor Panel 29 Antenna and Cable Connections Home Antenna Connections 30 Cable TV Connections 31 32 Programming Remote t...

Page 6: ...ntenna to your TV are on page 30 Details for connecting a cable TV system to your TV are on pages 31 Details for connecting a VCR to your TV are on pages 35 36 Back of TV TV Button CHANNEL Buttons VOL...

Page 7: ...U and then press Repeatedly press MENU PROG to select desired function and then press or to adjust it Details are on page 14 2 To see the audio menu repeatedly press MENU PROG to select the AUDIO MENU...

Page 8: ...t separated until it snaps back together The operation of the remote will probably not be affected 1 Turn the remote control face down 2 Press down on the ridged area of the battery cover and slide it...

Page 9: ...e used to control the basic functions of the component you selected in step 1 To control a different component first press its component button VCR1 VCR2 LD DSS CABLE AUDIO or TV and then press the de...

Page 10: ...annel number on the TV screen Quickly removes menus and displays from the screen SKIP Commercial Skip Button Use this button when you want to scan other channels during a program break When a break oc...

Page 11: ...press VOL up PREV CH Previous Channel Button Pressing the PREV CH button causes the TV to change back to the last tuned channel This is useful should you want to monitor two channels To operate selec...

Page 12: ...ator on the POWER button will light whenever the TV is turned on VOL Volume Buttons Press VOL up to increase volume or press VOL down to decrease volume The volume display will automatically appear on...

Page 13: ...umber whenever you change channels or press the remote s TV or DISPLAY button When the channel numbers are blue you are watching the signals from the ANT A antenna input If you change the ANTENNA A B...

Page 14: ...put the remote in the TV Mode press the TV button How to make it work Press FREEZE once to freeze the TV picture The sound of the program will not be affected Press and hold ZM IN until desired zoom...

Page 15: ...6K W2 6X 7 1 f f hf J L 7 1he he J L h he 7 1 h he Kg he V46K 3 5 eI4 hf V H N M I X U eN1 V1 e W5 e W5 H e H 5f 5 J HfJ H 7 f7 J Lf L W V1f S 7 5f U Y Hf 15 23 08 O2 6 O2 W2 7 3 0M N 0M eJ g7 g J5g3...

Page 16: ...ted to the TV s S VIDEO connector Remember to also connect the regular video cable to the VIDEO INPUT 1 jack for picture in picture viewing The TV automatically minimizes any annoying differences in t...

Page 17: ...PIP mode Press SWAP to switch the small picture with the main picture Press FREEZE to freeze the small picture Press FREEZE again to return to an action picture Press PIP to bring up picture in pictu...

Page 18: ...ture from each of your components and the TV will remember those settings automatically the next time you tune that input channel The COLOR function adjusts the amount of color in the picture Press to...

Page 19: ...t a channel that is active in your area Allow the TV to operate at least ten minutes before converging 2 Repeatedly press the VIDEO button until the CONVERGENCE function is selected 3 Then press the b...

Page 20: ...appear in the function when SAP is available Your TV will then reproduce the SAP audio until you change channels or return the STEREO SAP function back to STEREO Note Some TV stations transmit a pilo...

Page 21: ...stered trademarks of SRS Labs Inc 1 Repeatedly press the MENU PROG button to select AUDIO MENU press and then repeatedly press MENU PROG again to select SRS ON OFF function Note You can also change th...

Page 22: ...o which channel the TV will automatically tune when you press the DSS CABLE button on the remote After you set the clock you will be able to see the on screen time display whenever you change channels...

Page 23: ...in your area The Text modes Text 1 and Text 2 display on screen boxes containing the text of general information not necessarily related to the program being watched Note Closed Captioning is not ava...

Page 24: ...lect SLEEP TIMER 2 Press the or button to select the length of time up to four hours you want the TV to stay on Each time you press the or button the time will increase 30 minutes up to 4 hours Then t...

Page 25: ...l need to set the clock time before you will be able to turn on the alarm function Details for setting the clock are on page 3 IMPORTANT NOTE During extended power failures the alarm function will be...

Page 26: ...characters in alphabetical order Pressing VOL down sequences the letters in reverse order 5 Then press to move to the next letter frame Pressing moves you back to the previous letter frame 6 Repeat s...

Page 27: ...MENU PROG to select SETUP MENU and then press or to display setup functions Repeatedly press MENU PROG to select the PARENTAL CTRL function When this function is set to ON PARENTAL CTRL is activated a...

Page 28: ...RAM function 3 Press either or to begin autoprogramming The TV will first program all channels for ANT A input and then program all channels for ANT B input even if you only have one antenna input con...

Page 29: ...omatically checks both inputs and sets up a separate channel memory for each Changing Antenna Input Changing Antenna Input 1 Press the ANTENNA button on the remote control to switch from the ANT A inp...

Page 30: ...ote Pressing VCR1 will then not only turn on the VCR but also automatically tune the TV to the proper channel for viewing the picture from the VCR You can program most brands of remote controllable VC...

Page 31: ...e but will also automatically tune the TV to the proper channel for viewing the picture from the cable box 1 Repeatedly press MENU PROG to select the SETUP MENU and then press or to display the setup...

Page 32: ...ill be switched off when the component s power button is switched off If the outlet is labeled unswitched that means power will always be available at that outlet even when the component is turned off...

Page 33: ...Notes Remember that whatever you want to record must be displayed on the TV screen during recording Video signals from the S VIDEO connector can not be recorded from the SELECT OUT VIDEO jack To recor...

Page 34: ...tenna Adapter such as RCA 193983 BACK OF TV Incoming Cable From Home Antenna VHF or UHF Only or VHF UHF Combination CABLE ANTENNA ANT A ANT B CONVERTER UHF VHF CABLE ANTENNA ANT A ANT B CONVERTER Push...

Page 35: ...A ANT A ANT B CONVERTER C Incoming Cable BACK OF TV Nonscrambled cable channels will come thru the ANT B input whenever the channel numbers are yellow The scrambled channel from the decoder box will c...

Page 36: ...record a scrambled channel on the VCR at the same time you are watching a non scrambled channel thru the ANT A jack on the TV For picture in picture viewing be sure to also connect the audio and video...

Page 37: ...annels on the cable box If the cable box does not react to the remote or if the remote turns on the cable box but does not change channels repeat steps 1 thru 4 with another code number Operating Note...

Page 38: ...ome cable companies may require the use of a decoder with their cable TV system Consult your cable company or local dealer for details Scrambled Cable TV Channels Some cable companies offer premium pa...

Page 39: ...ed method using a 2 way signal splitter is shown above Note The audio video connections from the VCR to the TV are optional however these additional connections usually produce a better quality pictur...

Page 40: ...NPUT 1 jack and then tune to channel 91 You will not be able to record the picture in picture inset picture or any of the menus or status displays Special Recording onto VCR This connection only allow...

Page 41: ...Button Press to start tape playing FF Fast Forward Button Press while VCR is stopped to fast forward tape Press while VCR is playing to search forward REC Record Button Press to record STOP Button Pr...

Page 42: ...pe of VCR some models may not be able to respond to the remote Programming Remote To Control Other Brands of VCRs 1 Refer to the chart below to find the code number that corresponds to the brand name...

Page 43: ...onnection allows you to record onto the camcorder whatever is currently being displayed on the TV screen CONVERTER ANT B ANT A CABLE ANTENNA HI FI OUT SELECT OUT R MONO R MONO R MONO L L L INPUT 1 INP...

Page 44: ...sound through both the left and right speakers To View Signals From Computer If you connected the computer to the TV s INPUT 1 jacks select channel 91 on the TV so you can see whatever signal is comin...

Page 45: ...Back of TV Amplifier or Cassette Tape Deck If your stereo amplifier is part of a system that has its own remote control connect it to the SELECT OUT jacks as shown here The fixed level audio signal pr...

Page 46: ...the age brand model and type of audio equipment some models may not be able to respond to all the function buttons listed below You will want to experiment with each button to determine the exact fun...

Page 47: ...be in phase causing reduction in low frequencies bass 10mm Back of Right Speaker Back of Left Speaker R L E X T E R N A L S P E A K E R S TV Amp Speakers Connecting Speakers to Back of TV EXT INT EXT...

Page 48: ...able with RCA type phono plugs such as No AH069G S Video Cable such as No VAA020 AH037 3 ft Gold Tipped Cables AH065G 6 ft AH066G 10 ft Compatible Components A wide variety of compatible Video Cassett...

Page 49: ...Cable 6 ft AH077G 14 99 VCR Connection Kit AVH500 32 95 S Video Cable 8 ft VAA020 29 95 Replacement Power Cord 5 1 2 ft 187802 10 15 Antenna Adapter 193983 6 95 Antenna Mixer 193984 10 73 Antenna Mixe...

Page 50: ...d below between 8AM and 8PM Eastern Standard Time Use this number only to place an order for accessory items listed on this order form 1 800 338 0376 Most times your order will be shipped UPS within 7...

Page 51: ...ed into back of TV Maybe something is between the remote and the remote sensor Maybe the remote is not aimed directly at the component TV or VCR you are trying to control Maybe remote is not in TV Mod...

Page 52: ...on Make sure STEREO SAP function is in STEREO mode If using the VCR1 or VCR2 LD button make sure it is programmed to select the proper video input channel as described on page 26 If using an S VHS co...

Page 53: ...closed captioning Turn on the CAPTIONING function TV program does not have closed captioning Trouble Checks Trouble Checks and Adjustments Black bars appear on the screen Turn off the CAPTIONING func...

Page 54: ...sh will mar their appearance They can be easily cleaned with a damp soft cloth To clean the screen you can wipe it with a damp soft cloth A very diluted mild soap can be used on the screen if it is ex...

Page 55: ...l clearly describes how to install adjust and operate your television Any additional information should be obtained from your Dealer Installation and related adjustments Signal reception problems not...

Page 56: ...s 22 EXTERNAL SPEAKERS Terminals 43 FF Fast Forward Button 37 FREEZE Button 7 10 13 Front Panel Controls 8 Function Buttons 5 HI FI OUT Jacks 29 41 Home Antenna 30 INPUT Button 7 Installing Batteries...

Page 57: ...ote Control 6 Time Display 9 TINT Adjustment 14 TREBLE Function 16 Trouble Checks 47 49 TV Button 2 5 6 12 TV Mode 6 12 VCR 1 CHAN Function 18 26 VCR 2 CHAN Function 18 26 VCR Channel Setup 26 VCR Con...

Page 58: ...ated effort to phase in new water based paints to replace solvent based paints normally used in our manufacturing operations The key benefit of these new paints is to significantly reduce air pollutio...

Reviews: