background image

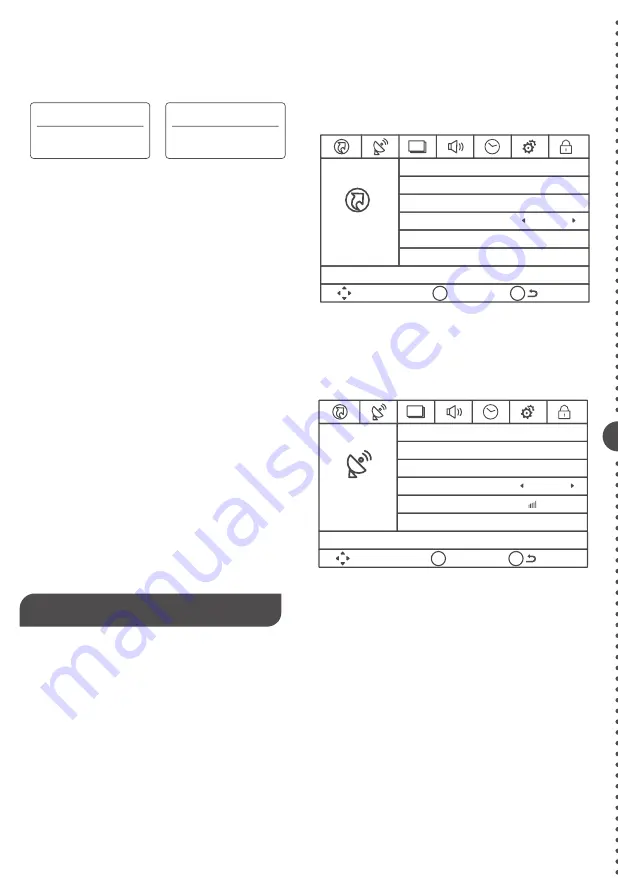
Channel Menu

The Channel Menu enables you to search, view and edit channels.
It is available in TV mode only. Press MENU and choose CHANNEL
from the Main menu. Press the OK/down button to proceed to
CHANNEL menu. 

Quick Menu

The Quick Menu contains menus and provides you a quick way to 
approach the main settings that may be most possibly and frequently 
approached. Press MENU on the remote and then you will see the 
Quick Menu showing on your screen. Press the down button to 
proceed the Quick Menu. Use up/down to choose the function you 
need, press OK to enter a sub-menu and press left/right arrow to 
adjust a sub-menu.  

Picture Menu

The Picture Menu contains menus and controls to configure the
way the picture appears. The Picture Menu options apply to the
video for the main TV and VIDEO INPUT selections. All picture
options can be applied to each input.
Press MENU on the remote. Select Picture from the Main menu.
Press the OK/down button to proceed to PICTURE menu. 

Use up/down to choose the function you need, press OK or right  
arrow to adjust or enter a sub-menu. The detailed explanation 
are shown below.  

Auto Scan

Execute an auto channel search.

Show / Hide
Enter sub-menu and press 

OK

 to show or hide the TV channel.

Channel List

Displays a channel list. It shows the current channels. Press OK to 
go to TV channel directly in sub-menu.

Signal Type

Select your TV signal type: Air or Cable.

DTV Signal( In DTV Mode)

Display how strong your TV signal is.

8 9

Channel Bar

Press the OK button on the remote control, when OSD (on-screen
display)is not used, the channel bar will appear on the Bottom of the 
screen. It displays the current channel’s information. The following list 
describes the items on the channel bar. 

Adjust the OSD Screen

The OSD (On Screen Display) menu enables you to approach to the 
TV functions.
To use OSD menu system, press OK button on remote control, then 
use left/right arrow to highlight an option from QUICK, CHANNEL,
PICTURE, AUDIO, TIME, SETUP or LOCK and press OK/down
button.  
Press the up and down arrow to move to a different option within 
each menu. If necessary, press OK or right arrow to display the 
choices of the option you’ve highlighted. If available, use the text at 
the bottom of each screen for help. To return to the previous menu, 
press the MENU button.

To exit the OSD menu:

t1

ress the EXIT button. The menu will clear from the screen.

t1

ress the MENU button repeatedly until the menus disappear.

Adjusting Volume

Press the VOL+/VOL- button on the remote control to adjust the 
volume. If you want to switch sound off, press MUTE. When OSD 
(On Screen Display) is not used, the arrows left/right can also work  
as VOL-/VOL+ buttons.

EPG (Electronic Program Guide)

Press EPG button on the remote control, the electronic program 
guide will appear in the center of screen. The electronic program 
guide gives the TV program playing project. You can use left/right 
arrows to switch pages.

OSD Menu Operations

QUICK MENU

Picture Mode

Sound Mode

Closed Caption

Sleep Timer

Move

Select

OK

MENU

Return

Off

CHANNEL

Auto Scan

Show / Hide

Channel List

Channel List

Signal Type

DTV Signal

Move

Select

OK

MENU

Return

Air

Good

Jan-01 07:10 Sat

4:3/CC

480i/480i

English/Stereo

Displays current program date and time.

Displays  the  screen  aspect  ratio. 
Display the CC status (on or off). 

Displays the signal resolution.

Displays whether the current channel is 
being broadcasted in stereo or mono. If 
the current channel is digital, this space 
will  be  SAP  (Second Audio Program) 
language.

ATSC-1

D14-1/A2

English

480i

Air

DTV

ATV

4:3

Jan-01 07:10 Sat

D14-1

ATSC-1

Stereo

480i

Air

CC

Jan-01 07:10 Sat

A2

If the channel is analog, A is displayed. If 
it’s a digital channel, D is displayed. For 
example, in the pictures above, A2 is an 
analog channel, and D50-1 is a digital 
channel ( -1 is a sub-channel number).
Display the current TV signal type.

Summary of Contents for LED24G45RQ

Page 1: ...RQ MODEL Date of Purchase Please register your product at www rca com Please keep your sales receipt and keep the record of the serial number and the date of purchase in order to receive warranty parts and service The serial number is located at the back of the TV Serial Number ...

Page 2: ...YPbPr Component device 06 Keypad and Front Panel 07 Connecting HDMI device 06 Keypad Buttons 07 How to obtain various kinds of Input Sources 06 Front Panel 07 TV Jacks Explanation 06 Check Accessories 05 SetupTVTable Stand 05 SelectTV Location 05 Preparation forYour NewTV 05 Connection and Using 05 07 08 08 11 13 09 08 12 14 09 08 14 10 10 Picture Menu Adjust the OSD Screen Frequently Asked Questi...

Page 3: ...propriate Some block construction If you are unsure contact a professional installer A minimum of two people are required for installation Flat panel displays can be heavy This Manufacturer Cares The consumer electronics industry is committed to making home entertainment enjoyable and safe Tune Into Safety One size does NOT fit all follow the manufacturer s recommendation for the safe installation...

Page 4: ... producto No permita a los niños a subir al equipo o jugar con muebles y televisiones No cloque los monitores de pantalla plana en el mueble quese puede usar fácilmente como escalón así como una cómoda Recuerde que los niños pueden llegar a ser excitados al ver una programación especialmente en el monitor de pantalla plana más grande que vida El cuidado se tiene que empezar por poner o instalar el...

Page 5: ...iance dealer or local power company For TV remote control battery power refer to the operating instructions 16 The TV set shall not be exposed to dripping or splashing No objects filled with liquids such as vases shall be placed on the TV set 17 Never push objects of any kind into this TV through openings as they may touch dangerous voltage or other electrical parts that could result in fire or el...

Page 6: ...ision channels via ANT CABLE jack Before connecting your TV determine using an antenna or a cable service to obtain the signal A Antenna Connect the antenna to TV via coaxial cable on ANT CABLE jack of the back panel You are ready to receive air local digital and analog channels B Cable TV service Connect the cable TV wall jack to TV via coaxial cable on ANT CABLE jack of the back panel You are re...

Page 7: ...e of TV to the audio output jack of computer with audio cable dual channel RCA jacks to 3 5mm stereo jack or the L AUDIO R jack Note 1 HDMI High Definition Multimedia Interface is a compact audio video interface for transmitting uncompressed digital data It carries the audio and video signal via the same cable and has the best display quality HDMI Connection The picture below is an example of a co...

Page 8: ...ing To Analog Channels an analog channel has a channel number beginning with A Input the digital number with numeric buttons directly and press OK button to confirm For example to watch analog channel A51 press 5 1 OK on remote control in sequence Note Although there is no analog TV signal available in America we reserve ATV functions for some expansible use A digital channel has a channel number ...

Page 9: ...o use OSD menu system press OK button on remote control then use left right arrow to highlight an option from QUICK CHANNEL PICTURE AUDIO TIME SETUP or LOCK and press OK down button Press the up and down arrow to move to a different option within each menu If necessary press OK or right arrow to display the choices of the option you ve highlighted If available use the text at the bottom of each sc...

Page 10: ...try s time zone you can Set Time zone Off Eastern Central Mountain Pacific Alaska Hawaii Samoa Newfoundland Atlantic Picture Mode Choose the preset visual mode of your TV Standard Movie User Dynamic Power Saving Only in User mode you can adjust Brightness Contrast Color Tint and Sharpness Changes to Power Saving mode can decrease the power consumption t SJHIUOFTT Adjust the brightness of picture t...

Page 11: ...UBM DPOUSPM NFOV DBO CF VTFE Use arrow up down to highlight the function you need and press OK or right arrow to use V chip Change Password Keypad Lock and Source Lock Clear Channel List sub menu Auto Clock Select auto clock on off Auto clock helps you synchronize your TV time to standard time from DTV signal Clock Set your TV time manually needs to turn off auto clock press up down and left right...

Page 12: ...ed can not be chosen from input list unless you input the correct parental password Use up down arrow to select the source press OK to lock or unlock it V Chip Press OK to enter V Chip sub menu the detail as follow Block Unrated Show Block all the unrated program Clear Downloadable Data Activate or downloadable rating data if available 11 Frequently Asked Questions FAQs Programming generally consi...

Page 13: ...nd white pictures from external device that you ve connected to your TV maybe it is due to the video cables is not connected well or they are connected wrongly Check the connection stability first then check the correctness For AV input the yellow video cable connects to the yellow Video In jack on the side of your TV For Component input the three Y Pb Pr video cables red blue and green should be ...

Page 14: ...ll and brickwork are eligible Do not place the mount on soft walls such as earth walls and plasterboard 4 If spare parts of different specifications such as screws are used during mounting consult with qualified professionals to make sure these parts are safe and effective 5 Before attaching the base to wall ensure the holes for anchors are in keeping with the installing rules Otherwise there may ...

Page 15: ...o misuse abuse negligence or neglect including but not limited to damage resulting from exposure to moisture humidity or salt Inability to receive a signal due to problems not caused by the product Damage to the product due to images burnt into the screen Product purchased or serviced outside of Country of Original Purchase i e Purchased USA can not be serviced in Mexico Purchased in Mexico can no...

Page 16: ...Trademark Management SAS usada bajo licencia de ON Corporation Cobertura Trabajo Durante un periodo de 12 meses desde la fecha de compra de su producto RCA pagaremos a un centro autorizado de servicio de RCA el cargo de mano de obra para reparar cualquier defecto en materiales o mano de obra en el televisor Si su televisor es irreparable que le proporcionara una unidad reacondicionada del mismo mo...

Reviews: