background image

6

PREPARATION

You must connect a TV to the system in order to use the system’s 
DVD player. You can connect other audio and audio/visual 
components to the system in order to use the Home Theater Audio 
System’s surround sound capabilities.

N

N

N

No

oo

otttteeeessss:::: 

• The system comes with one set of audio/video cables. Your local 

RadioShack store sells a wide variety of audio/video cables if you 
need additional cables to connect components.

AUDIO OUT L/R

 only works in DVD mode.

• The low frequency response of AUX OUT is dependent on the 

5.1 CH/2.1 CH setting and whether the subwoofer is on or off. 

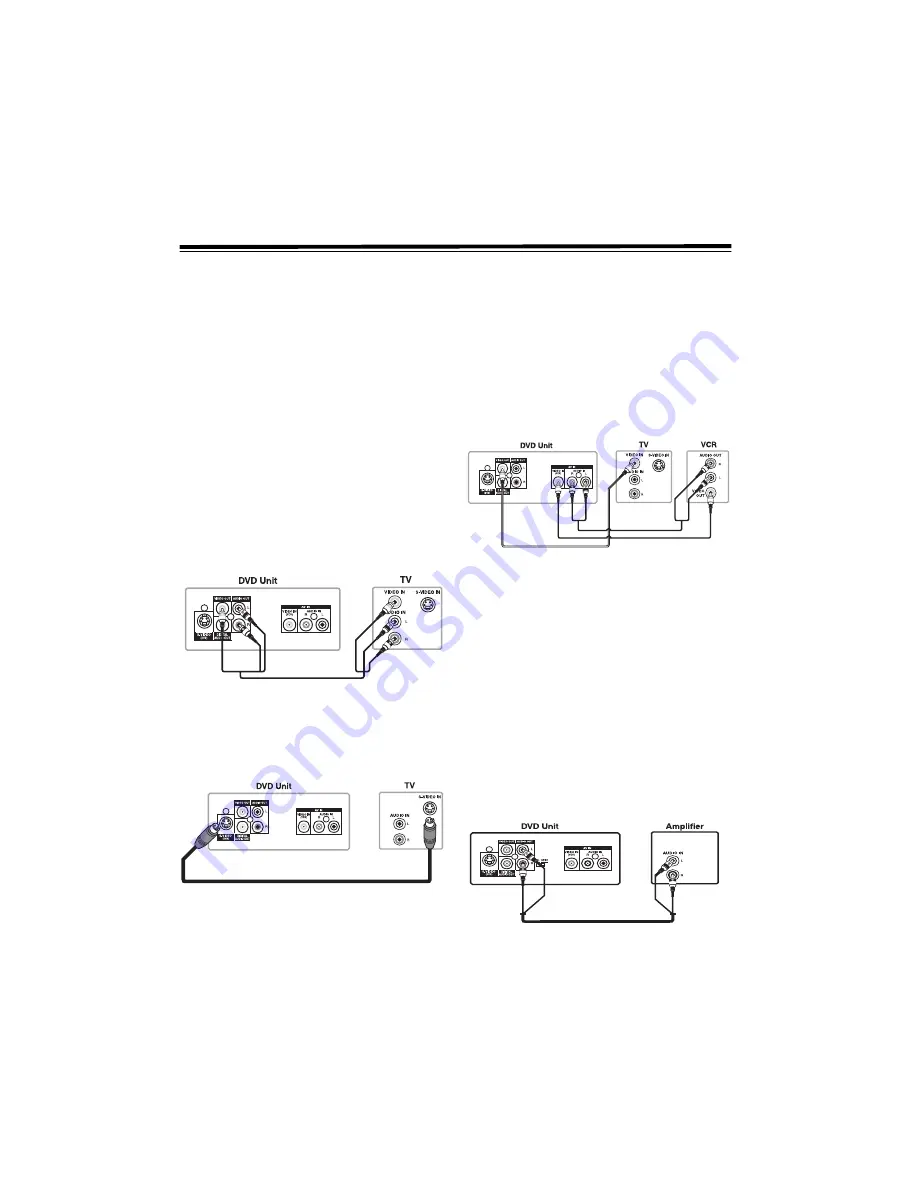
CONNECTING YOUR TV

The unit can be connected to your TV in several different ways, 
depending on the design of your TV.

RCA Audio/Video Jacks

Using the supplied audio/video cable, connect the 

VIDEO OUT 

and 

AUDIO OUT


L/R

 jacks to the VIDEO and left/right AUDIO IN jacks 

on your TV.

N

N

N

No

oo

otttteeee: 

: If you want the sound to come from the supplied speakers, 

you do not need to connect the audio cable.

S-Video Jack

1. Use an S-Video cable (not supplied) to connect the 

S-VIDEO 

(DVD)

 jack on your unit to the S-VIDEO IN jack on your TV.

2. Use the supplied audio/video cable to connect the 

AUDIO OUT 

L/R 

jacks to the AUDIO IN jacks on your TV. Do not connect the 

yellow video plug.

Coaxial Antenna Jack

Some TVs do not have an RCA or S-Video jack, they only have a 
coaxial antenna jack. In this case, you must purchase an RF 
modulator (not supplied, available at your local RadioShack store).

CONNECTING A VCR

1. Using the supplied audio/video cable, connect the yellow plug 

from the 

VIDEO OUT

 jack on your unit to VIDEO IN jack on 

your TV.

2. Connect the supplied speakers and subwoofer to your DVD 

unit. See “Connecting the Speakers & Subwoofer” on Page 7

3. Use a video cable (not supplied) to connect the 

VIDEO IN (VCR) 

jack on your unit to the VIDEO OUT jack on your VCR.

4. Use an audio cable (not supplied) to connect the 

AUDIO IN R/L 

jacks on your unit to the AUDIO OUT jacks on your VCR.

CONNECTING OTHER AUDIO EQUIPMENT

Use the supplied audio/video cable to connect the 

AUDIO OUT L/R 

jacks on your unit to the AUDIO IN jack or use a coaxial digital 
audio cable (not supplied) to connect the coaxial cable to your other 
equipment. Do not connect the yellow video plug.

Listening to Other Audio Equipment

1. Turn on the unit.

2. Turn on your audio equipment and follow the instructions 

included with it to select the AUDIO IN or DIGITAL IN 
function.

Analog Connection

Summary of Contents for Complete 7-Piece100-Watt Home Theater Audio System

Page 1: ...owner s manual Complete 7 Piece 100 Watt Home Theater Audio System with DVD Player ...

Page 2: ...isc 14 To Interrupt Playback Still Mode 14 To Stop Playback 14 Fast Forward Fast Reverse DVD CD 14 Skip Forward Reverse DVD CD 14 Slow Motion Play DVD 14 Zooming into an Image 14 Angle Selection 15 Audio Selection 15 Subtitle Selection 15 Special Functions 16 Display Function 16 GOTO Function 16 CD DVD Programmable Memory 18 Programmable Memory DVD 18 Programmable Memory CD 18 Repeat Playback 18 P...

Page 3: ...there is condensation inside the unit the unit may not function normally Let the unit stand for one to two hours before turning the power on or gradually heat the room up and dry the unit before use W W W Wa a a ar r r rn n n ni i i in n n ng g g g Should any trouble occur disconnect the AC power cord and refer servicing to a qualified technician Do not place anything directly on the top of the un...

Page 4: ...r r r P P P Po o o ol l l la a a ar r r ri i i iza za za zat t t ti i i io o o on n n n Precautions should be taken so that the grounding or polarization means of an appliance are not defeated P P P Po o o ow w w we e e er r r r C C C Co o o or r r rd d d d P P P Pr r r ro o o ot t t tec ec ec ect t t ti i i io o o on n n n Power supply cords should be routed so that they are not likely to be walk...

Page 5: ...quency tuning with the highest degree of accuracy and stability 2 2 2 20 0 0 0 A A A AM M M M F F F FM M M M S S S St t t ta a a at t t ti i i io o o on n n n M M M Me e e em m m mo o o or r r ry y y y Lets you store 20 stations from each band into memory for easy access DOLBY DIGITAL DTS Dolby Digital is a sound system developed by Dolby Laboratories Inc that gives movie theatre ambience to audio...

Page 6: ...N jack on your TV 2 Use the supplied audio video cable to connect the AUDIO OUT L R jacks to the AUDIO IN jacks on your TV Do not connect the yellow video plug Coaxial Antenna Jack Some TVs do not have an RCA or S Video jack they only have a coaxial antenna jack In this case you must purchase an RF modulator not supplied available at your local RadioShack store CONNECTING A VCR 1 Using the supplie...

Page 7: ...FM Antenna Press on the FM ANT 300 terminals and insert the supplied FM antenna wire ends AM Loop Antenna 1 Plug the supplied loop antenna s terminal into AM LOOP ANT The terminal fits only one way Do not force it 2 Snap the supplied stand to the bottom of the AM loop antenna and place it on a flat surface 3 Keep the antenna as far away as possible from the system speaker cords and power cord to p...

Page 8: ...nect the power cord TURNING ON THE UNIT AND TV 1 4or 3Press POWER to turn on the unit 2 Turn on the TV 3 Select the channel on your TV corresponding to the VIDEO IN jack that the unit is connected to See your TV user guide for more information 4 If you have connected the unit successfully the DVD logo start up picture appears on your TV screen 3 Use the remote for this step 4 Use the receiver for ...

Page 9: ...channel MPEG audio 1 2 only when the DIGITAL AUDIO OUT coaxial jack is used for connection It does not support 7 1 channel MPEG Audio Version 2 0 When playing back a CD G Graphics or CD EXTRA disc the audio portion is played but the graphic images are not shown TITLE CHAPTER AND TRACKS DVDs are divided into titles and chapters If the disc has more than one movie on it each movie is a separate titl...

Page 10: ...ce of the infrared remote sensor may be degraded causing unreliable operation The recommended effective distance for remote operation is about 16 feet 5 meters PARTS AND FUNCTIONS Front Panel D D D Di i i is s s sc c c c T T T Tr r r ra a a ay y y y Open or close tray by pressing OPEN CLOSE Place a disc on the disc tray label side up S S S St t t ta a a an n n nd d d db b b by y y y I I I In n n n...

Page 11: ... through titles chapters or tracks on a disc Tunes to the preset radio stations CLEAR Clears input selections and cancel certain playback functions DISPLAY Changes disc status information displayed on the TV ANGLE Switches the camera angle of the video presentation when scenes with multiple camera angles are recorded on a DVD SUBTITLE Selects one of the subtitle languages programmed on a DVD FUNCT...

Page 12: ...gh range of sounds To Select the Listening Channel While the DVD is stopped press 5 1 CH and 2 1 CH on the remote control to select different speaker output status The following tables show what speakers work in various modes CH TRK When a DVD is loaded in the unit this indicator appears along with the chapter number When an audio CD is loaded in the unit this indicator appears along with the trac...

Page 13: ...ofer is always off When the unit is set to 5 1 CH the AUDIO OUT red and white RCA jacks provide background sound only If necessary change the setting to 2 1 CH when using audio output When the unit is in TUNER AV IN mode there is no sound output from the AUDIO OUT red and white RCA jacks The low frequency response of AUX OUT is dependent on the subwoofer on off mode in the setup menu SOURCE AUDIO ...

Page 14: ... ý ý ý ýat the location where you want to interrupt playback To resume playback at the position where the disc was stopped press PLAY 2 4or 3Press STOP ý ý ý ýor STOP BAND ý ý ý ýtwice to clear the unit s memory FAST FORWARD FAST REVERSE DVD CD 1 3Press TUNING or when a disc is playing The disc begins fast scan at x2 speed Four speeds are available Each time TUNING or is pressed the fast scan spee...

Page 15: ...playing press AUDIO to view the current audio format number 2 3Press AUDIO repeatedly to select the desired audio format About two seconds after selecting a new mode playback continues in the new audio format N N N No o o ot t t te e e es s s s If only one audio format is recorded the number does not change You can also change the audio format using the Display function See Display Function on Pag...

Page 16: ...eatedly press SUBTITLE to select your desired language The unit changes to your desired language about three seconds later When a disc with only one subtitle is selected 1 1 Eng appears 3 3Press DISPLAY to return to the normal screen GOTO FUNCTION This function allows you to skip directly to any part of the disc while a disc is playing N N N No o o ot t t te e e e 3If you want to return to the nor...

Page 17: ...rm The unit starts playback about three seconds later 4 3Press CLEAR to reset the title chapter track number N N N No o o ot t t te e e es s s s Some discs may not respond to this process Some scenes may not be located as precisely as you specified This method for accessing specific locations is available only within the current title of the DVD disc 3You can move through the menu by pressing G H ...

Page 18: ... track the currently entered numbers are erased You can reset the numbers REPEAT PLAYBACK Repeating a Title DVD 3While the disc is playing press REPEAT DISC until Repeat Title appears on the screen The current title is played repeatedly Repeating a Chapter DVD 1 3While the disc is playing press REPEAT DISC until Repeat Chapter appears The current chapter plays repeatedly 2 3To resume normal playba...

Page 19: ...R The selected file is located and played back N N N No o o ot t t te e e es s s s The unit s ability to read MP3 discs depends on the following The bit rate must be between 64 256 kbps The total number of files on the disc should not exceed 254 The maximum number of directories should not exceed 32 The maximum depth level of directories should not exceed 4 File names should be named using eight o...

Page 20: ... weak signal PRESETTING STATIONS You can tune directly to a stored station by entering the preset number Up to 20 stations can be preset on FM band and up to 20 stations on AM band 1 4or 3Press POWER 2 4or 3Repeatedly press FUNCTION until the frequency band appears on the display 3 3Press BAND to select the desired band 4 4or 3Press TUNING or ý ý ý ýto tune to your desired station 5 3Press MEMORY ...

Page 21: ... may not conform to the picture size you select When you play DVDs recorded in the 4 3 picture size the playback picture always appears in the 4 3 picture size regardless of the TV shape setting If you select 16 9 wide screen mode and you own a 4 3 TV set the DVD playback picture is horizontally distorted during playback Images appear to be horizontally compressed Always be sure that your TV shape...

Page 22: ...ay 2 4or 3Press STOP or STOP BAND 3 3Press SETUP 4 3Use I or J to select Audio press ENTER 5 3Use G or H to select Surround Delay then repeatedly press ENTER to select the desired Surround Delay type 0 15ms 5 20ms 10 25ms or 15 30ms appears N N N No o o ot t t te e e es s s s The first number represents the Dolby Digital and the second number represents the Dolby Pro Logic The delay adjustment dep...

Page 23: ...N N N No o o ot t t te e e e You can adjust the channel balance on your unit See Adjusting the Sound on Page 12 Pink Noise 1 4or 3Repeatedly press FUNCTION until DVD appears on the display 2 4or 3Press STOP or STOP BAND 3 3Press SETUP 4 3Use I or J to select Audio press ENTER 5 3Use G or H to select Pink noise then press ENTER 6 3Use G or H to select the desired setting then press ENTER Off Pink n...

Page 24: ...to select Yes then press ENTER 5 3Press RETURN to exit N N N No o o ot t t te e e e When you set the unit to the Factory Set it takes a few seconds to return to the initial default setting L L L La a a an n n ng g g gu u u ua a a ag g g ge e e e C C C Co o o od d d de e e e L L L Li i i is s s st t t t f f f fo o o or r r r D D D Di i i is s s sc c c c L L L La a a an n n ng g g gu u u ua a a ag g...

Page 25: ...iya PA Panjabi PL Polish PS Pashto Pushto PT Portuguese QU Quechua RM Rhaeto Romance RN Kirundi RO Romanian RU Russian RW Kinyarwanda SA Sanskrit Code Language SD Sindhi SG Sangho SH Serbo Croatian SI Singhalese SK Slovak SL Slovenian SM Samoan SN Shona SO Somali SQ Albanian SR Serbian SS Siswat ST Sesotho SU Sundanese SV Swedish SW Swahili TA Tamil TE Telugu TG Tajik TH Thai TI Tigrinya TK Turkme...

Page 26: ... the disc Do NOT use irregular shape discs example heart shaped octagonal etc They may cause malfunctions CLEANING THE UNIT Be sure to turn the unit off and disconnect the AC power cord before maintaining the unit Wipe the unit with a dry soft cloth If the surfaces are extremely dirty wipe clean with a cloth which has been dipped in a week soap and water solution and wrung out thoroughly then wipe...

Page 27: ...he speaker volume The DVD cannot be decoded to produce speaker output This unit is too hot Shut off for about half an hour for cooling down You can use the Pink Noise setting to test the speaker See Customizing the Function Settings on Page 21 Severe hum or noise is heard Check that the speakers and equipment are connected securely Check that the connecting cords are away from a transformer or mot...

Page 28: ... ING FROM INCONVENIENCE LOSS OF TIME DATA PROPERTY REVENUE OR PROFIT OR ANY INDIRECT SPECIAL INCIDENTAL OR CONSEQUENTIAL DAM AGES EVEN IF RadioShack HAS BEEN ADVISED OF THE POSSIBILITY OF SUCH DAMAGES Some states do not allow limitations on how long an implied warranty lasts or the exclusion or limitation of incidental or consequential damages so the above limitations or ex clusions may not apply ...

Reviews: