V12 Overview 24
LCD Panel
The LCD panel provides system information, status, and error messages to indicate if the
system is functioning correctly or requires attention. The LCD panel can also be used to
configure or view the system's iDRAC IP address.
The LCD panel is available only on the optional front bezel. The optional front bezel is hot-
pluggable. The statuses and conditions of the LCD panel are outlined here:
•
The LCD backlight is white during normal operating conditions.
•
When the system needs attention, the LCD backlight turns amber and displays an
error code followed by descriptive text.
NOTE:
If the system is connected to a
power source and an error is detected, the LCD turns amber regardless of whether
the system is turned on or off.
•
When the system turns off and there are no errors, LCD enters the standby mode
after five minutes of inactivity. Press any button on the LCD to turn it on.
•
If the LCD panel stops responding, remove the bezel and reinstall it.
If the problem persists, see
Getting help
.
•
The LCD backlight remains off if LCD messaging is turned off using the iDRAC
utility, the LCD panel, or other tools.
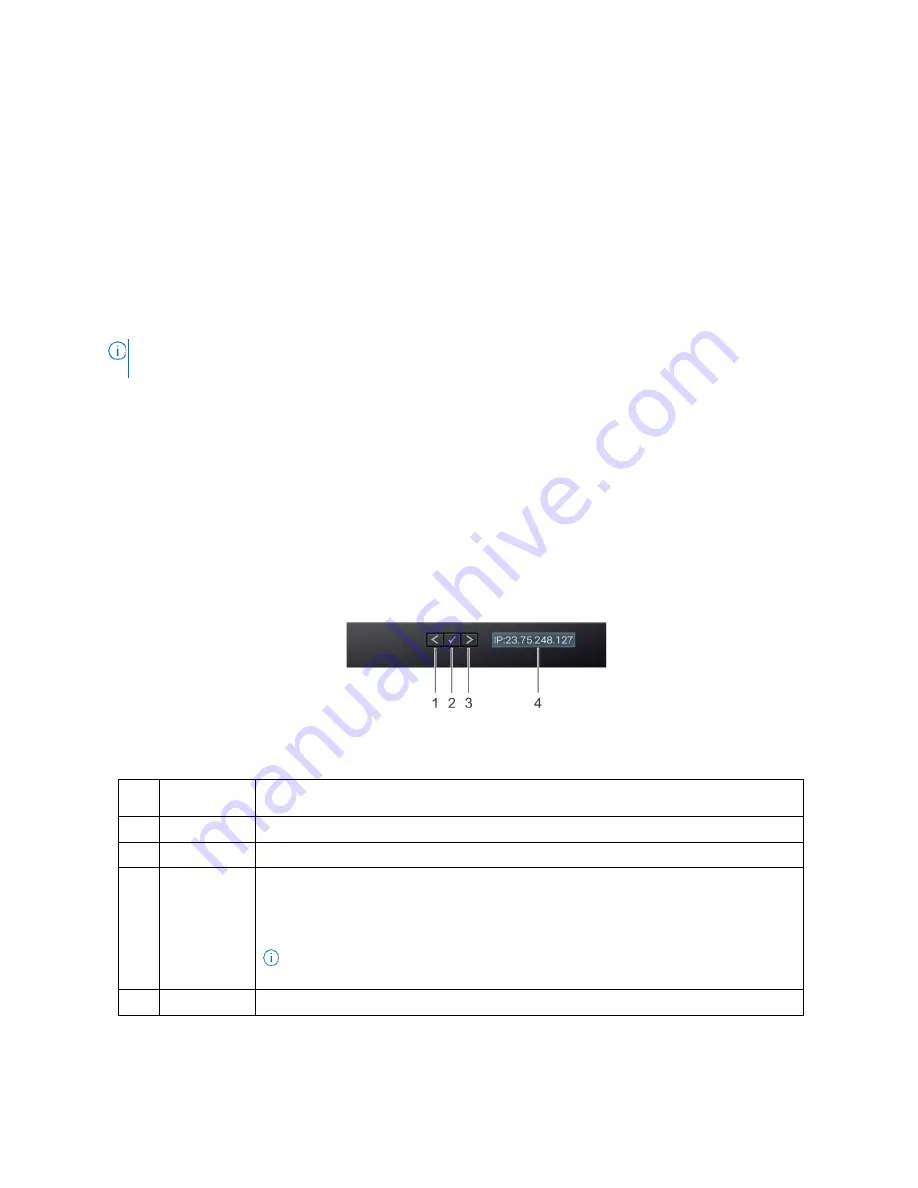
Figure 19. LCD Panel Diagram
Table 15. LCD Panel Diagram
Item Button or
display
Description
1 Left
Moves the cursor back in one-step increments.
2 Select
Selects the menu item highlighted by the cursor.
3 Right
Moves the cursor forward in one-step increments. During message scrolling:
•
Press and hold the right button to increase scrolling speed.
•
Release the button to stop.
NOTE:
The display stops scrolling when the button is released. After 45
seconds of inactivity, the display starts scrolling.
4 Display
Displays system information, status, and error messages or iDRAC IP address.
Summary of Contents for V8
Page 1: ...rcgs20200916 2020 2020 2020 2020 2020 2020 2020 2020 2020...
Page 27: ...V12 Overview 26 Figure 21 Service Information with System Touch Points...
Page 75: ...RAID Storage 74 Select Virtual Disk Management Figure 63 PERC Adapter Server Profile View...
Page 81: ...RAID Storage 80 Select Create Virtual Disk Figure 69 Create Virtual Disk...
Page 82: ...RAID Storage 81 Select RAID level Figure 70 Select RAID Type...
Page 83: ...RAID Storage 82 Select Physical Disks Figure 71 Select Physical Disks...
Page 85: ...RAID Storage 84 Scroll up and Click Apply Changes Figure 73 Apply Changes...
Page 86: ...RAID Storage 85 Select OK Figure 74 Confirm Completion...
Page 89: ...RAID Storage 88 Confirm and Click Yes Figure 77 Confirm Operation...
Page 96: ...RAID Storage 95 Verify all settings and if correct click Finish Figure 84 Complete the Wizard...


