Chapter 3: Getting Started
15
Chapter 3: Getting Started
3.1 Introduction
This chapter provides basic instructions to get you started using the DS400/
500X Digital Fishfinder. It describes Simulator mode and can help you to
become familiar with the basic functions of the fishfinder’s operation
controls. More detailed information on using the menu items and display
controls is provided in
Chapter 4
and
Chapter 5
, respectively.
3.2 Powering on the Fishfinder
Connect the power cord to boat’s power source and plug into the power port
on the connector panel. Press the
PWR
button on the DS400/500X.
Details on setting up your DS400/500X and display are given in
Chapter 6
.
3.3 Simulator Mode
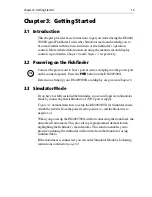
If you have not fully installed the fishfinder, you can still operate in Simulator
mode by connecting the fishfinder to a 12VDC power supply.
Figure 3-1
demonstrates how to setup the DS400/500X for Simulator mode.
Attach the red wire from the power lead to positive (+) and the black wire to
negative (–).
When you power up the DS400/500X without connecting the transducer, the
unit enters Demo mode. This provides a preprogrammed demonstration
highlighting the fishfinder’s main features. This function enables you to
practice operating the fishfinder without data from the transducer, using
simulated data.
If the transducer is connected, you can enter Simulator Mode by following
instructions outlined on
page 62
.
PWR
Summary of Contents for DS400X
Page 1: ...DS400X DS500X Digital Fishfinders Owner s Handbook Document number 81234 2 Date April 2004...
Page 2: ...ii...
Page 14: ...4 DS400X and DS500X Digital Fishfinders...
Page 50: ...40 DS400X and DS500X Digital Fishfinders...
Page 86: ...DS400 Mounting Template...
Page 88: ...DS500 Mounting Template...
Page 92: ...Warranty...

