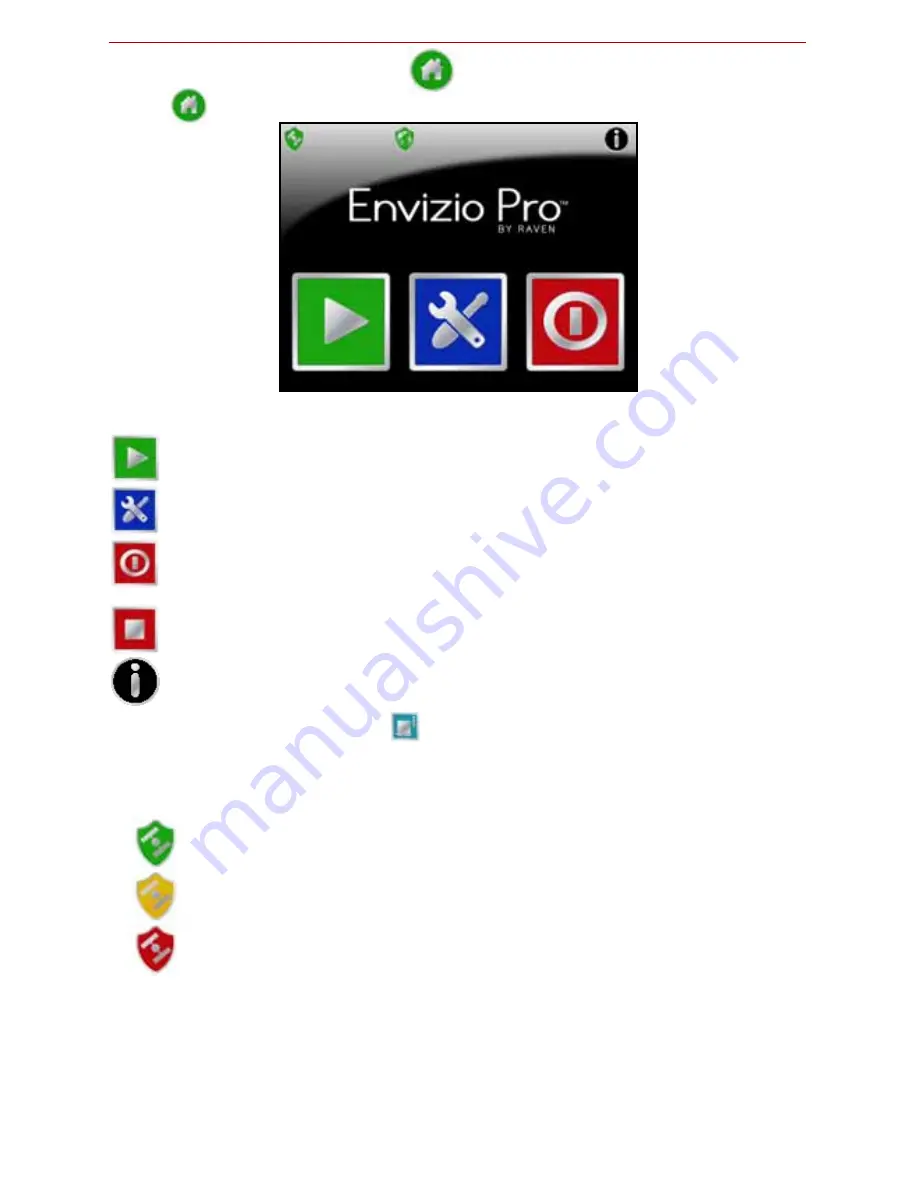
background image

2

Home Screen 

Touch 

 anywhere it appears to return to the


Home


screen.

Touch the:

Start Job

 icon to begin a new job or resume an existing job.

Tools 

icon to access the 

Tools Menu

. The 

Tools Menu


contains the 

settings and calibrations for the Envizio Pro system.

Shutdown 

icon to power down the Envizio Pro console. The Shutdown 

icon only appears when a job is not in progress. Be sure to shutdown the 
console before switching the console off.

End Job

 icon to close a job in progress. The End job icon only appears if a 

job is in progress and replaces the Shutdown icon on the Home screen.

Info

 icon in the upper, right corner of the display to view the current 

software and firmware versions of the Envizio Pro console. If the Envizio 
Pro is connected to a CANbus system, additional system information is 
available by selecting the 

 on the About Envizio Pro screen.

GPS Status Indicator

The status of GPS reception is displayed in the upper, left corner of the 

Home


screen. When the following icon appears:

DGPS is O.K.

Envizio Pro has encountered a DGPS warning condition.

No DGPS position is available.

Touch the 

GPS Status

 indicator on the 

Home


screen to display the 

GPS Health


screen. For more information regarding the GPS Status and Status Indicator 
icons, refer to the 

Envizio Pro Installation & Operation Manual

.

Summary of Contents for Envizio Pro

Page 1: ...Quick Reference Guide Envizio Pro...

Page 2: ...n TM 1 Tilt Module for tilt corrected guidance Startup To power up the Envizio Pro console press the power button located on the right side of the Envizio Pro console Do s and Don ts Do have the Enviz...

Page 3: ...utdown icon on the Home screen Info icon in the upper right corner of the display to view the current software and firmware versions of the Envizio Pro console If the Envizio Pro is connected to a CAN...

Page 4: ...e and Setup Wizard menus Quick Access Bar While working in the Tools Menu the Quick Access Bar remains at the top of the screen and allows access to the Setup Wizard System GPS Computer and Vehicle me...

Page 5: ...the currently loaded profile highlighted in the list of profiles stored on the Envizio Pro To Create a New Profile Touch the icon and use the on screen keyboard to enter the desired profile name To Sa...

Page 6: ...ole Touch the All button on to perform the selected action on all of the files displayed in the list For example select the Unload All to USB Drive to transfer all the jobs onto the connected USB flas...

Page 7: ...Select the desired baud rate for the output messages from the list on the right side of the screen Start a Job 1 To begin a job touch the icon on the Home screen The Start Job Verify Settings screen w...

Page 8: ...oom system will be used the system may be enabled by selecting the AutoBoom button See the AutoBoom section in this guide or the AutoBoom Calibration Operation manual for more information 9 When finis...

Page 9: ...he selected product or touch in the rates area to access the In Job Product Configuration screen Additional display options may be activated on the In Job Product Configuration screen 11 Touch the Rat...

Page 10: ...ctive To Load an A B Line Touch the Load A B Line icon to load a previously saved line into the current job This icon will not appear if an A B Line has already been set Reset the line to access the L...

Page 11: ...con to move the guidance path to the left in the increments set on the Nudge Settings screen Recording a Field Boundary To Record a Field Boundary 1 Begin a job file by following the procedure outline...

Page 12: ...creen to display the AccuBoom Override icon on the Guidance screen 2 The Turn Off Percent value sets the percentage of the boom section width that must be in a previously applied area or no spray zone...

Page 13: ...Guidance screen will re appear and Envizio Pro will begin recording the boundary or feature On the Guidance screen a Pause and End icon appear for the feature currently being recorded The Guidance scr...

Page 14: ...e procedure in the Start a Job section earlier in this guide and select the to begin guidance 4 Before guidance will begin the operator will be prompted to review the Glide Series AutoBoom system sett...

Page 15: ...CANbus ends not terminated Make sure that both ends of the CANbus system are properly terminated Refer to the Envizio Pro Installation Operation manual for more information Corroded pins in CANbus con...

Page 16: ...Industries Inc All rights reserved under copyright laws Raven Industries Toll Free U S and Canada 800 243 5435 Applied Technology Division or Outside the U S 1 605 575 0722 P O Box 5107 Fax 605 331 04...

Reviews: