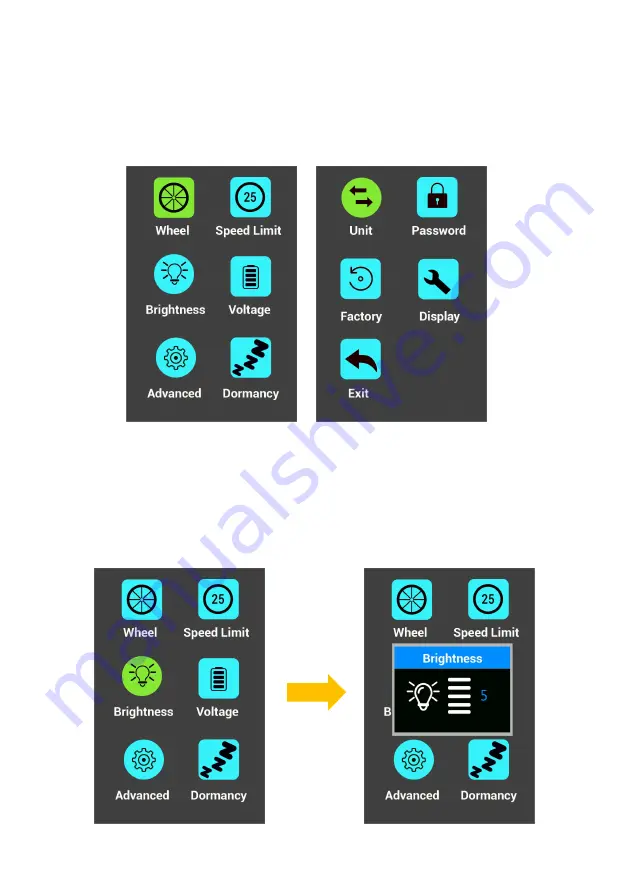
RATTAN QUERCUS Owner'S Manual Download Page 21

- 19 -

5. Display Setting

Turn on the display, press " + " and " - " 2s simultaneously to access.

* Do not change the setting when riding for safety first.

6. Backlight Brightness Adjustment

Enter the display setting, choose Brightness, adjust the backlight

brightness by " + " " - ".

Summary of Contents for QUERCUS

Page 1: ...RATTAN QUERCUS Owner s Manual www rattanebike com...

Page 2: ......

Page 3: ...If you encounter any problems in the installation or use please contact Rattan E Bike customer support team NOTE TO ALL RIDERS UNDER 18 YEARS OF AGE It s very important that you get parental permissi...

Page 4: ...tice 03 Warning 03 Package Content 05 Product Overview 06 Specification 07 Assembly 08 Battery Use and Protection 13 Display and Setting 15 Connection App 23 Troubleshooting 24 FAQ 25 Limited Warranty...

Page 5: ...ther vehicle 3 It is your responsibility to familiarize yourself with the laws and re quirements of operating this product in the area s where you ride 4 Failure to properly charge store or use your b...

Page 6: ...d the posted speed limit and obey all traffic laws 07 Avoid touching the charging port directly and do not let it make contact with a metal object 08 Keep hands and all body parts away from moving par...

Page 7: ...Unpack the bike Unbox the package and remove the small box that contains the display inside in case of any damage occurs With the help of another person capable of safely lifting a heavy object remove...

Page 8: ...ke 1 User Manual 1 Tool Kit 1 Tool Bag 1 Front Wheel 1 Quick Release Screw 1 Fender 2 Charger 1 Headlight 1 Pedals 2 Display 1 Seat 1 Product Overview Brake Lever LCD Display Shifter Display Controls...

Page 9: ...IFICATION Model Quercus Product Dimensions 168 71 128 CM Package Dimensions 146 5 32 78 CM Max Load 450 LBS Saddle Battery Seat Post Rear Rack Rear Light Motor Wheel Chain Crankset Pedal Front Suspens...

Page 10: ...ric Mode 40 60 Miles Max Angle of Climb 30 Degrees Charging Time 4 5 Hours Tire Pressure 25 29 PSI Frame Material Aluminum Alloy Incorrect assembly maintenance or use of your ebike can cause component...

Page 11: ...the cre wand turn in to the front Remove the plastic axle guard from the front wheel and unscrew the screws 1 Insert the front wheel hub axle thru the hub from the rotor side 2 Adjust the screws and...

Page 12: ...s 2 1 Loose the screws on the front fork install the fender and headlight to gether Remove the spacer and align the front wheel make sure centralize the brake disc in the pads 3 Make sure the front wh...

Page 13: ...ide on the front fork Adjusting the Seat DO NOT raise the seat post beyond the minimum insertion marked on the tube 2 Close the quick release lever using your palm or finger 4 Untighten the quick rele...

Page 14: ...the pedal threads Battery Battery Rotating in the direction of the po inter shown on the crank 1 Key Location hung on the handlebar near the display 1 Tighten the pedals with the wrench 2 Plug the key...

Page 15: ...Switch activate deactivate the battery B Battery Power Button indicates the power C Key plug in Location lock unlock the key D Battery Lock Switch remove release the battery Please check the battery c...

Page 16: ...the full range per charge next ride There is no memory effect so charging the battery after short rides will not cause damage Charging the battery normally takes 4 5 hours In rare cases it may take l...

Page 17: ...assisted mode Speed Current riding speed USB Charging Using the display for USB charging and the plug symbol will appear on the display Normal Operation mode Trip Shows the distance of a single trip...

Page 18: ...hree modes ECO Normal and Sport The acceleration of ECO mode is small while the Sport mode s is big ECO mode will consume the power of the battery least while Sport mode will consume it most Turn on o...

Page 19: ...display the display will show speed and Trip Km by default short press the i to switch ODO Km Max Km h Avg Km h Time Min Press the power button for 2 4s turn on the display and power system connection...

Page 20: ...nd the screen shows The turn icon and signal flashes 60 times a minute once pressed Press the button again to turn off the right turn signal The left and right turn signals cannot be turned on at the...

Page 21: ...rn on the display press and 2s simultaneously to access Do not change the setting when riding for safety first 6 Backlight Brightness Adjustment Enter the display setting choose Brightness adjust the...

Page 22: ...e advanced Enter advanced settings and select power set 8 levels to choose from 0 3 1 3 0 5 1 5 0 7 1 7 0 9 1 9 8 Set Units Choose unit Press and release the Up Arrow or Down Arrow to toggle between i...

Page 23: ...time Enter the setting interface choose dormancy The auto turn off time can be set from 0 9 minutes The default auto shut off time is 5 minutes 0 minutes shows that the auto shut off is closed 10 Res...

Page 24: ...de Definition 21 Current Abnormality 22 Throttle Abnormality 23 Motor Phase Abnormality 24 Motor Hall Signal Abnormality 25 Brake Abnormality 30 Communication Abnormality 12 Slow Start Enter Advanced...

Page 25: ...23 Connection App Turn on the Bluetooth on your phone first Use your email to register an account for the first use and log in Please download the Key Disp App from Google play store or IOS store...

Page 26: ...d if so stop using the battery and contact us The brakes make abnormal noise Adjust the brake pads and brake disc Motor makes abnormal noise Contact us with a video to show the condition and sound The...

Page 27: ...bike during the warranty A3 We believe that communication is the best way to solve the pro blem Please contact us in time To help you solve the problem as quickly as possible please describe the probl...

Page 28: ...days Return is not acceptable Accept exchange new product or partial refund We will deduct the shipping fee or restocking 180 pc when we are making a refund for non defective products and non longer n...

Page 29: ...bike purchased from Rattan ebike online or physical storefront is covered by this Limited Warranty The Warranty Period begins upon your receipt of the bike and shall end immediately upon the earlier o...

Page 30: ...or the avoidance of doubt Rattan ebike will not be liable and or responsible for any damage failure or loss caused by any unauthorized service or use of unauthorized parts The Battery is not warranted...

Page 31: ...Rattan ebike will always be by your side Contact us directly by e mail to info rattanebike com or call Rattan ebike phone support 562 488 5588 FaceBook Group Facebook Page Unboxing Videos...

Page 32: ......

Reviews: