background image

Re-Install Barrel

1.  Install barrel over cascade.

2.  Tighten barrel screws.

3.  Re-install fluid tube.

4. Re-install trigger.

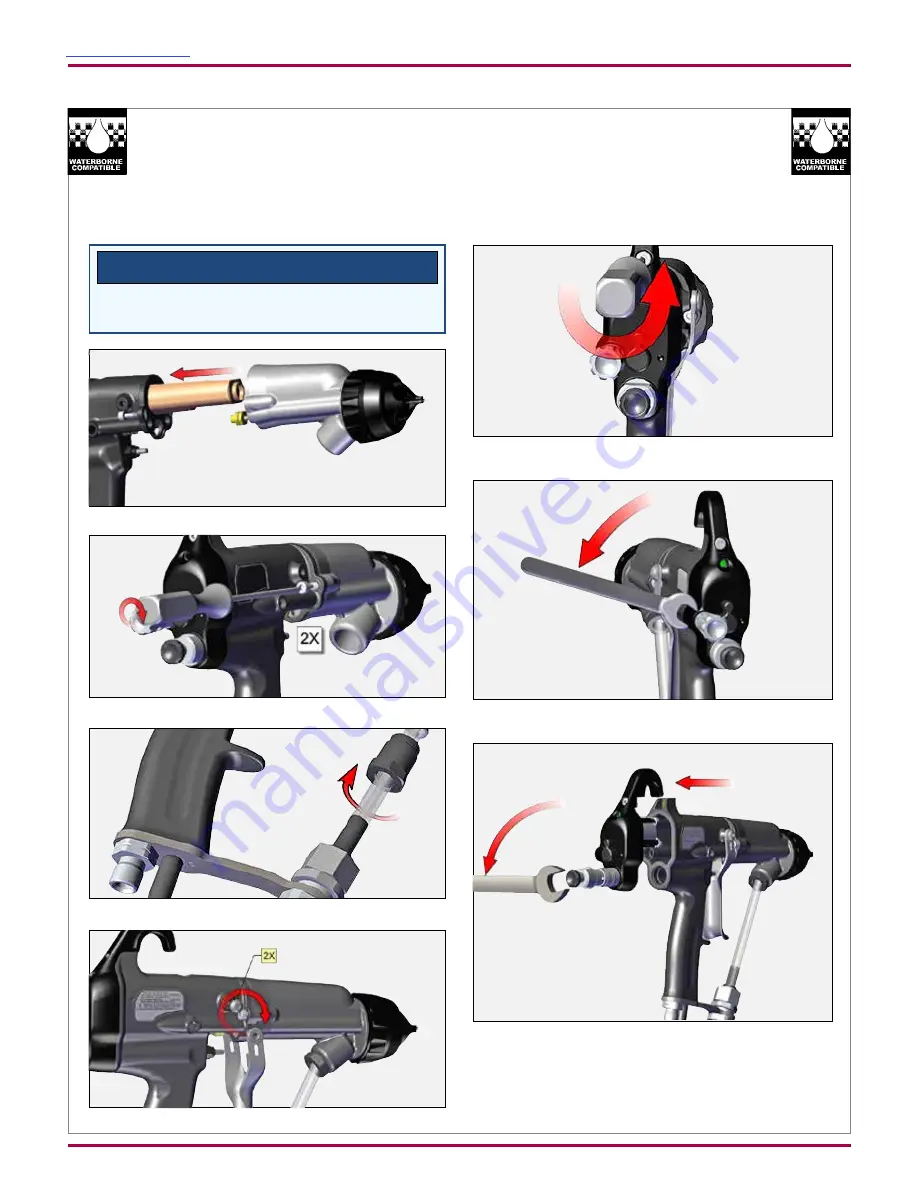
Rear Cover/Motor Module Repair

1.  Loosen cover screw with 3mm driver.

2.  Remove fan air cartridge with 10mm wrench.

3.    Remove rear cover and cartridge with 15mm wrench.

4.    Disconnect motor connector from handle wire harness 

connector and remove rear cartridge.

NOTE


†

The gasket between the handle and barrel is  reu-

seable. It should only be replaced if torn or damaged.

Return To Contents

AH-17-04-R0.0  (11/2017)

35 / 59

www.carlisleft.com

MAINTENANCE

Summary of Contents for Ranflex 81345 RFX

Page 1: ...UTIONS starting on page 3 and all instructions in this manual Keep this Service Manual for future reference MODEL 81520 RFXw APPLICATORS By Ransburg FOR DIRECT CHARGE WATER BASED APPLICATORS AH 17 04...

Page 2: ...ne Isolation System Installation Guidelines 19 Applicator Installation 19 OPERATION 21 27 Applicator Operation 21 Flushing Color Change Procedure 23 Fluid Nozzle Air Cap 24 New Nozzle Design 24 Air Ca...

Page 3: ...priateRansburg equipment manuals to reconcile such differences Careful study and continued use of this manual will provide a betterunderstandingoftheequipmentandprocess resulting in more efficient ope...

Page 4: ...y booth ventilation must be kept at the rates required by NFPA 33 OSHA country and local codes In addition ventilation must be maintained during cleaning operations using flammable or combustible solv...

Page 5: ...ertent arcing that is capable of causing fire or explosion is lost if the current overload sensitivity is not properly set Frequent power supply shutdown indicates a problem in the system which requir...

Page 6: ...aring or carrying any ungrounded metal objects When using an electrostatic handgun operators must assure contact with the handle of the applicator via conductive gloves or gloves with the palm section...

Page 7: ...ntact with the skin Follow the requirements of the Safety Data Sheet supplied by coating material manufacturer Adequate exhaust must be provided to keep the air free of accumulations of toxic material...

Page 8: ...ocumentation 8 The certification of this equipment relies upon the following materials used in its construction If the equipment is likely to come into contact with aggressivesubstances thenitistheres...

Page 9: ...is sprayed meets this requirement FM 7260 waterbased spray material a material that does not sustain burning when tested in accordance with ASTM D 4206 ATEX Requirements This product provides a direc...

Page 10: ...RFXw WATER BASE ONLY 81520 Base Model No Optional Designations ABC0EF Ordering Information Only CONFIGURATION DWG 81521 00 REV A F E A C B Return To Contents AH 17 04 R0 0 11 2017 10 59 www carlisleft...

Page 11: ...tion ATOMIZATION TABLE OF A DASHES R S T 0 V SERIES 1 2mm 80265 00 80264 12 79809 00 1 V SERIES 1 4mm 80265 00 80264 14 79809 00 2 V SERIES 1 8mm 80265 00 80264 18 79809 00 3 C SERIES 1 2mm 80231 00 8...

Page 12: ...10 80868 00 3 STANDARD AIR HOSE 15m 80558 15 80868 00 4 STANDARD AIR HOSE 20m 80558 20 80868 00 5 NO AIR HOSE QD 80869 00 6 QD AIR HOSE 10m 80558 06 80869 00 7 QD AIR HOSE 10m 80558 11 80869 00 8 QD...

Page 13: ...7mm 80265 00 Black 80264 10 V SERIES 1 0mm 80265 00 Black 80239 07 T SERIES 0 7mm 80240 00 Black 80239 10 T SERIES 1 0mm 80240 00 Black Description Nozzle Color For Use With Return To Contents AH 17...

Page 14: ...the resistive charging electrode is limited to the optimum level of safety and efficiency The system is incapable of releasing sufficient electrical or thermal energy during normal operating conditio...

Page 15: ...oz Hose 80558 XX Lengths Std 5m 10m 15m and 20m Operating Voltage 65kV DC maximum Current Output 120 microamperes maximum Paint Resistance Water base paint only Part Sprayability Determine sprayabilit...

Page 16: ...2 Barrel 3 Handle 4 Fan Adjustment 5 Fluid Adjustment 6 Air Hose 7 Exhaust Air Hose 8 Waterborne Fluid Hose 9 Voltage On Off Switch 10 Trigger 11 Compensation Valve 12 Air Cap Fluid Nozzle Figure 1 Ra...

Page 17: ...Fluid Supply Grounded 7 Fluid Regulator 8 Air Hose 80558 XX 9 Air Hose Ground Wire 10 Isolated Waterborne Hose 11 Voltage Isolation Protection Figure 2 RansFlex Typical Waterborne Installation RANSFL...

Page 18: ...e equipment malfunction that might create HAZARDOUS CONDITIONS W A R N I N G Air Hose For proper safe function of the applicator and operator the 80558 XX Air Hose Assembly must be used either standar...

Page 19: ...the solvent supply with the main supply air to the applicator When solvent is On main supply air to the applicator is Off Interlocks are user supplied WATERBORNE ISOLATION SYSTEM INSTALLATION GUIDELI...

Page 20: ...r 4 Trigger applicator with fluid off Look for leaks in any connections 5 Activate fluid check for leaks with solvent flush if required Return To Contents AH 17 04 R0 0 11 2017 20 59 www carlisleft co...

Page 21: ...discharged from system 2 Disconnect the air to the applicator 3 Activate trigger to start material stream into grounded metal bucket or suitable area 4 Release trigger stop material flow 5 Re connect...

Page 22: ...applicator with voltage off to spray test pattern 9 As a guide the tables below show a pressure at the wall to give 2 7 bar 40 psig dynamic at the handle of the applicator with different hose lengths...

Page 23: ...ith small driver FLUSHING COLOR CHANGE PROCEDURE 1 Turn off electrostatics 2 Disconnect air to applicator OR 3 Discharge fluid into appropriate earth grounded metal container 4 Load next color solvent...

Page 24: ...guration of nozzles was also released Red nozzles 1 2 mm I D Grey nozzles 1 4 mm I D Green nozzles 1 8 mm I D All other accessory sizes are black Air cap to be used with nozzle Air cap part number 20...

Page 25: ...P N Color Nozzle Opening 80264 07 80265 00 Black 0 7 mm 80264 10 80265 00 Black 1 0 mm 80264 12 80265 00 Red 1 2 mm 80264 14 80265 00 Grey 1 4 mm 80264 18 80265 00 Green 1 8 mm NOZZLE SELECTION 80265...

Page 26: ...2 mm 80239 14 80240 00 Grey 1 4 mm 80239 18 80240 00 Green 1 8 mm 80240 00 80239 XX T SERIES Nozzle Part Number For Use With Air Cap P N Color Nozzle Opening 80230 12 80231 00 Red 1 2 mm 80230 14 8023...

Page 27: ...livery ml min Spray Type Pattern Length mm in Pressure Reducer Pattern Width mm in 80230 12 1 2 047 250 Air Spray 350 14 0 76 3 0 79809 03 White 80230 14 1 4 055 250 Air Spray 330 13 0 76 3 0 79809 03...

Page 28: ...will effect efficiency of the applicator and cause damage to the components CAUTION All electrical components cannot be cleaned or soaked in any solvents SUITABLE SOLVENTS FOR CLEANING RANSFLEX APPLI...

Page 29: ...ked with dielectric grease LSCH0009 00 leaving NO air space or voids when assembling All O Rings PTFE o rings do not need lubrication Needle Shaft Assembly Packing Tube Cascade and Barrel Equipment Re...

Page 30: ...d objects Inspect work holders for accumulated coating materials and remove such accumulations Check that atomizer assembly is clean and undamaged Straighten the applicator electrode if necessary Clea...

Page 31: ...on O ring and then 1 8 additional turn 2 Clean and replace as necessary 3 Install in reverse order Barrel Removal 1 Remove trigger W A R N I N G NOTE Prior to removing the fluid nozzle all pressure fr...

Page 32: ...s necessary 4 Apply LSCH 0009 grease to end of cascade Remove Replace Cascade 1 Pull cascade straight out CAUTION Do not pull with excessive force or twist wires This could damage casscade connector o...

Page 33: ...polar solvent Inspect for any discolored areas Replace parts as required 6 Prior to installation apply dielectric grease inside packing tube completely full 7 Insert parts on front of shaft 8 Insert p...

Page 34: ...Needle Shaft Into Barrel 1 Install needle shaft into barrel with die electric grease 2 Tighten packing using wrench Pull back and forth on the needle shaft till a slight amount of drag is felt 0 3 Sq...

Page 35: ...ith 3mm driver 2 Remove fan air cartridge with 10mm wrench 3 Removerearcoverandcartridgewith15mmwrench 4 Disconnectmotorconnectorfromhandlewireharness connector and remove rear cartridge NOTE The gask...

Page 36: ...e porting block 5 Remove fluid valve cartridge O ring NOTE Block must be pulled out with fingers rocking the part side to side while pulling NOTE Only remove fluid valve cartridge if parts are being c...

Page 37: ...into porting recess 2 Align motor slots with 3 tab arms 3 Install cartridge then o ring if removed 4 Install screw and retainer 5 Install light pipe When re assembling the rear cover carefully insert...

Page 38: ...emove rear cover assembly 3 Remove air valve and spring 4 Remove air valve packing nut and packing 9 Tighten cover screw 6 Install gasket and re connect motor connector to handle harness connector Thi...

Page 39: ...le moving it back and forth Fluid Bracket Removal 1 Remove nut and ferrules 2 Remove air fitting 7 Install rear cover assembly 8 Install trigger 3 Remove bracket gasket and hose assembly 4 Remove fitt...

Page 40: ...d bracket Hose Cut Dimensions If the water base hose is serviced for any reason the cut dimensions are shown below 1 Conductive Sheath 2 Outer Jacket 3 Hose NOTE This gasket is reuseable It should onl...

Page 41: ...Wrench Functions 80353 00 1 Adjust packings 2 Remove nozzles For C T Series For V Series 3 Air fiting 4 Remove rear cartridge Return To Contents AH 17 04 R0 0 11 2017 41 59 www carlisleft com MAINTENA...

Page 42: ...is properly tightened Ensure air before fluid is properly adjusted Spray Performance On Off lever in wrong position Low pressure No ground connection Cascade not functioning Failed motor function Too...

Page 43: ...00 80264 14 79809 00 YELLOW 2 V SERIES 1 8mm 80265 00 80264 18 79809 00 YELLOW 3 C SERIES 1 2mm 80231 00 80230 12 79809 03 WHITE 4 C SERIES 1 4mm 80231 00 80230 14 79809 03 WHITE 5 C SERIES 1 8mm 8023...

Page 44: ...15m 80868 00 80558 15 4 STANDARD AIR HOSE 20m 80868 00 80558 20 5 NO AIR HOSE QD 80869 00 6 QD AIR HOSE 5m 80869 00 80558 06 7 QD AIR HOSE 10m 80869 00 80558 11 8 QD AIR HOSE 15m 80869 00 80558 16 9...

Page 45: ...TAINING RING 80377 00 Qty Part No 1 80377 00 NUT RETAINING O RING ASSEMBLY CONTAINS ALL PARTS 1 2 LSOR0005 17 O RING ENCAPSULATED 1 2 1 Return To Contents AH 17 04 R0 0 11 2017 45 59 www carlisleft co...

Page 46: ...D RETURN 1 6 80250 65 ASSEMBLY CASCADE RFX 65 kV 1 1 80489 00 BARREL 65kV INCLUDES O RING 1 2 79001 07 O RING SOLVENT PROOF 1 Item No Description Qty Part No RFXw 65kV BARREL Item No Description Qty P...

Page 47: ...6 80225 65 NEEDLE SHAFT ASSEMBLY 1 7 79001 06 O RING SOLVENT PROOF 1 8 78629 00 RETAINER NEEDLE SEAL REAR 1 9 10051 05 CUP SEAL SPRING LOADED 1 10 78630 00 SPACER SEAL 1 11 17390 04 WASHER SPRING BELV...

Page 48: ...HOSE WATER BASE 3 16 ID 1 80501 XX FLUID HOSE WATER BASE 1 4 ID 4 EMF 203 05 FERRULE FRONT 1 4 05 IS P N 1 5 EMF 202 05 FERRULE BACK 1 4 05 IS P N 1 6 80346 01 NUT CONNECTOR HOSE WATER BASE 1 7 80268...

Page 49: ...CONTROL 1 80262 01 ASSEMBLY VALVE NON ADJUSTABLE FLUID CONTROL 1 5 80273 00 ASSEMBLY VALVE FAN AIR 1 6 80378 00 REAR COVER AND MOTOR ASSEMBLY 1 7 80732 00 GASKET REAR 1 Item No Description HANDLE WITH...

Page 50: ...BARREL HANDLE 2 3 80229 00 NUT RETAINING AIR VALVE 1 4 10051 05 CUP SEAL SPRING LOADED 1 1 80262 00 ASSEMBLY FLUID CARTRIDGE INCLUDES ALL PARTS BELOW 1 2 79001 08 O RING SOLVENT PROOF 3 Item No Descri...

Page 51: ...1 2 79001 16 O RING SOLVENT PROOF 1 1 80262 01 ASSEMBLY FLUID CARTRIDGE NON ADJUSTABLE 1 2 79001 08 O RING SOLVENT PROOF 3 Item No Description REAR CARTRIDGE ASSEMBLY 80262 01 NON ADJUSTABLE FLUID CON...

Page 52: ...REAR ASSEMBLY INCLUDES ALL PARTS BELOW 1 2 80213 00 PIPE LIGHT 1 3 80255 00 ASSEMBLY MOTOR 1 4 79775 00 BLOCK PORTING 1 5 7554 61 O RING SOLVENT RESISTANT 1 6 80275 00 SCREW 1 7 80219 00 BRACKET LOCKI...

Page 53: ...0 MOTOR ASSEMBLY Qty Part No 1 80255 00 ASSEMBLY MOTOR INCLUDES ALL PARTS BELOW 1 2 80217 00 COVER SUPPORT MOTOR 1 3 79796 00 SCREW MOTOR 3 Return To Contents AH 17 04 R0 0 11 2017 53 59 www carlislef...

Page 54: ...escription 80254 00 REAR COVER ASSEMBLY Qty Part No 1 80254 00 COVER REAR CONTAINS PARTS BELOW 1 2 80274 00 M4 X 7 SHCS 1 Return To Contents AH 17 04 R0 0 11 2017 54 59 www carlisleft com PARTS IDENTI...

Page 55: ...80499 10 1 4 ID HOSE 1 80499 15 1 4 ID HOSE 1 2 10553 05 NUT SPECIAL 1 3 3587 02 NUT NYLO SEAL TUBE FITTING 1 4 72310 00 BULKHEAD CONNECTOR ASSEMBLY 1 5 72315 00 FERRULE CONDUCTOR 1 6 6241 06 CONNECTO...

Page 56: ...02 Spayability and SCI Paint Test Meter 76652 03 Paint Resistivity Sprayability 76652 04 Deluxe Kit 80464 14 Nozzle Fluid High Wear for 80265 00 1 4 mm 80464 18 Nozzle Fluid High Wear for 80265 00 1 8...

Page 57: ...n Kit Contains 1 80240 00 Air Cap 2 80239 14 Nozzle and 1 74963 05 Restrictor 80401 31 C Series Atomization Kit Contains 1 80231 00 Air Cap 2 80230 14 Fluid Nozzle and 1 79809 03 Restrictor 70430 01 K...

Page 58: ...Models 1 80745 00 Gasket Barrel 1 80265 00 Air Cap V Series 2 80231 00 Air Cap C Series 2 80240 00 Air Cap T Series 2 80377 00 Nut Retaining Air Nozzle 1 EMF 201 04 Nut Hex Nylon 2 EMF 202 04 Ferrule...

Page 59: ...technical assistance or to locate an authorized distributor contact one of our international sales and customer support locations Carlisle Fluid Technologies reserves the right to modify equipment sp...

Reviews: