R80EX Tire Changer
17
P/N 5900087 — Rev. B — Jan. 2020
To install the Bead Breaker Mechanism
:
1.
Take the protective wrapping off the Bead Breaker Mechanism.
Make sure to locate the Blade Tension Spring; it is small and easy to lose.
2.
On the Tire Changer, take off all of the components of the Arm Pin Bracket Assembly and the
Nyloc Nut on the end of the Cylinder Shaft.
Keep everything nearby; you will be putting them back into place soon.
3.
Pick up the Bead Breaker Mechanism, move the Arm Pin Hole into where you removed the Arm
Pin Bracket Assembly, then put the Arm Pin into place through the Arm Pin Hole when the holes
are aligned.
⚠
CAUTION
Ranger recommends having at least two people install the Bead Breaker
Mechanism; one person to hold it in position, the other to align the holes and put
the Arm Pin into position.
4.
Put the Arm Pin Bracket Assembly back into place, then securely tighten the Socket Head Cap
Screw and washers on the side of the Assembly using a 6 mm hex key.
5.
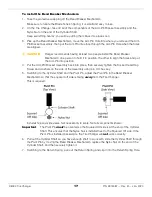
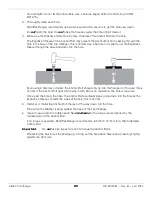
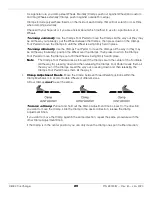
Switching to the Cylinder Shaft and the Pivot Pin, adjust the Pivot Pin in the Bead Breaker
Mechanism so that the squared-off side is facing
away
from the Tire Changer.
This is required.
Includes top and side views. Not necessarily to scale. Not all components shown.
Important
: The Pivot Pin
must
be oriented so the Squared Off side is at the end of the Cylinder
Shaft. This ensures that the Nyloc Nut is installed next to the Squared Off side. If the
Pivot Pin is installed backwards, the Tire Changer will
not
work correctly.
6.
Pull out the Cylinder Shaft so you have enough shaft to work with, slide the Cylinder Shaft through
the Pivot Pin by moving the Bead Breaker Mechanism, replace the Nyloc Nut on the end of the
Cylinder Shaft, and then securely tighten it.
7.
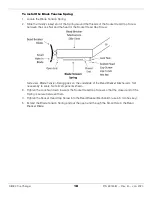
Switching to the Return Spring, pull out the Return Spring and clip it into the Return Spring Hole.

