21
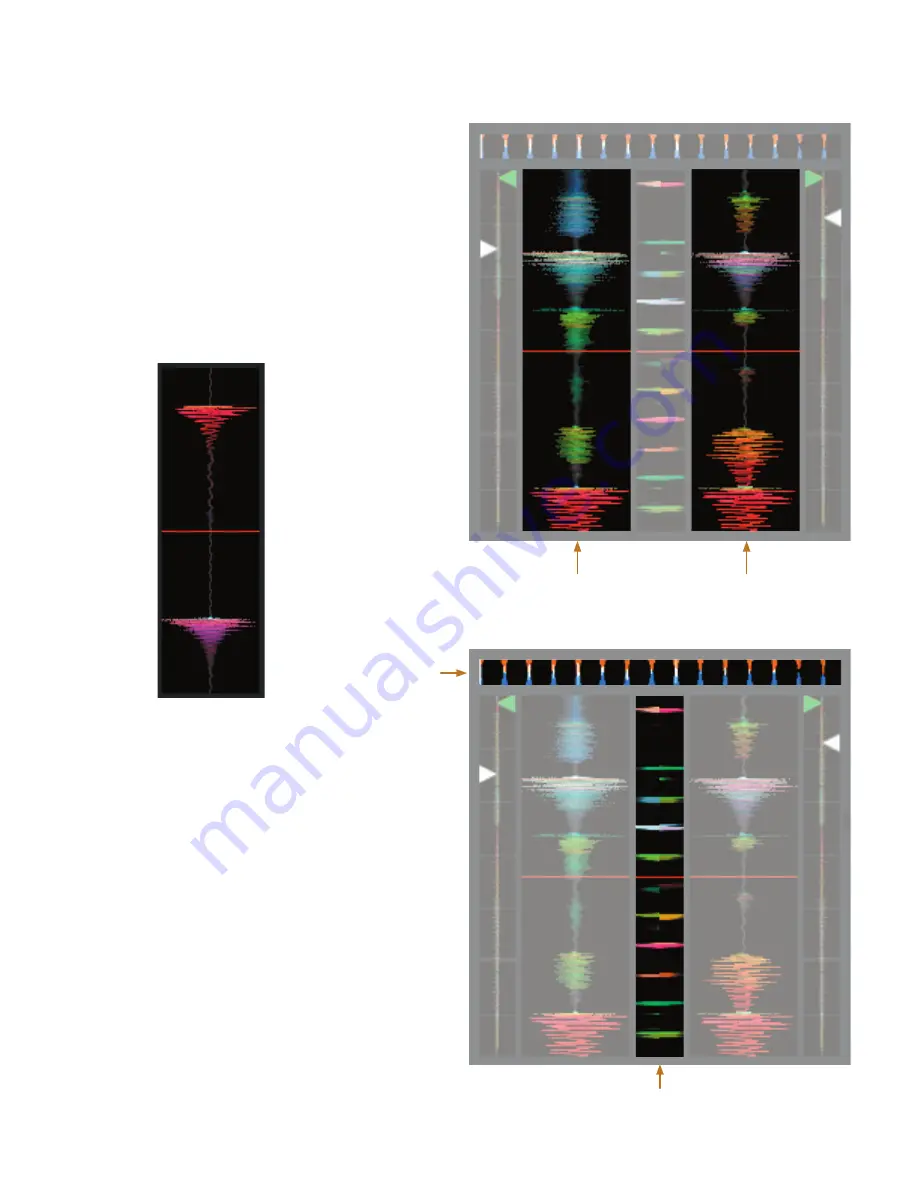
Main Waveform display
This view provides a close-up view of the track, including color-
coding to show the frequency of the sound; red representing low-
frequency bass sounds, green representing mid-frequency sounds
and blue representing high-frequency treble sounds.
You can also switch to a three-band spectrum view by holding
the
crtl
key and clicking on the waveform.
Click on the waveform to ‘scrub’ or make fine adjustments
to your position within the track. This applies to
internal
mode
only, and may be useful if you wish to set cue points in your
tracks without turntables or CD players connected. The Main
Waveform is zoomed around the current position in the track.
See also:
Internal mode
on page 24.
Cue points
on page 25.
Tip: Use the + and – keys to zoom in and out.
In the example below, the red part of the wave represents a
kick drum, while the purple part represents a snare drum.
Kick Drum
Snare Drum
Beat Matching display
This view shows the position of beats within the track. When
beat matching, this view helps align the downbeats of the two
tracks. The markers are matched up when the two tracks are beat
matched.
Example
The following is a demonstration of using the visual aids to help
beat match. In this example, the track that is playing is on the left
deck, and the track to be mixed in is on the right deck.
1.
Start the track playing on the right deck. After a few seconds,
blue peaks appear in the
Tempo Matching
display.
2.
Adjust the pitch of the right turntable until the blue peaks sit
under the orange peaks in the
Tempo Matching
display. Once
they are aligned, the two tracks have the same tempo.
3.
Next align the markers in the
Beat Matching
display. Watch
the color of the items passing by in the
Main Waveform
dis-
play. Remember that a kick or bass drum will be red in color,
and a snare drum will be green or blue.
This technique will by no means guarantee perfect mixes, but
may help to speed up the process of beat matching.
Main waveform display
Beat matching display
Tempo Matching display


