background image

AutoRAE Lite User’s Guide 

11 

8  Transferring Data 

 
Bump test and calibration data is collected each time a ToxiRAE 3 is bump tested or calibrated. The 
AutoRAE Lite collects this data and event data and stores it on an SD Card, providing a convenient 
means of storage and easy data transfer. 

8.1  Transferring Data From The SD Card To A Computer 

 
The data stored on the SD card in the AutoRAE Lite is in standard ASCII text format, making it easy 
to import into most spreadsheet and word-processing programs. In addition, it is in CSV (comma-
separated value) form, so that it can be easily put into existing spreadsheets (such as Microsoft 
Excel

®

) or into columns in word-processing programs. 


Important!

 In order for AutoRAE Lite to work correctly, it is recommended that you clear the SD 

card’s (30 days maximum). 
 
Some computers and external hard drives have ports that accept SD cards directly. For computers that 
do not have an SD port, inexpensive converters designed to accept an SD card and plug into a USB 
input are widely available (at electronics stores, camera stores, etc.). 
 
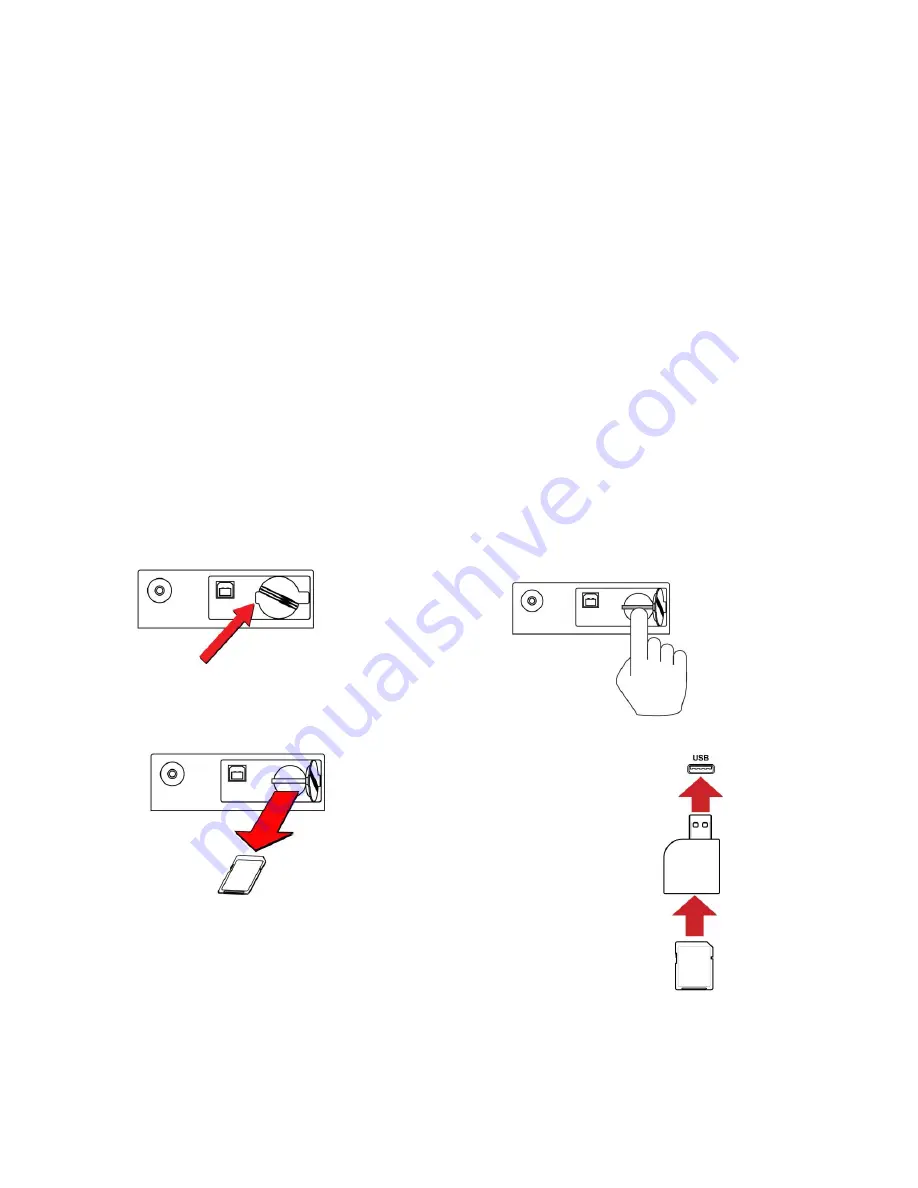
Follow this procedure for removing the SD card from the AutoRAE Lite and connecting it to a 
compute for data transfer: 


WARNING! 

Do not remove the SD card from the AutoRAE Lite during a bump test or calibration. After the two 
LEDs above the buttons glow green, it is safe to remove the SD card.

Pry up the corner of 
the protective cover 
and open it. 

Press the 
card and 
release it. 

After the card ejects, 
pull it out of the slot. 

Place the SD 
card into an 
adapter and 
plug it into the 
USB port of a 
computer. 

Summary of Contents for AutoRAE Lite

Page 1: ...AutoRAE Lite User s Guide Rev C June 2014 P N T01 4007 000...

Page 2: ...Copyright 2014 RAE Systems Inc...

Page 3: ...tility Program User Interface 19 9 3 1 Menu Bar 20 9 3 2 Toolbar 21 9 4 Using The AutoRAE Lite Utility Program In User Mode 21 9 4 1 Without A ToxiRAE 3 In The Dock 21 9 4 2 With A ToxiRAE 3 In The Do...

Page 4: ...and their components at end of life This symbol crossed out wheeled bin indicates separate collection of waste electrical and electronic equipment in the EU countries This product may contain one or m...

Page 5: ...at surface or mounted on a wall Wall mounting instructions are included in this guide In addition it can be powered by either an AC adapter or four alkaline C cell batteries Front View gas cylinder re...

Page 6: ...nnection P N 410 0086 000 12 volt power supply P N 500 0036 100 Demand flow regulator P N 490 0053 000 SDHC memory card P N 550 0301 000 Quick Start Guide P N T01 0901 000D Inlet filter P N 002 3022 0...

Page 7: ...into the wall and inserting screws to hold the AutoRAE Lite Important Make sure the wall is strong enough to support the weight of the AutoRAE Lite and a cylinder of calibration gas If necessary mount...

Page 8: ...ize batteries instead of the AC adapter Always use high quality alkaline batteries The battery compartment is located on the end of the AutoRAE Lite Open and remove the door by pulling up on the latch...

Page 9: ...eplaced Note The AutoRAE Lite is designed to accommodate a 58L cylinder of calibration gas It can also accommodate a 34L cylinder but an adapter sleeve is recommended in order to keep the cylinder sec...

Page 10: ...on a regular basis is recommended This enhances data security and speeds the data transfer process IMPORTANT The AutoRAE Lite cannot perform a bump test or calibration without an SD card in its slot S...

Page 11: ...and blinks or glows red continuously Replace the SD card with another with more space on it or offload the data to a computer Then erase the data from the card using your computer and reinsert the SD...

Page 12: ...button until its display shows Ir 3 Firmly press the ToxiRAE 3 face down in the dock on the AutoRAE Lite The two LEDs above the buttons should glow green If not make sure the ToxiRAE 3 is firmly seate...

Page 13: ...er External power or battery OK N A N A Bump Fail Pass N A Processing Cal Fail Pass N A Processing Service Request No SD card or communication failure or SD card space is very low N A N A SD card is l...

Page 14: ...tant In order for AutoRAE Lite to work correctly it is recommended that you clear the SD card s 30 days maximum Some computers and external hard drives have ports that accept SD cards directly For com...

Page 15: ...t should show up as an external device or a drive 1 Double click the Computer icon on your desktop When it opens you should see a list of drives including your C where most programs reside and the ext...

Page 16: ...ted each time the AutoRAE Lite was turned off or the SD card was inserted 4 Create a new folder on your desktop or elsewhere on your computer 5 Drag the file s from the SD card into the folder on your...

Page 17: ...n place the SD card back into the AutoRAE Lite and resume collecting data from bump tests and calibrations New files will not overwrite old ones If the SD card is full or you want to retain it as a ph...

Page 18: ...RAE 3 monitors as you want 9 1 Computer Setup And AutoRAE Lite Utility Program Installation 1 Install the USB driver following the instructions on the RAE Systems website or on the utilities disc that...

Page 19: ...the port for the AutoRAE Lite plus its port number for example COM6 Write down this port number you will need it when you start AutoRAE Lite Utility Program 7 Close Device Manager and System Propertie...

Page 20: ...our computer s port make sure the AutoRAE Lite is on and that the USB cable between it and the computer is connected Double click the AutoRAE Lite Utility Program icon on your desktop to start the pro...

Page 21: ...when you went into the computer s System Properties Click OK Note If there is a problem you will see this message Double check your COM port choice Also make sure the USB cable is connected to the Au...

Page 22: ...f a menu bar toolbar and a left selection navigation pane and two right information panes for synopsis and information In addition when the program is in Admin istrator Mode the lower right pane becom...

Page 23: ...3 s parameters Setup Port Set the COM communication port Get Configurations Open saved configurations in the program window Operation Mode Go to User Mode or Administrator Mode Load Monitor Configura...

Page 24: ...ide quick convenient way to activate major functions Note that the Configuration icon is not functional in User Mode and is therefore grayed out 9 4 Using The AutoRAE Lite Utility Program In User Mode...

Page 25: ...d from the AutoRAE Lite including Instrument Name Serial Number and Firmware Version It also provides functional information including Working Status and Power Status battery or external power Finally...

Page 26: ...3 Press and hold Y until you see Ir 4 Place the ToxiRAE 3 into the AutoRAE Lite s dock 5 At the menu bar pull down Operation and select Get Configurations As the connection is being made and the Auto...

Page 27: ...a about the AutoRAE Lite Note When the AutoRAE Lite is running on its charger with an AC power source External Power is shown in the box next to Power If the AutoRAE Lite is running on its batteries a...

Page 28: ...appears to be an editable format but is grayed out indicating that it is read only To change settings in this pane the AutoRAE Lite Utility Program must be in Administrator Mode 9 4 3 Getting Events...

Page 29: ...other two panes data The upper right pane provides a synopsis of the data about the sensor that was transferred from the ToxiRAE 3 to the AutoRAE Lite Utility Program Included are the last calibratio...

Page 30: ...settings and the calibration span concentration The lower right pane shows the information in an editable format but is grayed out indicating that it is read only To change settings in this pane the...

Page 31: ...ick on the ToxiRAE 3 icon in the left pane 2 Pull down the File menu and click Save 3 When the Save As dialog box appears find a location where you want to save the Monitor Configuration File 4 Name t...

Page 32: ...monitors It also allows you to change settings and synchronize an AutoRAE Lite s time to a computer 9 6 1 Entering Administrator Mode After you start the AutoRAE Lite Utility Program you must enter a...

Page 33: ...ave it Once your password is accepted the pop up dialog box disappears and the main screen is shown Click Get Configurations As the connection is being made and the AutoRAE Lite configuration data is...

Page 34: ...ws the lower right pane in an editable form You can now edit Gas Lot No Gas Lot number as shown on the side of a gas cylinder Clock From PC Synchronize the clock in the AutoRAE Lite to the PC s time C...

Page 35: ...Sensor Reading Tells the ToxiRAE to show the sensor reading always or only when an alarm sounds Password Changes the password in the ToxiRAE 3 When you click Set the parameter changes are set in any...

Page 36: ...an index of events with sensor type date time type of event and reading The number of events indexed depends on the number of alarm events that have taken place in the ToxiRAE 3 Therefore the list can...

Page 37: ...interval until the monitor requires calibration Bump Date Interval Shows the bump date and sets the bump interval Alarm Levels Sets the threshold concentrations at which the High Low STEL and TWA alar...

Page 38: ...meters are transferred to the ToxiRAE 3 automatically 3 Remove the ToxiRAE 3 4 Place another ToxiRAE 3 in the dock 5 Press Set If the parameters are successfully transferred you see this dialog box 6...

Page 39: ...rs to use a single configuration Note You can only load a configuration file if the AutoRAE Lite Utility is in Administrator Mode Once you have provided a password and have entered Administrator Mode...

Page 40: ...p window so that you can ensure that you have the correct configuration file and that its parameters are the ones you want to load into the AutoRAE Lite Utility and eventually into your monitors Impor...

Page 41: ...website or from a disc to your computer follow these steps 1 Connect the AutoRAE Lite to the computer using a USB cable 2 Power up the AutoRAE Lite make sure it has batteries in it or has its AC adap...

Page 42: ...9 5 A pop up window appears reminding you to unplug the USB cable when you are done updating the firmware Click OK 6 The RAE Programmer 7000 dialog box appears Set the COM port to match your current c...

Page 43: ...cate the firmware update file on your computer it has a rfp suffix 9 Once you select the file click Open RAE Programmer 7000 opens 10 Click Go to start updating the firmware You receive the message Pr...

Page 44: ...times for transferring data 11 1 Checking Whether An SD Card Needs Formatting If the AutoRAE Lite s Service Requested LED blinks orange or if you are using a new SD card for the first time the SD car...

Page 45: ...re on it cannot be recovered Always make a backup of the data on an SD card before reformatting it 1 Make sure the SD card is not locked 2 Place the SD card into an adapter and connect it to a compute...

Page 46: ...use the disk If the disk is formatted for any other file system FAT or FAT 16 for example you should reformat it for FAT 32 Note If the disk is formatted for FAT 32 and you simply want to reformat th...

Page 47: ...lick Start It does not matter whether you select Quick Format so leave it unchecked 11 A pop up window warns you that everything on the disk will be erased during formatting If you do not want to cont...

Page 48: ...er s Guide 45 12 Formatting should take less than one minute When the operation is complete you see this message 13 Click OK The SD card can now be used in the AutoRAE Lite Remove it and place it in t...

Page 49: ...all obstructions If debris is lodged in any portion of the AutoRAE Lite and cannot be removed by compressed air or soft cloth refer it to qualified service personnel Inspect the AC adapter s wires the...

Page 50: ...line Solutions Check that calibration tank has sufficient gas it should register 50psi Remove ToxiRAE 3 and check that it is clean and that the dock area is also clean Try a calibration tank known to...

Page 51: ...e User s Guide 48 14 Support To contact the RAE Systems Technical Support Team Monday through Friday 7 00AM to 5 00PM Pacific US Time Phone toll free 1 888 723 4800 Phone 1 408 952 8461 Email tech rae...

Page 52: ...77 orders raeeurope com sales raeeurope com service raesystems com Web www raesystems eu RAE Systems UK Ltd D5 Culham Innovation Centre Culham Science Centre Abingdon Oxon OX14 3DB United Kingdom Phon...

Page 53: ...y Dubai Silicon Oasis Dubai United Arab Emirates Phone 97143424344 Fax 97143424330 Email mesales raesystems com RAE Systems Hong Kong Ltd Room 8 6 F Hong Leong Plaza 33 Lok Yip Road Fanling N T Hong K...

Page 54: ...tems com RAE Systems Europe Kirstineh j 23A DK 2770 Kastrup Denmark Tel 45 8652 5155 Fax 45 8652 5177 RAE Systems Hong Kong Ltd Units 1516 18 15 F Delta House 3 On Yiu Street Shatin N T Hong Kong Web...

Reviews: