background image

26

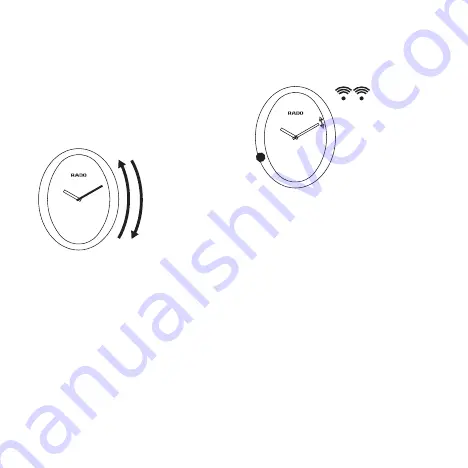
2b. Setting the minutes

Slide your finger along the right hand side of 
the case clockwise = + 1 minute or anti-
clockwise = - 1 minute.

- 1 mn

+ 1 mn

3. Confirmation / Exit setting mode

Touch the case at 8 o’clock for approxi-
mately 2 seconds to confirm the changes 
made to the time setting in step 2. The min-
ute hand will move slightly and the watch 
will emit two ‘beeps’. Setting mode is now 
deactivated.


2 s

Without this confirmation, the watch will 
automatically exit setting mode after 
10 seconds and will not retain the changes 
made in Step 2. The watch will return to the 
previous time setting.

Summary of Contents for Captain Cook Automatic Bronze

Page 1: ...PRODUCT INFORMATION ...

Page 2: ...ith a metallic alloy Light and adaptable to skin temperature it has the same qualities and benefits as high tech ceramic enhanced by a metallic luster CARBON DIFFUSED STEEL Through the diffusion of a high quantity of carbon at a low temperature this treatment makes it possible to harden the surface of steel parts SAPPHIRE CRYSTAL High tech sapphire crystal is used through out our collection The ap...

Page 3: ...aterials may break PRECIOUS STONES The name Jubilé refers to all the Rado products with diamonds or other precious stones Depending on the model the name Jubilé may or may not figure on the dial Details regarding the precious stones used on Jubilé watches may be found on the accompanying Precious Stone Certificate The quality of a diamond is defined by 4C s Carat Clarity Color and Cut CARAT The we...

Page 4: ...ry must be changed when the seconds hand starts to move in 4 second intervals or when on a multifunction watch the digital display begins to blink Battery exhaustion in a watch without a seconds hand becomes apparent only when the hands stop moving altogether Battery changes should only be performed by an authorized Rado dealer or Service Center to ensure that only original parts are used and that...

Page 5: ...6 hours If the watch stops e g if it has not been worn for some time or during periods of low activity it should be wound manually To wind an automatic watch man ually place the crown in position 1 Turn the crown forwards several times IMPORTANT Magnetic fields can affect the accuracy of the watch NOTE Date setting is not recommended between 8 pm and 2 am SWISS PRECISION The name Rado guarantees a...

Page 6: ...lowing must be observed after every operation involving the crown return it to position 1 or screw it back in by pressing and turning it forwards simultaneously Avoid shocks to the crown Do not use either the crown or chronograph pushers underwater TEMPERATURE Avoid exposing your Rado watch to extreme temperatures higher than 60 C 140 F or lower than 0 C 32 F extreme changes in temperature or high...

Page 7: ... can differ and the colour may vary slightly To preserve the condition of your leather strap for as long as possible please avoid contact with water dampness prolonged exposure to sunlight or with greasy sub stances and cosmetic products SKIN FRIENDLINESS For Rado luxury means not only beauty and exquisite materials but also personal comfort Apart from ensuring durability our high tech materials e...

Page 8: ...18 ...

Page 9: ...OPERATING INSTRUCTIONS ...

Page 10: ...age 34 290 ________________________ page 47 291 ________________________ page 21 312 ________________________ page 37 318 322 ____________________ page 23 370 ________________________ page 39 420 ________________________ page 23 510 ________________________ page 57 538 539 ____________________ page 37 541 ________________________ page 39 542 ________________________ page 37 550 557 561 580 _______...

Page 11: ...d in against the case position 1 the crown ensures that the watch is water resistant if not damaged 2 To set the date Pull the crown out to position 2 turn it forwards or backwards depending on the movement to the desired date Push the crown back to position 1 3 To set the time Pull the crown out to position 3 and turn it forwards or backwards to the desired time If the watch is equipped with a se...

Page 12: ...te of the last full moon Turn the crown backwards again until the moon is in the position indicated on the calendar Turn the crown forwards until the desired date is displayed Press the crown back into position 1 3 To set the time Pull the crown out to position 3 and turn it forwards or backwards to set the desired time If the watch is equipped with a seconds hand accept by pushing the crown back ...

Page 13: ... back to position 1 to coincide with a given time sig nal QUARTZ WATCHES WITHOUT DATE DISPLAY CALIBERS 080 140 150 153 318 322 420 963 THE CROWN HAS 2 POSITIONS 1 Normal position When pressed in against the case position 1 the crown ensures that the watch is water resistant if not damaged 2 To set the time Pull the crown out to position 2 and turn it forwards or backwards to set the desired time I...

Page 14: ...ting QUARTZ WATCHES WITHOUT CROWN CALIBER 964 To set the time on crownless watches use the magnetic pin or the enclosed magnet accessory to press the respective contacts on the caseback forwards or backwards to set the desired time To adjust the time forwards or back one minute at a time maintain contact for 1 second for 30 minute adjustments maintain contact for around 3 seconds to adjust by seve...

Page 15: ... your index finger down the right hand side of the watch case from top to bottom The watch will emit a short beep and the minute hand will move slightly again 2 Setting the time 2a Setting the hours Changing time zone Slide your finger along the left hand side of the case clockwise 1 hour or anti clockwise 1 hour 1 h 1 h ...

Page 16: ...8 o clock for approxi mately 2 seconds to confirm the changes made to the time setting in step 2 The min ute hand will move slightly and the watch will emit two beeps Setting mode is now deactivated 2 s Without this confirmation the watch will automatically exit setting mode after 10 seconds and will not retain the changes made in Step 2 The watch will return to the previous time setting ...

Page 17: ...nised with the main one TO SET THE MAIN TIME ZONE MAIN DIAL 1 Activating setting mode Activation is always a two step process to avoid any unwanted changes in time setting 1a Touch the case at 10 o clock until the minute hand on the main dial moves slightly 2 s 1b Immediately slide your finger along the right hand side of the case from top to bot tom The minute hand moves slightly again and the wa...

Page 18: ...h 1 h 2b Setting the minutes Slide your finger along the right hand side of the case clockwise 1 minute or anti clockwise 1 minute 1 mn 1 mn 3 Confirmation Exit setting mode Touch the case at 10 o clock or at 8 o clock for 2 seconds The watch emits two small beeps Setting mode is now deactivated and the time cannot be changed accidentally 2 s ...

Page 19: ...kwise 1 hour 1 h 1 h TO SET THE SECOND TIME ZONE SMALL DIAL 1 Activating setting mode 1a Touch the case at 8 o clock the minute hand on the small dial moves slightly 2 s 1b Immediately slide your finger along the right hand side of the case from top to bottom The minute hand moves slightly again and the watch emits a small beep ...

Page 20: ...Setting the quarter hours minimum possible time zone difference Slide your finger along the right hand side of the case clockwise hour or anti clockwise hour h h 3 Confirmation Exit setting mode Touch the case at 8 o clock or at 10 o clock for 2 seconds The watch will emit two small beeps Setting mode is now deactivated and the time cannot be changed accidentally ...

Page 21: ...not be changed accidentally 2 s 1b Immediately slide your finger along the right hand side of the case from top to bot tom The same minute hand moves slightly again and the watch emits a small beep 2 Swapping time zones Touch the case simultaneously at 9 o clock and 3 o clock for 2 seconds The hands on both dials will move quickly and the time set on each dial will move to the other one ...

Page 22: ...e of the case from top to bot tom The minute hand moves slightly from right to left and the watch emits a small beep 2 Set the position of the minute hand on the small dial In order to proceed with the resynchronisa tion make sure the minute hands of both di als are at almost a full hour time difference To do so follow the setting instructions 3 Resynchronising the minute hand Use option a or b de...

Page 23: ...d until it has reached the same position as the minute hand on the main dial The hand moves at 1 3 minute intervals for accuracy and the maximum correction possible is 5 minutes 10 s b Resynchronising the minute hand clockwise Touch the case at 4 o clock wait 10 seconds for hand to begin moving hold until it has reached the same position as the minute hand on the main dial The hand moves at 1 3 mi...

Page 24: ...o position 2 the hands return to twelve o clock and the watch goes back into energy saving mode after about 1 minute PRECIDRIVE OF 10 SECONDS PER YEAR The watch ensures the display of hours minutes and seconds to an accuracy of 10 sec year This extreme accuracy is achieved through an ultra precise quartz combined with time display correction in the event of a disturbance GPD SYSTEM The GPD system ...

Page 25: ...ond and minute hands to the exact position of the previous time therefore ensuring extra precision BATTERY The watch signals the end of battery life when the second hand is jumping every five seconds If the battery is not replaced during the E O L end of life phase the system goes into E O E end of energy mode by setting the watch hands to 12 o clock You have then about 6 months to change the batt...

Page 26: ...first Intermediate split time Start again Press pusher B to show elapsed time Repeat for further intermediate split times Stop Press pusher A read off total elapsed time Reset to zero Press pusher B again THE CROWN HAS 2 POSITIONS 1 Normal position When pressed in against the case position 1 the crown ensures that the watch is water resistant if not damaged 2 To set the time Pull the crown out to ...

Page 27: ...e Start again Press pusher A again Stop again Press pusher A again and read off time Reset to zero Press pusher B QUARTZ CHRONOGRAPH WATCHES CALIBERS 312 538 539 542 On certain models these movements have no 1 10th of a second counter In this case the timekeeping is precise to 1 second THE CROWN HAS 3 POSITIONS 1 Normal position When pressed in against the case position 1 the crown ensures that th...

Page 28: ...y to reset the hands to their original position Pull the crown out to position 2 and turn it forwards or backwards to set the desired hour The minutes and seconds remain the same Push the crown back to position 1 3 To set the time Pull the crown out to position 3 The small seconds hand will stop Set the correct time by turning the crown forwards or backwards Accept by pushing the crown back to pos...

Page 29: ...1 10th of a second hand Pusher B and crown in position 3 Short push Forward movement by one unit Long push Rapid forward movement of the hand QUARTZ CHRONOGRAPH WATCHES CALIBER 370 541 SCREW IN CROWN Certain models are fitted with a screw in crown With these models the crown must be unscrewed before using it to adjust any settings Following any adjustments the crown must be returned to position 1 ...

Page 30: ...ill stop Set the correct time by turning the crown forwards or backwards Accept by pushing the crown back to posi tion 1 to coincide with a given time signal Chronograph functions Timing to within 1 10th of a second for up to 12 hours Addition function Pusher A Start Pusher A Stop to read time Pusher A Restart Pusher A Stop At the end of the last step the chronograph indicates the total time Pushe...

Page 31: ...rt push Forward movement by one unit Long push Rapid forward movement of the hand 541 Initialization of the 12 hour totalizer hand Pusher A and crown in position 2 Initialization of the 60 minute totalizer hand Pusher B and crown in position 2 Initialization of the 60 second totalizer hand Pusher A and crown in position 3 Initialization of the 1 10th of a second hand Pusher B and crown in position...

Page 32: ...rown out to position 2 and turn Turn function on off Press crown briefly Set to zero Press crown and hold for 3 seconds 1 To adjust the time Select function 1 Pull crown out to position 2 a Hours Turn crown quickly b Minutes Turn crown slowly c Seconds Push the crown back to position 1 The seconds display blinks for 1 minute during which a brief press of the crown will reset the seconds to zero ...

Page 33: ...ized a Hours Turn crown quickly b Minutes Turn crown slowly Push the crown back to position 1 3 AL Alarm Select function 3 To set the alarm Pull crown out to position 2 a Hours Turn crown quickly b Minutes Turn crown slowly Push the crown back to position 1 To switch alarm tone on off Press crown briefly AL alarm tone on OF alarm tone off NOTE The alarm can be set in 12 hour AM PM or 24 hour mode ...

Page 34: ...r at least 3 seconds 4 CHR SP Stopwatch with intermediate times SPLIT Select function 4 Start Press crown Stop Press crown again read off first intermediate split time Chronograph continues to operate Start again Press crown again to show elapsed time Repeat for further intermediate split times Stop Press crown read off total elapsed time Reset to zero Press crown and hold for at least 3 seconds ...

Page 35: ...ction 6 To check the display mode briefly press the crown once if A or P appears the time display is in 12 hour mode If no letter appears the time display is in 24 hour mode To change mode press crown briefly a second time 7 TM Timer Select function 7 To set countdown start time Pull crown out to position 2 a Hours Turn crown quickly b Minutes Turn crown slowly To start countdown Push the crown ba...

Page 36: ...nction 8 Pull crown out to position 2 Language Turn crown quickly E English D German F French S Spanish Year Turn crown slowly Push the crown back to position 1 9 To adjust the date Select function 9 Pull crown out to position 2 Month Turn crown quickly Date Turn crown slowly Push the crown back to position 1 NOTE The month number is stored in the memory but is not continuously displayed it must b...

Page 37: ... to zero NOTE The seconds are not displayed To set the date Turn the crown The date is displayed Immediately pull the crown out to position 2 Display blinks a Month Turn crown quickly b Date Turn crown slowly Push the crown back to position 1 NOTE The month number is stored in memory but is not continuously displayed it must be set correctly in order for the calendar to function properly To select...

Page 38: ...RVE WINDING The running time depends on how long the watch has been worn With a fully loaded power reserve the watch will run for 120 days It takes 4 to 9 months of wearing the watch for it to reach the full power reserve When there is only a little energy left the corresponding symbol the small bar at the center of the dial directly beneath the time display starts to blink The watch can be wound ...

Page 39: ...e the 60 minute marker to the position of the minute hand Screw the crown back in place The elapsed time can subsequently be read off on the inner rotating bezel THE CROWN HAS 3 POSITIONS 1 Normal position The crown is in its normal position if it is pressed up against the case position 1 or screwed in In this position the crown ensures that the watch is water resistant if not damaged 2 To set the...

Page 40: ... 1 NOTE Date setting is not recommended between 8 pm and 2 am POWER RESERVE INDICATOR Caliber 772 features a power reserve indicator When the watch is fully wound by wearing or manual winding it provides a power reserve of up to 80 hours If the watch is not worn for a while or worn only infrequently the power reserve indicator moves counter clockwise When the indicator reaches the lower red area o...

Page 41: ...r resistant if not damaged 2 To set the date Pull the crown out to position 2 and rotate it backwards Caliber 650 forwards only to the desired date then push the crown back to position 1 NOTE Date setting is not recommended between 8 pm and 2 am 3 To set the time Pull the crown out to position 3 The small seconds hand will stop Set the correct time by turning the crown forwards or backwards Calibe...

Page 42: ...r up to 12 hours Make sure the chronograph hands are at zero Pusher B Pusher A Start stop start stop etc Pusher B Reset after a stop Make sure the chronograph hands are at zero Pusher B Pusher A Start stop start stop etc Pusher B Reset after a stop SELF WINDING SPLIT SECONDS CHRONOGRAPH CALIBER 663 SCREW IN CROWN This model is fitted with a screw in crown The crown must be unscrewed before using i...

Page 43: ...utes and seconds continue to measure the elapsed time While the chronograph is running do not leave the split seconds hand stopped any longer than is necessary to read the split time otherwise the functioning of the split seconds mechanism may be affected 3 Press pusher C for the split seconds hand to catch up with the chronograph seconds hand 4 To record a new split time start from step 2 above 5...

Page 44: ...hen pressed in against the case position 1 the crown ensures that the watch is water resistant if not damaged 2 To set the date Set the date by pressing on push button C The date changes at each press Date cor rection is not possible between 8 30 pm and 11 pm To set the time Pull the crown out to position 2 The small seconds hand will stop Set the correct time by turning the crown forwards or back...

Page 45: ...er B Pusher A Start stop start stop etc Pusher B Reset after a stop SELF WINDING CHRONOGRAPH WITH DATE CALIBERS 603 674 On certain models this movement has no display of the date THE CROWN HAS 3 POSITIONS 1 Normal position When pressed in against the case position 1 the crown ensures that the watch is water resistant if not damaged 2 To set the date Pull the crown out to position 2 turn it forward...

Page 46: ...rown ensures that the watch is water resistant if not damaged SELF WINDING WATCHES WITH A SECOND TIME ZONE AND DATE DISPLAY GMT UTC CALIBER 642 THE CROWN HAS 3 POSITIONS 1 Normal position When pressed in against the case position 1 the crown ensures that the watch is water resistant if not damaged 2 To set the date and the second time zone Pull the crown out to position 2 and turn it backwards unt...

Page 47: ... it forwards or backwards to the desired time 2 To set the time and the second time zone Pull the crown out to position 3 and turn it forwards or backwards until the desired time is set The 24 hour hand also moves to set the desired time in the second time zone Accept by pushing the crown back to position 1 to coincide with a given time signal 3 Setting the hour changing the time zone or from summ...

Reviews: