background image

D9000/D7000 Series Operation & Installation Manual

Page 23

74-07692-000-C   4/97

Set the ring count above 2 on answering
machines:
  The line's RAM Monitor feature may
not operate correctly if you connect an answering
machine with a ring count of less than 2 rings, to
a phone line used by the D928 module.

Operation

The panel always uses the primary phone line to
initiate phone calls, unless it has been detected
as faulted. See 

Phone Line Monitor in this

manual for a description of the panel’s phone line
monitor operation.

See the 

Phone section of the Panel Wide

Parameters module of the D9000/D7000 Series
Program  Entry Guide (74-07695-000) for phone
supervision and reporting options. You must set
the 

Two Phone Lines prompt to YES to use the

D928.

With the D928 Dual Phone Line Switcher
installed, the panel uses two phone lines, primary
and secondary, to dial up to four phone numbers.

When using only a Primary Device within a Route
Group #, the panel will make two attempts on the
primary phone line before switching to the
secondary phone line. It alternates between the
two phone lines, making two attempts on each
line until a total of ten attempts have been made.
After ten unsuccessful attempts, the panel
generates a Comm Fail event for the given Route
Group #.

When using a Primary and Backup Device within
a Route Group #, the panel makes two attempts
on the primary phone line using the Primary
Device # as programmed. If these two attempts
fail, the panel switches to the secondary phone
line using the Backup Device # as programmed.
This pattern continues for a total of ten attempts.
After ten unsuccessful attempts, the panel
generates a Comm Fail event for the given Route
Group #.

Watchdog Feature

The D928 Watchdog circuit monitors the panel’s
CPU (Central Processing Unit) for proper
operation. If the CPU fails, the buzzer on the
D928 sounds as does the sounder on the panel.
You cannot reset this sounder while the CPU is
failed. The D928 stops sounding only when the
panel’s CPU returns to normal operation.

Installing the D928

Mounting
The D928 mounts on the lower right side of the
enclosure using the screws provided with the
switcher.

Wiring
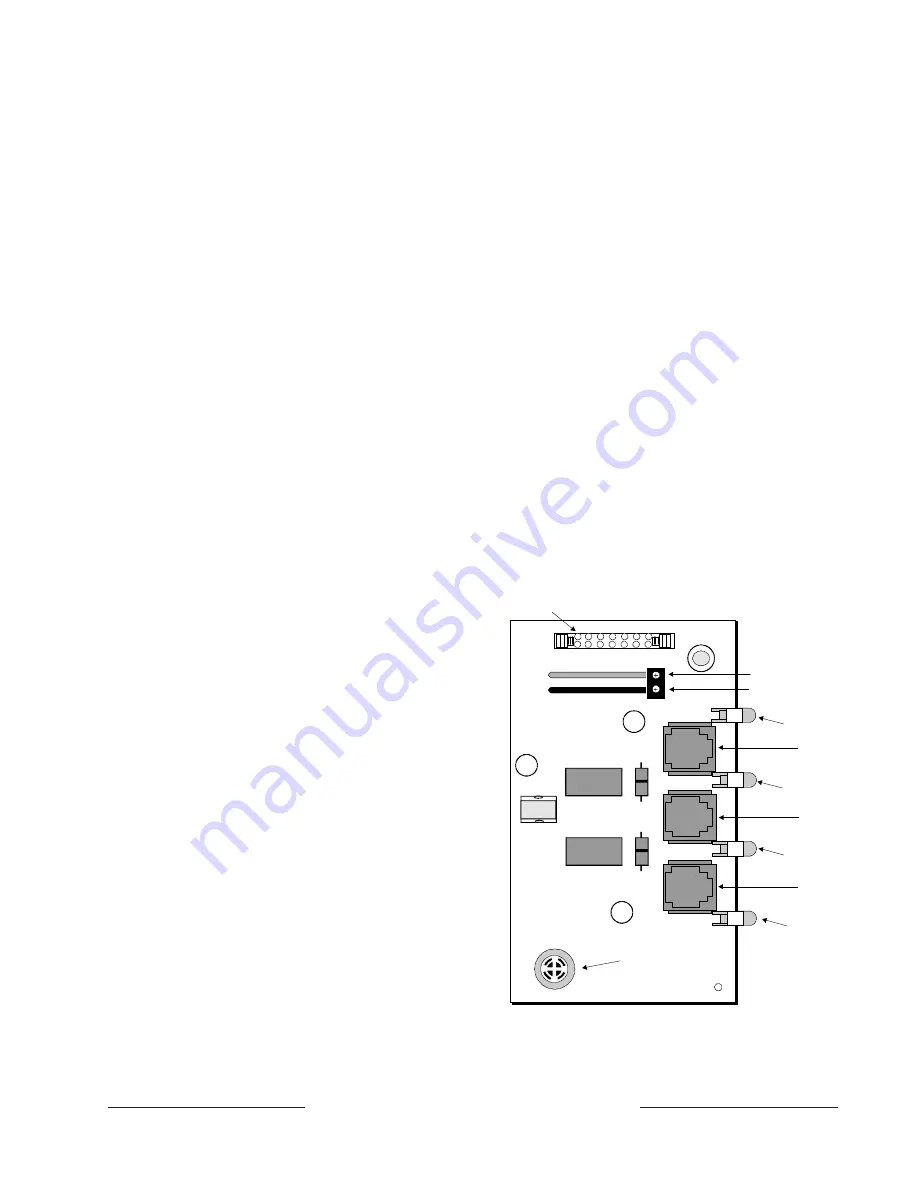
The D928 has two flying leads. The green lead
monitors AC power. The black lead provides

surge protection for the two incoming phone
lines. The black lead also is the ground reference
for the AC LED.

1.

Connect the green lead from the D928 to
terminal 1.

2.

Connect the black lead from the D928 to
terminal 9.

Phone Connections
1.

Plug one end of the ribbon cable provided
with the D928 into J4 on the D928. Plug the
other end into J2 (ACCESSORY) on the
panel.

2.

Plug one end of the D162 (2') phone cord
provided with the D928 into J3 on the D928.
Plug  the other end into J3 (TELCO) on the
panel.

3.

Plug one end of a D161 (8') or D162 (2')
phone cord into J1 on the D928. Plug the
other end into the RJ31X for the primary
phone line.

4.

Plug one end of a D161 or D162 phone cord
into J2 on the D928. Plug the other end into
the RJ31X for the secondary phone line.

Conne ct to  AC CESSO RY

CO NNECTO R (J2) with ribbon cable

Phone jack to primary

pho ne line - RJ31 X

Phone jack to seco ndary

phone line - R J31X

Phone jack to

T ELC O CO NN EC TO R

Buzzer

Phone jack to prim ary

phon e line - RJ31X

Green to Term in al 1

Black to Te rminal 10

AC Power LED

(Gree n)

Prim ary F ail   LED

(Yellow )

Seconda ry Fail  LED

(Yellow)

Com m unications

 Fail  LED

(Yellow)

Figure 10: D928 Dual Phone Line Switcher

www.PDF-Zoo.com

firealarmresources.com

Summary of Contents for D7000 Series

Page 1: ...74 07692 000 C 4 97 D9000 D7000 Series Control Communicator Operation and Installation Manual www PDF Zoo com firealarmresources com ...

Page 2: ...D7212 Access Control YES 8 Doors No YES 2 Doors No Expanded Users Arm Disarm Passcodes Cards Tokens 249 996 249 N A 99 396 99 N A Passcode Protected Custom Functions 16 16 4 4 Number of Printers 3 3 1 1 Number of Points 246 246 75 75 Number of Relays 128 128 64 64 Text marked with a diamond indicates that this function or feature is available on the D9412 and D7412 only The table below provides an...

Page 3: ...d five 5 To be certain of the number of devices that may be connected to the line as determined by the RENs contact the telephone company to determine the maximum REN for the calling area If the D9000 D7000 Series Control Communicators cause harm to the telephone network the telephone company will notify you in advance If advance notice isn t practical the telephone company will notify the custome...

Page 4: ...us 26 D8125 POPEX Module D8127 and D9127 POPIT Modules 26 Installing the D8125 POPEX Module 28 Wiring the D8125 to the D9412 D9112 28 Wiring POPITs to the Data Expansion Loop 28 Preface 2 FCC Notices 3 Part 15 3 Part 68 3 Introduction 7 Points 7 Areas and Accounts 7 Communicator 8 CommandCenters 8 Keyswitch 8 Access Control 8 Event Memory 8 Event Log 8 EMI LightningTransientProtection 9 Programmin...

Page 5: ...ics 45 PhoneLineTrouble 46 CommunicationsFailure 47 Problems Programming the Panel 48 Problems with Points 49 Extra Points 49 Problems with the D8125 POPEX Data Expansion Loops 50 EMI 50 Metering the Loops 50 CheckingShieldedCable 50 EMI on Long Wire Runs 50 Battery and Power Reports 51 ProblemswithCommandCenters 51 WatchdogResetReports 51 Runaway Reports to the Receiver 52 OverloadedPowerSupply 5...

Page 6: ...Panel 27 Figure 13 Program Record Sheet 29 Figure14 D8128COctoPOPITs 32 Figure15 D8129OctoRelayConnections 35 Figure 16 D811 Module Wiring 36 Figure 17 Power at Command Centers 38 Figure 18 Keyswitch Wiring 39 Figure 19 Reset Pin 42 Figure20 Programmer andAccessoryConnections 42 Figure 21 Service Walk Test Flow Chart 53 Table 1 Compatible Command Centers 8 Table 2 Data Expansion Loop Wire Specific...

Page 7: ... 75 points of protection Point programming parameters determine the panel s response to open and shorted conditions on the point s sensor loop Points are programmed individually with several options to custom fit the protection to your installation Points 1 to 8 are located on the circuit board on board points They are standard sensor loops The remaining off board points are POPIT Point of Protect...

Page 8: ... the eight available areas with maintained or momentary closure devices such as keyswitches and sub control units D279 Point programming determines loop responses and which area a keyswitch controls Access Control The D9412 can control eight access doors each requiring the optional D9210B Access Control Module with up to 996 uniquely identified cards tokens The D7412 can control two access doors w...

Page 9: ...OctoRelay Module Opening and Closing Windows Skeds scheduled events Control Communicator Assembly The Radionics Control Communicator is shipped pre assembled from the factory You should receive the following parts with your panel Literature Pack D9000 D7000 Installation and Troubleshooting Quick Reference 33317 D9412 D9112 Program Record Sheet 74 07697 000 or D7412 D7212 Program Record Sheet 34583...

Page 10: ...ehold Fire Warning CSFM Approved by the California State Fire Marshal for residential and highrise NYC MEA Approved by New York City s Materials and Equipment Acceptance System requires red enclosure Factory Mutual FM Approved by Factory Mutual BSA Not listed Burglary UL Underwriters Laboratories lists the D9412 D9112 D7412 D7212 Control Communicators for Central Station Local Police Connect Bank ...

Page 11: ...n Beginning the Installation Mounting the Enclosure Mount the enclosure in the desired location Be certain to use all five mounting holes See Figure 2 Premises Wiring Run the necessary wiring throughout the premises and pull the wires into the enclosure EMI Electro Magnetic Interference may cause problems EMI may occur if you install the system or run system wires near the following Computer netwo...

Page 12: ...Program Entry Guide 74 07695 000 Locking the pin in the disable position allows you to power up the panel and charge the battery as you install the detection devices and Command Centers Finishing the Installation Earth ground and reset pin first Make the earth ground connection to terminal 10 and lock the reset pin in the closed position if you haven t already done so Charge the Battery as You Fin...

Page 13: ...ices sections for instructions Power Up Reconnect the battery and then plug in the transformer Remember the buzzer sounds for 2 seconds when you first power up the panel Leave the reset pin locked down for now Yellow Charging Status LED doesn t go out If the yellow charging status LED doesn t go out within 5 minutes of powering up the panel the battery may be deeply discharged or you may have conn...

Page 14: ...operly programmed If you test a POPIT with it s switches set for a point with a blank point index and or no area assignment it appears as an extra point during a Service Walk Test If you test a device and the panel doesn t respond there may be a problem with the device the wiring the POPIT ID setting or the programming for the point If you incorrectly set the switches on a POPIT you may create bot...

Page 15: ...er Instructions for Installing the Battery appear on the next page Only plug the transformer into an unswitched 120 VAC 60 Hz power outlet Secure the transformer to the outlet with the screw provided D8004 Transformer Enclosure required for fire systems Use the D8004 Transformer Enclosure for the D1640 transformer in fire and combined fire burglary applications Check with AHJ on mounting transform...

Page 16: ... in the BFSK format At 13 9 VDC the Charging Status LED goes out Investigate low battery reports immediately If primary AC power is off and the discharge continues the panel becomes inoperative when the battery voltage drops below 10 2 VDC BatteryChargingCircuit Float Charge The float voltage for the battery charging circuit is 13 5 to 13 9 VDC at a maximum current of 1 4 Amps If float voltage dro...

Page 17: ...eaches 13 7 VDC Missing Battery Red LED flashing same rate as green LED The red LED flashes with the green Operation Monitor LED when the battery is missing or shorted Missing Battery and Over Current Red and yellow LEDs flashing once per minute The yellow and red LEDs flash once every minute when current draw for devices connected to the power outputs exceeds 1 4 Amps and the battery is missing Y...

Page 18: ... ZONEX modules such as the D8125 D8128C and D8129 modules To increase output by 1 4 amps connect a D8132 module to this terminal Terminal 32 Power Use this terminal to power SDI Serial Device Interface devices such as command centers the D9131A Parallel Printer Interface and the D9210B Access Control Interface To increase output by 1 4 amps connect a D8132 module to this terminal Accessory Connect...

Page 19: ... 1 4 Am ps PH ON E MONITOR SELECT Loop Start Ground Start TELCO COR D PHONE LED O N W HEN C O MMU NI CATI NG O F F W H EN I DLE Requires Relay D136 O N BOARD POIN TS 1 0K R esistor R equired at End o f Line Ω VOLTAGE R ANGES Open 3 7 5 0VD C Norm al 2 0 3 0VDC Short 0 0 1 3VDC PER IPHERAL DEVIC E WIRIN G ZONEX OUT 1 ZO NEX IN 1 ZONEX OUT 2 ZO NEX IN 2 ZON EX POWER ZONEX COMM ON Operation Monitor P...

Page 20: ...ed fire burglary systems Fire System Power Formula To calculate the current available at terminals 6 and 7 for fire and combined fire burglary systems 1 Add together the current draws for all devices connected to terminals 3 8 24 and 32 the Expansion Port J4 and the Accessory Connector J2 This total is the total current required for the Normal Standby Condition NSC 2 The current available for Norm...

Page 21: ...s lit until the panel returns the phone line See Figure 8 for the location of the red LED Operation Monitor LED Green The green LED indicates the operation of the CPU Central Processing Unit When the CPU is operating normally the LED flashes 0 5 second on 0 5 second off The green LED also serves as a ring indicator See Figure 8 for the location of the LED When there is ring voltage on the phone li...

Page 22: ...t it in the ground start position See Figure 9 Figure 8 Telephone Connections 5 9 10 1 2 Low B attery LED s Off When N ormal EARTHGROUND COMMON C L ASS 2 TR AN SFO RME R 1 6 5 VA C 40 VA 6 0 HZ P art No D1 6 4 0 I n te rn a lly Fu se d D o N ot Sh o rt R e q uire s Un s wit ch ed Ou t le t D o N ot Sh a re W ith O th e r Eq u ip men t A UX P OWE R BATTERY NEGATIVE ONLY Maximum Charging Current 1 4...

Page 23: ...tempts the panel generates a Comm Fail event for the given Route Group WatchdogFeature The D928 Watchdog circuit monitors the panel s CPU Central Processing Unit for proper operation If the CPU fails the buzzer on the D928 sounds as does the sounder on the panel You cannot reset this sounder while the CPU is failed The D928 stops sounding only when the panel s CPU returns to normal operation Insta...

Page 24: ... Line Fail LEDs Two yellow phone line status LEDs one for the primary phone line one for the secondary phone line light up when phone line voltage drops below 4 5 to 7 5 VDC without a corresponding 8 13 mA increase in current The panel monitors the faulty phone line for the programmed interval before indicating a trouble condition See Phone Line Monitor in this section for a description of phone l...

Page 25: ... sensor loops for normal shorted or open conditions between an input terminal 11 13 14 16 17 19 20 or 22 and any of the point common terminals 12 15 18 and 21 Programming for the point determines how the panel responds to those conditions See the D9000 D7000 Series Program Entry Guide 74 07695 000 for point programming options Point Sensor Loops When wiring the on board points install a 1k ohm res...

Page 26: ...ted and responds according to point programming except for fire points The fire points will respond locally as a trouble condition and transmit missing fire reports if programmed during this condition POPIT modules monitor their sensor loops for three conditions loop normal loop open and loop shorted They report these three conditions to the D9412 D9112 The D9412 D9112 uses point programming to in...

Page 27: ...RANG ES Open 3 7 5 0VDC Norm al 2 0 3 0VDC Shor t 0 0 1 3VDC P ERIPHE RAL DEVICE WI RING ZONEX OUT 1 ZO NEX IN 1 ZONEX OUT 2 ZO NEX IN 2 Z ONEX POW ER ZONEX CO MMO N Operation Monitor Pulses When Normal Flickers When Ring ing PROG CONN RED YELLO W GREEN BLACK 17 05823 002 32 PO W ER DATA BUS A COMMON Reset Pin Dis able All Exc ept Battery Charging And Prog ramming GRN N F P A Style 3 5 Signaling L...

Page 28: ...nal 24 Do not connect more than one D8125 to ZONEX 1 terminals 27 and 28 or ZONEX 2 D9412 D9112 only terminals 25 and 26 See Wiring POPITs to the D8125 for instructions on connecting POPITs to the D8125 POPEX module Wiring POPITs to the Data Expansion Loop Use one 2 wire data expansion loop or distribute the POPITs on up to three loops Setting DIP switches on the POPIT modules assigns them to poin...

Page 29: ...ion POPIT Module Point Assignments Six switches on each POPIT assign the module to a point number POPIT switch settings are found in the Point Assignment section of the Program Record Sheet See Figure 13 Program Record Sheet The first column on the program record sheet contains the switch settings for the POPITs Switches are numbered 1 to 6 left to right on the D8127 POPIT Switches are numbered 0 ...

Page 30: ...eports Review the Power Outputs section of this manual to be sure you provide enough power for the OctoPOPITs and other powered devices you wish to connect to your system Listing The D8128C OctoPOPIT Module is UL listed for Local or Police Connected Burglary Alarm Central Station Burglary Alarm and Household Burglary Alarm applications The D8128C is also suitable for fire supervisory applications ...

Page 31: ... normally open and or normally closed detection devices each sensor loop can supervise is limited only by the resistance on the loop Resistance on each sensor loop must be less than 100Ω with the detection devices connected Certain UL and NFPA applications may limit the number of detection devices Consult the appropriate UL or NFPA standards The OctoPOPIT detects open short normal and grounded cir...

Page 32: ...s 73 120 TO C ON T RO L 1 2 3 4 5 6 7 8 9 10 11 12 13 14 15 16 P 1 COM P 2 P 3 COM P 4 P 5 COM P 6 P 7 COM P 8 SENSOR LOOPS SENSOR LOOPS AUX OUT GND IN ZONEX BUS 2 Switch 0 ON Points 129 192 TO CO NT RO L 1 2 3 4 5 6 7 8 9 10 11 12 13 14 15 16 P1 COM P 2 P 3 COM P 4 P 5 COM P 6 P7 COM P 8 SENSOR LOOPS SENSOR LOOPS AUX OUT GND IN ZONEX BUS 2 Switch 0 OFF Points 193 240 GND AUX IN OUT LOOP O N 0 6 5...

Page 33: ... P3 091 211 P4 028 On On Off On 148 P4 092 Off On Off On 212 P5 029 149 P5 093 213 P6 030 150 P6 094 214 P7 031 151 P7 095 215 P8 032 152 P8 096 216 P1 033 153 P1 097 217 P2 034 154 P2 098 218 P3 035 155 P3 099 219 P4 036 On On Off Off 156 P4 100 Off On Off Off 220 P5 037 157 P5 101 221 P6 038 158 P6 102 222 P7 039 159 P7 103 223 P8 040 160 P8 104 224 P1 041 161 P1 105 225 P2 042 162 P2 106 226 P3...

Page 34: ...lly closed and common terminals Installation Set the switches on the OctoRelay before you install it in the enclosure See Configuring the D8129 OctoRelay You can install the OctoRelay in the enclosure with the panel see Figure 2 or in an adjacent enclosure not more than 5 feet from the panel Use 16 to 22 AWG wire Follow the procedure below to install OctoRelays in the enclosure with the panel 1 Al...

Page 35: ...T IN A UX ZON EX O UT 1 ZON EX IN 1 Z ON EX OU T 2 ZO NEX IN 2 ZON EX C OM MO N 28 27 26 25 24 23 AUX DATA D8129 OC TOR ELAYS FO R RE LAY N UM BE RS 65 TO 128 C ON N EC T OC TOR ELAY S IN PA RA LLEL 1 2 3 4 5 6 7 8 GND AUX DATA D 8129 O CTO R ELAY S FOR R ELAY N UM BER S 1 TO 64 C O NNE C T O CTO RE LAYS IN PAR ALLEL ZO NE X P OW E R GND OUT IN AUX D8125 PO PE X C ontrol C om m unicator P an el D9...

Page 36: ...e the D137 Mounting Bracket to install D811 modules in enclosures with no module mounting locations available WiringConnections Power down the panel to connect D811 modules as shown in Figure 16 Note that the D811 for relay number 53 connects to ZONEX 1 The D811 for relay number 117 connects to ZONEX 2 on the D9412 D9112 Figure 16 D811 Module Wiring 5 GND D 8125 PO PEX GND OUT IN AUX ZO NE X OU T ...

Page 37: ...ures a 16 character alphanumeric display for general use The D1256 is also a text display Command Center with functional keys optimized for local fire alarm control The D1257 is a text display Command Center for fire annunciation The D720 is an LED display Command Center appropriate for use as a single area Command Center with up to eight points See the User s Guide 71 06150 000 for operational in...

Page 38: ...ation For UL certificated accounts use a UL listed power supply The D8132 is not UL listed as a stand alone power supply C ONNECTION S 32 COMMON 31 30 29 D8132 12VDC C OMM O N 12 V DC COMMON DATA BUS B DATA BUS A POWER D ATA D ATA PAN EL Figure 17 Power at Command Centers Control Communicator and D8132 or other power supply must share COMMON Note that Figure 19 shows the common from the D8132 modu...

Page 39: ...uble if it is disarmed See Figure 18 KeyswitchOperation Maintained Contact If you program the point the keyswitch is connected to for a maintained contact an open on the arming circuit arms the area All faulted points are force armed regardless of the entry in the FA Bypass Max program item Returning the circuit to normal disarms the area See Area Wide Parameters and Point Assignments in the D9000...

Page 40: ... any SDI device must also be connected to a common terminal on the panel Do not connect the stand alone power supply to earth ground other than terminal 10 on the panel D9131A Parallel Printer Interface Module The Radionics D9131A Parallel Printer Interface is a 4 wire powered device used to connect a standard parallel printer to panel The D9412 D9112 can supervise three printers and the D7412 D72...

Page 41: ...addition to granting access can control whether the system will disarm Used with the D9412 the D9210B recognizes 250 master users by user name passcode and access authority The D9210B recognizes 99 master users when used with the D7412 Each master user will support three subusers with unique cards tokens having the same access level as the master user Door Module 1 2 3 4 5 6 1 ON ON ON ON ON 2 OFF...

Page 42: ... sent Accessory Connector J2 Use the Accessory Connector J2 to connect the panel to the D928 Dual Phone Line Switcher The Accessory Connector is on the bottom right corner of the I O board See Figure 20 The D928 allows the panel to use two telephone lines to transmit reports See D928 Dual Phone Line Switcher in the Telephone Connections section of this manual for installation and operating instruc...

Page 43: ...MON Operation Monitor Pulses When Normal Flickers When Ringing PROG CONN RED YELLOW GREEN BLACK 17 05823 002 32 POWER DATA BUS A COMM ON RED GROUND START Y EL RED Reset Pin Disable All Except Battery Charging And Programming GR N STEADY OR PULSE Charging Status N F P A Style 3 5 Signaling Line Circuits 12 15 18 21 13 11 1 4 16 17 19 2 0 22 PROGRAMMABLE ALARM OUTPUTS Terminals Requires Optional D13...

Page 44: ...with terminals 6 and 7 D136 Plug in Relay required Install a D136 in socket K1 for output at terminal 8 9 COMMON Terminal 9 is common for Auxiliary Power Steady or Pulsed Alarm Power Alternate Alarm Power and Switched Aux Power terminals 3 6 7 and 8 10 EARTH GROUND Connect to earth ground A cold water pipe or grounding rod is preferred Do not connect to telephone or electrical ground 11 13 14 16 1...

Page 45: ...r to sound the green operation monitor LED continues to flicker See Operation Monitor LED in the Telephone Connections section for a description of the green LED PARAM FAIL alternates with the idle text at the Command Centers The panel sends a PARAM FAIL report to the receiver Pressing ESC may silence the buzzer Silencing the buzzer does not correct the problem You must replace the corrupted copy ...

Page 46: ...ine Trouble Phone line problems that are not corrected can result in the panel going into Communications Failure You can program the D9412 D9112 to monitor one or two phone lines See the D9000 D7000 Series Program Entry Guide 74 07695 000 for programming instructions If you enable the phone line monitor SERVC PHONE LINE 1 or 2 if two lines are used appears in the Command Center s display when the ...

Page 47: ... Verify that the phone lines are not shorted between the phone company s equipment and the receiver by placing a call to the number for the receiver If you hear the line ring but the ring detector doesn t light or if you hear a busy signal and the green on line OL indicator is not lit call the phone company for service The receiver s call load is too great Additional line cards and phone lines may...

Page 48: ... point When you find a missing point perform a Service Walk Test to search for extra points See the Owner s Manual 71 06150 000 for test instructions Symptom Diagnosis Remedy Point appears as missing at command centers and in reports to the receiver POPIT is not connected or incorrectly connected to the data expansion loop Verify that a POPIT module programmed for the missing point number is conne...

Page 49: ... 121 128 or points 241 248 Check to be certain all POPIT and OctoPOPIT address switches are set correctly POPITs cannot be used for points 128 or 248 these are reserved for panel functions OctoPOPITs cannot be used for points 121 128 or 241 248 All off board points are MISSING Short on Aux Power terminal 3 or ZONEX power terminal 24 Terminals 3 and 24 share a common circuit breaker Check wiring an...

Page 50: ...eeds 1 VAC Checking Shielded Cable If improperly installed shielded cable can create problems rather than solve them Follow the procedure below to check shielded cable for proper installation 1 Remove the drain wire for the shield from terminal 10 2 Meter the drain wire for continuity to terminal 10 earth ground If there is continuity find and remove the foreign ground on the drain wire 3 Reconnec...

Page 51: ...ast 16 5 VAC on terminals 1 and 2 3 The outlet the transformer is plugged into should meter between 110 VAC and 120 VAC 4 Verify that the output for the transformer connected to terminals 1 and 2 is rated for 16 5 VAC and at least 40 VA 5 Disconnect the transformer from terminals 1 and 2 and meter the battery at terminals 3 and 4 A fully charged battery should show 13 8 volts 6 Make sure the batte...

Page 52: ... load on terminals 3 6 7 8 24 and 32 and connectors J2 and J4 remains below 1 4A With the overload removed the panel returns power to terminals 3 6 7 8 24 and 32 and connector J4 The panel sends PT BUS RESTORAL and SDI RESTORAL reports If a D928 module is connected to J2 it stops sounding If the battery voltage is below 8 4 volts the panel does not reconnect it You must replace the battery When th...

Page 53: ...isplays Press ESC The display momentarily shows ALL PTS TESTED before returning to idle text Note The Service Walk Test when performed on a D7412 or D7212 cannot display 0 points to test as it is physically unable to connect to the second POPEX module used for points 129 247 Automatic time out returns the system to idle text If there is no point or Command Center activity for 20 minutes the walk t...

Page 54: ...nent specification and installation documents to determine suitability Test weekly UL Standard 1023 requires a weekly test for residential burglary applications Bank Safe and Vault Applications You must use the UL listed Model 5110 Bell and Model 4001 42 External Line Balancer both made by Rothenbuhler for the bell and balanced line module in bank safe and vault applications Modifications must be ...

Page 55: ...ar or fire alarm application where the 5591 or D8109 enclosure is suitable The D8108A with some modification can be used for bank safe and vault applications see the Radionics Technogram D7212 D9112 UL Certificated Bank Safe and Vault Applications RPN 73 07302 000 UL lists the D8108A for all commercial fire alarm applications The D8108A is approved by Factory Mutual California State Fire Marshal a...

Page 56: ...t Opt Opt 1 1 Indicating Device D1255 Comnd Center 1 1 1 1 1 1 1 1 1 1 1 1 Opt O ptiona l m ay b e required by job specifica tio ns a nd or A utho rity H aving Jurisdiction D192A C Bell Circuit Supervision Opt Opt Opt Opt Opt Opt No Not acceptable for this application Req Required for this application Opt Optional for this application D125 or D129 required to connect fire alarm initiating devices ...

Page 57: ... 5 0VDC Norm a l 2 0 3 0V DC Short 0 0 1 3V DC PERIPHER AL DE VICE W IRING ZONE X OUT 1 Z ONEX IN 1 ZONE X OUT 2 Z ONEX IN 2 ZONEX POWE R ZONEX CO MMON Op erati on Mo nito r P ulses W h en No rma l Fli ckers W h en Ringin g PROG CONN RE D Y ELLOW G RE EN B LA CK 17 05823 00 2 3 2 POW ER DATA BUS A CO MMON RED GRO UND S TAR T YEL RED Re set Pin D isable All Exce pt B attery C h arg ing An d Program...

Page 58: ...ICE W IRI NG Z ONE X OU T 1 ZO NEX I N 1 Z ONE X OU T 2 ZO NEX I N 2 ZO NEX POW E R ZO NEX CO MMON Op era tio n M o n ito r Pu lse s W he n N o rma l F lick ers W h e n R ing ing PROG CONN RE D Y EL LO W GREEN BLACK 1 7 0 58 23 00 2 3 2 POW ER DATA BU S A CO MMON RED G RO UND S TAR T YEL RED R e set Pin Dis ab le All Ex ce p t B att ery C harg in g An d P rog ram m ing GR N STE AD Y O R PU LSE C h...

Page 59: ...1 ZO NEX I N 1 ZO NE X OU T 2 ZO NEX I N 2 ZO NEX POW E R ZO NEX CO MMON Op era tio n M o n ito r P ul se s W he n N o rma l Fl ick ers W h e n R ing in g PROG CONN RED Y EL LOW G RE EN B LA CK 1 7 0 58 23 00 2 3 2 POW ER DATA BU S A CO MMON R ED G R OU ND S TART YEL RED R e set Pin Dis ab le A ll Ex ce p t B att ery C h arg in g An d P rog ram m ing G RN ST EADY OR PU LSE Charging Status N F P A ...

Page 60: ... Z ON EX IN 1 Z ONEX OU T 2 Z ON EX IN 2 Z ON EX PO WE R ZO NEX CO MMON O p erati on Mo nito r Pu lse s W h en No rm al F licker s W h en Rin gin g PROG CONN RE D YELLO W GREEN BLACK 17 05 823 0 02 3 2 PO W ER DATA BU S A CO MMON RED GR OU ND STAR T YEL R ED R e set Pin Di sa ble All Ex ce pt B at ter y C ha rg ing An d P rog ra mm ing G RN STE AD Y O R PUL SE C harging Status N F P A Style 3 5 Si...

Page 61: ... ____ D8127T U ______ 3 x Quant ____ 3 x Quant ____ 4 x Quant ____ D8128C ______ 50 x Quant ____ 50 x Quant ____ 50 x Quant ____ D8129 ______ 20 x Quant ____ 20 x Quant ____ 20 x Quant 25 x of relays ___ D8130 ______ 5 x Quant ____ 5 x Quant ____ 54 x Quant ____ D9127T U ______ 0 5 x Quant ____ 0 5 x Quant ____ 0 8 x Quant ____ D9131A ______ 24 x Quant ____ 22 x Quant ____ 36 x Quant ____ D9210B _...

Page 62: ...ion required See Central Station or Local Systems Ampere Hour Calculation Formula in the Standby Battery Calculation for NFPA 72 Fire Alarm Applications section Remote Station or Auxiliary Fire Alarm 60 hours of standby plus 5 minutes of alarm operation required SeeRemote Station or Auxiliary System Ampere Hour Calculation Formula in the Standby Battery Calculation for NFPA 72 Fire Alarm Applicati...

Page 63: ...andby plus 5 minutes of alarm operation at the end of the 60 hour period A D8132 Battery Charger Module with additional batteries installed in a separate D8109 or D8108A enclosure may be required in the system to meet the basic standby requirements for a Remote Station or Auxiliary System installation You must use battery ampere hour Ah calculations to verify compliance The following formula inclu...

Page 64: ...teries using the D122 Dual Battery Harness Current Requirements Panel 500 mA See the Standby Battery and Current Rating Chart for the current requirements of other system components Power Outputs All external connections are inherently power limited except battery terminals Continuous Power Outputs 3 24 32 1 4A maximum at 10 2 VDC to 13 9 VDC continuous supply total for all devices and outputs sup...

Page 65: ... D161 Phone Cord D162 Phone Cord D185 Reverse Polarity Module D192C Bell Circuit Supervision Module D268 D269 Independent Zone Control on board and OctoPOPIT points D279 Independent Zone Control on board and OctoPOPIT points D442 10 Bells D435 D448 12 VDC Horns D1255 Command Center General Purpose D1255R Command Center Red D1256 Fire Command Center D1257 Fire Annunciator D720 Command Center Area L...

Page 66: ...1 5 023 0 1 2 6 063 0 3 6 103 1 6 024 0 1 2 064 0 3 104 1 025 0 1 3 4 5 6 065 0 4 5 6 105 2 3 4 5 6 026 0 1 3 4 5 066 0 4 5 106 2 3 4 5 027 0 1 3 4 6 067 0 4 6 107 2 3 4 6 028 0 1 3 4 068 0 4 108 2 3 4 029 0 1 3 5 6 069 0 5 6 109 2 3 5 6 030 0 1 3 5 070 0 5 110 2 3 5 031 0 1 3 6 071 0 6 111 2 3 6 032 0 1 3 072 0 112 2 3 033 0 1 4 5 6 073 1 2 3 4 5 6 113 2 4 5 6 034 0 1 4 5 074 1 2 3 4 5 114 2 4 5 ...

Page 67: ...228 2 3 4 149 0 1 3 5 6 189 0 5 6 229 2 3 5 6 150 0 1 3 5 190 0 5 230 2 3 5 151 0 1 3 6 191 0 6 231 2 3 6 152 0 1 3 192 0 232 2 3 153 0 1 4 5 6 193 1 2 3 4 5 6 233 2 4 5 6 154 0 1 4 5 194 1 2 3 4 5 234 2 4 5 155 0 1 4 6 195 1 2 3 4 6 235 2 4 6 156 0 1 4 196 1 2 3 4 236 2 4 157 0 1 5 6 197 1 2 3 5 6 237 2 5 6 158 0 1 5 198 1 2 3 5 238 2 5 159 0 1 6 199 1 2 3 6 239 2 6 160 0 1 200 1 2 3 240 2 161 0 ...

Reviews: