background image

22

Replacing

 the Remote’s Battery

4'2.#%+0)

"

6*'

"

4'/16'

N

5

"

$#66'4;

Your remote control requires one CR2025 lithium button cell 
battery for power. Batteries are available at your local 
RadioShack store or online at www.radioshack.com. 

RRRRý

.

.

.

.

5'66+0)

"

6*'

"

2#4'06#.

"

.'8'.5

F7H;DJ7B

F7H;DJ7B

F7H;DJ7B

F7H;DJ7B

 — Select 

F7H;DJ7B

F7H;DJ7B

F7H;DJ7B

F7H;DJ7B

 using 

H

G

I

 or 

J

 on the 

remote and then press 

J

 to enter the submenu.

Select the parental level you desire using 

H

G

 for discs 

with lock-up function categories in different levels. The 
levels are listed from the highest level of restriction (

''''

) to the 

lowest level of restriction (

DE

DE

DE

DE


F7H;DJ7B

F7H;DJ7B

F7H;DJ7B

F7H;DJ7B

)

R

"

9#40+0)

"

R

"

Keep button-cell batteries away 
from children. Swallowing a 
button-cell battery can be fatal.

Dispose of the old battery 
promptly and properly. Do not 
burn or bury it.

.

"

%#76+10

"

.

• Use only a fresh battery of the 

required size and recommended 
type.

• If you do not plan to use the 

remote for a month or more, 
remove the battery. Batteries 
can leak chemicals that can 
destroy electronic parts.

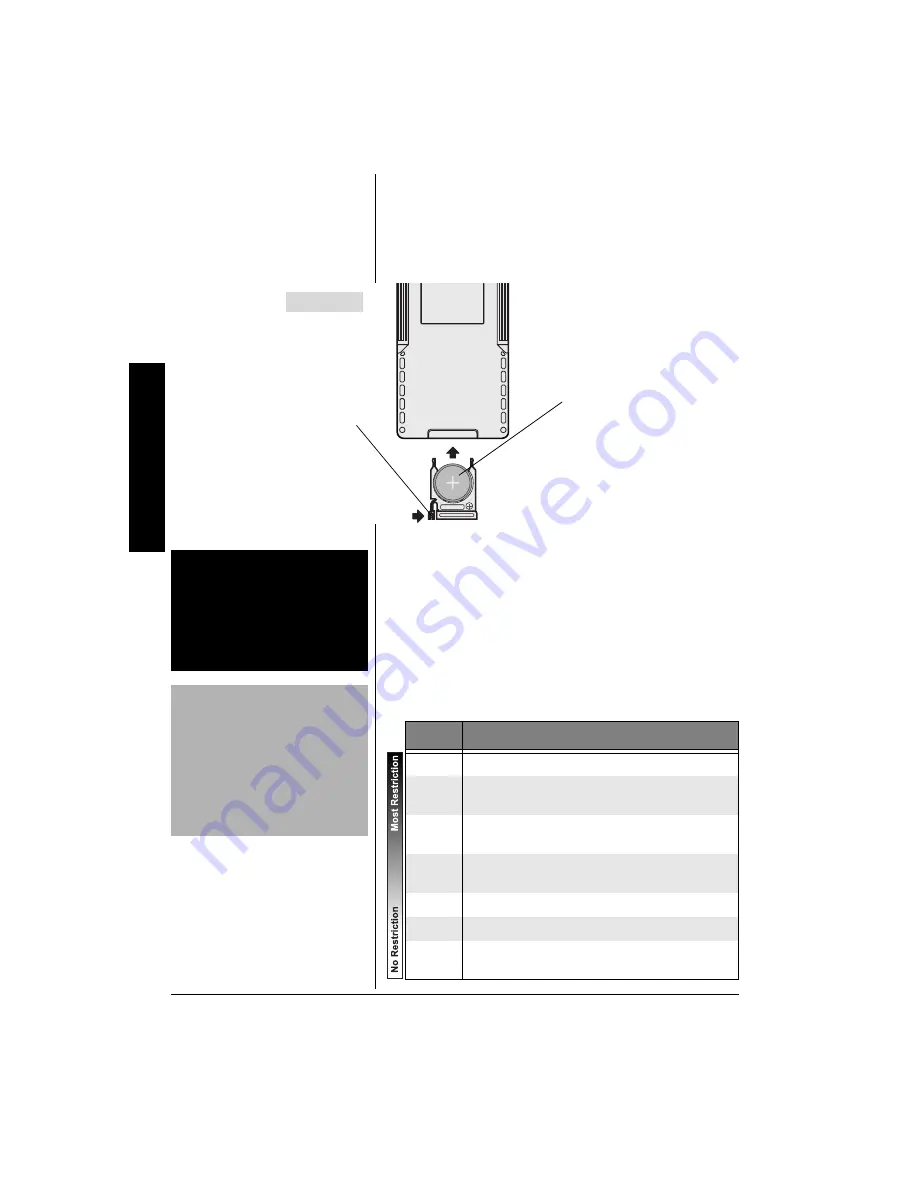
1. Press the tab on the 

battery compartment tray 
to the right and slide the 
battery compartment tray 
out.

2. Remove the old battery 

and insert a new CR2025 
button cell Lithium battery 
in the battery compartment 
tray,  side up.

3. Slide the tray back into the 

battery compartment until it 
clicks. 

Back View

.GXGN

&GUETKRVKQP

1

G (General Audiences – all ages)

3

PG (Parental guidance suggested. Some material 
may not be suitable for children)

4

PG-13 (Parents strongly cautioned. Some material 
may be inappropriate for children under 13)

6

R (Restricted. Under 17 requires accompanying of 
parent or adult)

7

NC-17 (No one 17 and under admitted)

8

Adult

No 

Parental

No limits

Summary of Contents for Go Vision 16-3255

Page 1: ...t is perfect for use in your car SUV or van Dual AC DC Power Sources let you power the player using either your car s DC power source or household AC power 5 6 TFT Flat LCD Color Monitor makes the DVD...

Page 2: ...remove the cover or attempt to service this device due to possible eye injury The use of controls adjustments or procedures other than those specified herein might result in hazardous radiation expos...

Page 3: ...educe the risk of serious injury or death or damage Read these instructions Keep these instructions Heed all warnings Follow all instructions Do not attempt to service or repair the monitor DVD player...

Page 4: ...shock or fire and can damage the Monitor and DVD player Avoid Laser Hazards As the laser beam used in the DVD player is harmful to eyes and to avoid electrical hazards do not attempt to disassemble t...

Page 5: ...ing to view previous chapters PLAY J NEXT Press while a disc is playing to view upcoming chapters OPEN IR infrared SENSOR CLOSE POWER V1 and V2 G G G G BRIGHT H H H H Adjusts brightness of LCD display...

Page 6: ...forward through a disc during playback Advances forward one chapter or track at a time SKIP Press to search backward through a disc during playback Advances backward one chapter or track at a time PLA...

Page 7: ...ou easily carry it and all of the accessories anywhere An accessory pouch is also included Shoulder Strap Attaches to the carrying case Clip hooks on both ends DC Adapter lets you power the DVD player...

Page 8: ...let Audio Video Cables let you connect the DVD player to a TV amplifier video game or camcorder Four 4 Straps for Vehicle Installation let you install the DVD player securely in your vehicle Clip the...

Page 9: ...the adapter plug into the jack 2 Connect the supplied 12V DC adapter cord s barrel plug to the DC IN 12V jack on the back of the DVD player 3 Connect the other end of the adapter to the vehicle s cig...

Page 10: ...D display The LCD s POWER indicator below the LCD display lights 7 Press PLAY J located on the right side of the disc tray or on the remote The DVD player reads the disc s table of contents and then o...

Page 11: ...nd Audio Video receiver a camcorder a game system console or a digital camera 100 6 0 61 68 Position Cables Properly to Avoid Audio Interference Insert each cable firmly into the designated jack If yo...

Page 12: ...he other end of the cable to your DVD player s AUDIO OUTPUT L and R jacks 2 Connect the audio video cable s yellow plug to the VIDEO OUTPUT jack on the back of your DVD player and the other yellow plu...

Page 13: ...eft white and right red Output sockets and connect the other end to the AUDIO INPUT L white and R red jacks on the back of your DVD player 2 Connect the audio video cable s yellow plug to the VIDEO IN...

Page 14: ...stem is accessed only when a disc isn t playing It appears automatically when you press STOP on the remote or the DVD player A feature only works if the disc was programmed with that feature For examp...

Page 15: ...to decrease the speed Each time you press SLOW the playback speed decreases see Playback Speed to the right You may also press PLAY J to return to normal speed 5MKRRKPI JCRVGTU Use SKIP to go to the...

Page 16: ...equence Follow these steps to change the camera angle 1 During disc playback press ANGLE on the remote The current and total angle numbers appear If no camera angle is available appears If multiple ca...

Page 17: ...t off press REPEAT until H F 7J H F 7J H F 7J H F 7J E E E E appears A B Repeat A B Repeat lets you repeat a specific segment on the DVD that you define 1 At the beginning of the segment you want to r...

Page 18: ...ures that a CD player has including track skip and repeat play 5MKRRKPI 6TCEMU Press SKIP to go to the next track and SKIP to go to the previous track 7UKPI VJG 4GRGCV GCVWTG There are three repeat op...

Page 19: ...til it clicks shut Track 1 begins playing 4 Press STOP to stop playback 5 6 0 64 5 Once you stop an MP3 disc press PLAY J on the player to bring up the list of tracks available on that disc The track...

Page 20: ...Setup page JL IFB7O0 JL IFB7O0 JL IFB7O0 JL IFB7O0 Select JL JL JL JL IFB7O IFB7O IFB7O IFB7O using H G I or J on the remote and then press J to enter the submenu Press H Gon the remote to select one...

Page 21: ...H G I or J on the remote and then press J to enter the submenu Select the subtitle language you desire using H G on the remote D B I D B I D B I D B I H D9 H D9 H D9 H D9 IF7D I IF7D I IF7D I IF7D I 9...

Page 22: ...be fatal Dispose of the old battery promptly and properly Do not burn or bury it 76 10 Use only a fresh battery of the required size and recommended type If you do not plan to use the remote for a mo...

Page 23: ...irmed new password Press ENTER to store the change Press I to return to the previous menu The default password is 2001 and this password is always effective whether you have changed it to a new one or...

Page 24: ...till or slow motion play If you connected an audio or audio video receiver to your player make sure you chose the correct input setting on the receiver Remote control does not work Install a new batte...

Page 25: ...language does not exist on the disc the initial settings does not be seen heard The disc s priority language is selected instead Set the subtitle and or audio language manually through the setup menu...

Page 26: ...on the player or disconnect and then reconnect the AC power cord to the AC power outlet Remove the disc and turn off the player after use 5 06 0 0 For safety reasons when cleaning the case be sure to...

Page 27: ...ter perimeter If a disc becomes very dirty wet a soft cloth in water wring it out well Wipe the dirt away gently and remove any water drops with a dry cloth Do not use record cleaning sprays or anti s...

Page 28: ...the event of a product defect during the warranty period take the product and the RadioShack sales receipt as proof of purchase date to any RadioShack store RadioShack will at its option un less othe...

Reviews: