INSTALLATION INSTRUCTIONS
18
3 bar
1.5 bar
0.5 bar
1.2 bar
GREEN AREA
1
3
PUMP PLUG
PUMP
AUTOMATIC AIR VENT VALVE
AIR VENT VALVE PLUG
M
R
2
4.2 Filling the system
Use only clean tap water to fill the system.
Once the water pipes have been connected, close the
gas feed valve and fill the system as follows:
•
Check that the circulation pump runs freely;
•
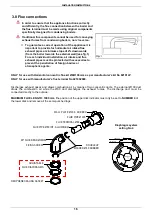
Check that the plug of the air vent valve has been
slackened slightly to allow air to escape from the
system (fig.1);
•
Open the filling tap
R
(fig. 2);
•
Unscrew the plug on the pump to remove any
trapped air, check that the pump is free then re-
tighten it when water starts to flow out;
•
Open the air vents on the radiators and monitor the
air evacuation process. When water starts to flow
out of the radiators, close the air vents;
•
Use the pressure gauge
M
(fig.2), to check that the
systems pressure reaches the middle of the green
area (equal to 1,2 bar, see fig. 3) and that the code
H2O
does NOT appear on the control panel
display;
•
On completion, make sure that the filling tap R
is perfectly closed.
4.3 Flushing the system
Failure to flush and add inhibitor to the system will
invalidate the appliance working.
All systems must be thoroughly drained and
flushed out using additives – corrosion inhibitors
and flushing agents/descalers .
To flush out the primary side of this unit.
a.
Fill the boiler as per the filling instructions.
b.
Using a drain off cock on the lowest point of the
system allow the water to drain from the system
and boiler.
c.
In order to flush the system correctly turn off all
radiators open the filling loop and drain cock
simultaneously and allow the water to flow through
the boiler.
d.
Open each individual radiator allowing water to
flow through then turn that radiator off and repeat
for all radiators on the system.
e.
Turn off the filling loop and close the drain cock
open all radiators and open the filling to fill the
system.
f.
Continue to fill the system until the pressure gauge
reaches 1 bar.


