background image

RADIANT SERVICES™  I

NSTALLATION

 O

PERATION


AND

 S

ERVICE

 M

ANUAL

SECTION 1: HEATER SAFETY

Yo

u

r Safety is Important to Us!

This symbol is 

u

sed thro

u

gho

u

t the man

u

al 

to notify yo

u

 of possible fire, electrical or 

b

u

rn hazards. Please pay special attention 

w

hen reading and follo

w

ing the 

w

arnings in 

these sections.

Installation, ser

v

ice and ann

u

al inspection of heater m

u

st 

be done by a registered installer/contractor q

u

alified in 

the installation and ser

v

ice of gas-fired heating 

eq

u

ipment.

Read this man

u

al caref

u

lly before installation, operation 

or ser

v

ice of this eq

u

ipment.

This heater is designed for heating nonresidential indoor 
spaces. Do not install in residential spaces. These 
instr

u

ctions, the layo

u

t dra

w

ing, local codes and 

ordinances, and applicable standards that apply to gas 
piping, electrical 

w

iring, 

v

enting, etc., m

u

st be thoro

u

ghly 

u

nderstood before proceeding 

w

ith the installation.

Protecti

v

e gear is to be 

w

orn d

u

ring installation, operation 

and ser

v

ice. Thin sheet metal parts, s

u

ch as the reflector 

portion of the heater and the 

v

ario

u

v

enting 

components, ha

v

e sharp edges. To pre

v

ent inj

u

ry, the 

u

se 

of 

w

ork glo

v

es is recommended. The 

u

se of glo

v

es 

w

ill 

also pre

v

ent the transfer of body oils from the hands to 

the s

u

rface of the reflector.

Before installation, check that the local distrib

u

tion 

conditions, nat

u

re of gas and press

u

re, and adj

u

stment of 

the appliance are compatible.

For additional copies of the Installation, Operation and 
Ser

v

ice Man

u

al, please contact Radiant Ser

v

ices Ltd.

1.1 Manpower Re

q

uirements

To pre

v

ent personal inj

u

ry and damage to the heater, t

w

persons 

w

ill be req

u

ired for installation.

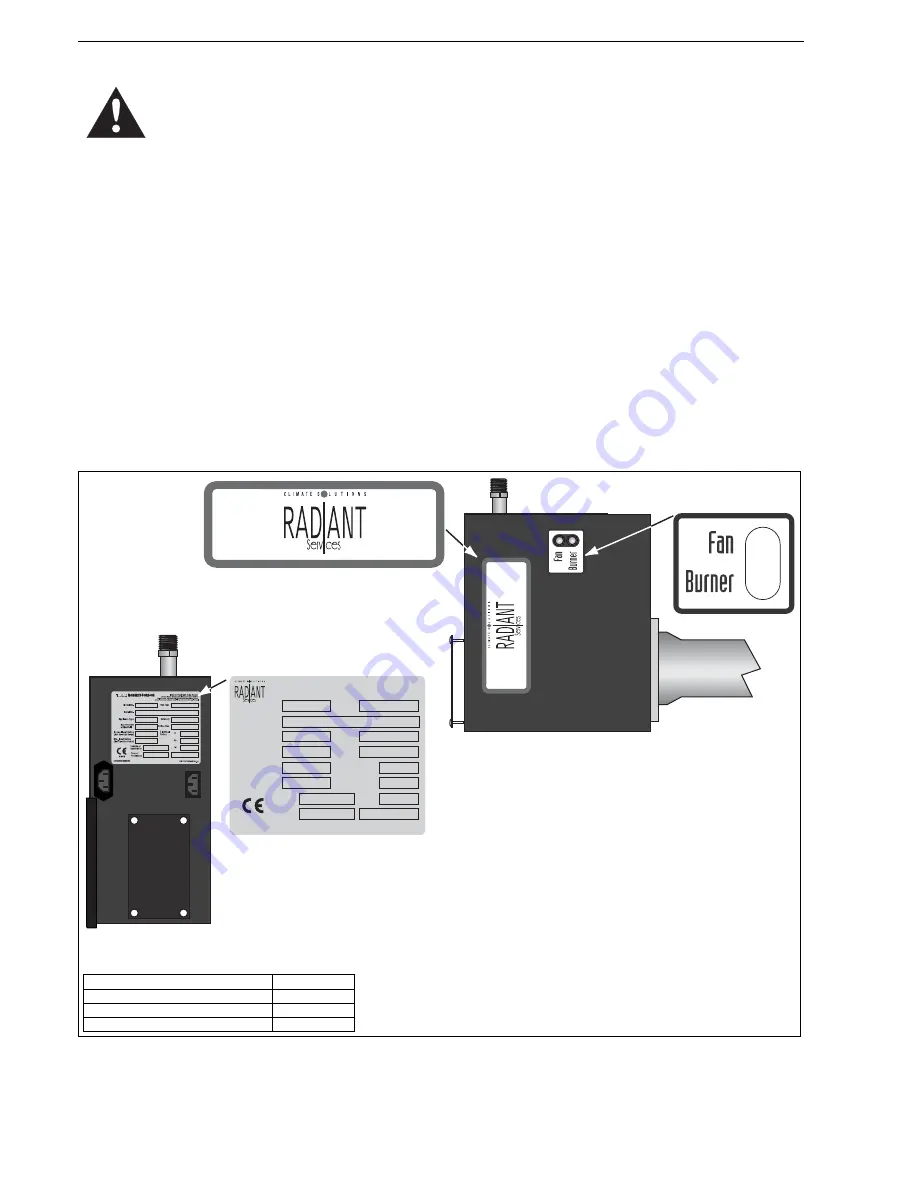
1.2 Safety Labels and Their Placement

Prod

u

ct safety signs or labels sho

u

ld be replaced by the 

prod

u

ct 

u

ser 

w

hen they are no longer legible. Contact 

Radiant Ser

v

ices Ltd. for obtaining replacement signs or 

labels. 

See Page 2, Figure 1


through Page 3, Figure 2

.

Fi

g

ure 1: Side and Back Panel Label Placement

Logo La

b

el

Fan/Burner La

b

el

Side Panel

Rating Plate La

b

el

Back Panel

www.radiantservices.co.uk

www

.radiantservices.co.uk

© 

2007 RADIANT SERVICES LIMITED™ 

Model No.

Serial No.

Appliance Type

Gas Pressure
at Manifold

Normal Input Rating
(Net Calorific Value)

Min. Input Rating
(Net Calorific Value)

Country of 
Destination

Year of 
Production

Category

Orifice Size

Electrical
Rating

V

Hz

W

Gas Type

Infrared Radiant Tube Heater

This applicance must be installed in accordance with the

rules in force, and used only in a sufficiently ventilated space.

Consult instructions before installation and use of this applicance.

0063

P/N 91031303UK 

Printed in the U.S.A.

Description

Part N

u

mber

Logo Label

91033204

Fan/B

u

rner Label

91033300

Rating Plate Label

91031303

Summary of Contents for BH15UT

Page 1: ...er installation adjustment alteration service or maintenance can result in death injury or property damage Read the installation operation and service manual thoroughly before installing or servicing...

Page 2: ......

Page 3: ...over Installation 43 10 3 Decorative Grille Installation 44 10 4 Protective Grille Installation 45 10 5 Sports Hall Guard Installation 46 10 6 Undershield Installation 47 10 7 Wall Mounting 48 SECTION...

Page 4: ......

Page 5: ...igure 17 U Tube Venting 9 Figure 18 Critical Hanger Placement 12 Figure 19 Linear General Assembly Overview 14 Figure 20 Linear Layout Overview 15 Figure 21 Double Linear General Assembly Overview 17...

Page 6: ......

Page 7: ...ained in accordance with these instructions These instructions refer to appliances designed to operate in the European Union Appliances designed for other countries Non European Union are available on...

Page 8: ...he reflector Before installation check that the local distribution conditions nature of gas and pressure and adjustment of the appliance are compatible For additional copies of the Installation Operat...

Page 9: ...HEATER SAFETY 3 Figure 2 Top Panel Label Placement Internal Wiring Label Gas Connection Label Top Panel Inside Door Top Panel Description Part Number Gas Connection Label 91018126 Internal Wiring Labe...

Page 10: ...your RADIANT SERVICES independent distributor to obtain the wall tag Affix the tag by peeling off the backing of the adhesive strips on the rear surface and position the tag on a wall near the heater...

Page 11: ...assure that adja cent materials are protected from degradation Maintain clearances from heat sensitive equipment and workstations Maintain clearances from vehicles parked below the heater Maintain cl...

Page 12: ...Model BH15ST BH30DL BH20ST BH40DL BH25ST EF BH50DL EF BH30ST EF BH60DL EF BH35ST EF BH70DL EF BH40ST EF BH45ST EF BH50ST EF BH55ST A 150 150 150 150 150 150 200 200 B 230 230 230 230 230 230 230 230 C...

Page 13: ...GURE 8 LINEAR DOUBLE LINEAR PROTECTIVE GRILLE Model BH15ST BH30DL BH20ST BH40DL BH25ST EF BH50DL EF BH30ST EF BH60DL EF BH35ST EF BH70DL EF BH40ST EF BH45ST EF BH50ST EF BH55ST A 150 150 150 150 150 1...

Page 14: ...C D B FIGURE 12 U TUBE ONE SIDE REFLECTOR Model BH15UT BH20UT BH25UT EF BH30UT EF BH35UT EF BH40UT EF BH45UT EF BH50UT EF A 150 150 150 150 150 150 200 200 B 230 230 230 230 230 230 230 230 C 1580 176...

Page 15: ...250 275 300 300 B 1370 1530 1530 1630 1780 1830 1880 1930 C 1500 1650 1650 1860 1960 2040 2110 2160 D 560 560 560 560 560 560 560 560 A C D B FIGURE 16 U TUBE PROTECTIVE GRILLE Model BH15UT BH20UT BH2...

Page 16: ...ssembly is attached to the last section of heat exchanger tubing Fan Tube Tube and Reflector Hanger Suspend system from these hangers Flex Gas Line Tube Heat treated aluminised tube supplied in 3 000...

Page 17: ...h clearances to combustibles as indicated in this manual The minimum and maximum gas inlet pressures must be maintained as indicated on the rating plate Typical installation configurations are shown o...

Page 18: ...ew Front View Hanger Bow Shackle I Beam I Beam Beam Clamp Bow Shackle Anchor Concrete Beam Locknut Washer Screw Hook min 10 mm Washer Wood Beam Turnbuckle not included 600 mm minimum 300 mm minimum 10...

Page 19: ...ST BH25ST BH25ST EF BH30ST BH30ST EF BH35ST BH35ST EF BH40ST BH40ST EF BH45ST BH45ST EF BH50ST BH50ST EF BH55ST R72XXXXX Burner Assembly Input and Fuel Varies 1 1 1 1 1 1 1 1 1 07260001 Fan Package XP...

Page 20: ...9 Linear General Assembly Overview Fan Tube Reflector Reflector End Cap Reflector Support Burner Coupling U Clips Burner Tube Tube and Reflector Hanger Tube Clamp Package Internal Swirler Fan Assembly...

Page 21: ...or width not shown 365 mm b end cap to burner fan 50 mm c end cap to hanger 50 mm d distance first hanger 2290 mm e distance typical between hangers 3050 mm f burner height 366 mm g burner length 291...

Page 22: ...Swirler 2 2 2 2 S5134W Fan Tube 100 mm x 3048 mm with 2134 mm Swirler 2 E0009170 Tee 100 mm x 100 mm x 100 mm 1 1 1 1 1 01329600 Standard Coupling Assembly 4 6 6 8 8 01329700 Coupling Lock 4 6 6 8 8 0...

Page 23: ...ure 21 Double Linear General Assembly Overview 1200 mm approx Fan Tube Burner Tube Clamp Package Reflector Reflector End Cap Reflector Support Coupling Fan Assembly Burner Tube Tube and Reflector Hang...

Page 24: ...r Tube Tube Reflector Hanger Coupling Assembly Fan Assembly LEGEND BH60DL EF BH70DL EF g c b d e b f e e Repeated Opposite Side BH40DL BH50DL EF g c b d e b f e Repeated Opposite Side BH30DL g c b d e...

Page 25: ...st be to the top Description Part Number Burner Tube 03051100 Bow Shackle E0007576 Tube Reflector Hanger 03090100 Tube Tube Orient coupling so that the impact block is in the 2 00 or 10 00 o clock pos...

Page 26: ...bar should be within tolerance listed below Repeat Step 6 4 A D until all tubes are assembled See Page 20 Section 6 4 2 shown below Tighten slide bar as shown below 3050 mm Typ 250 mm 2290 mm 250 mm T...

Page 27: ...6 LINEAR DOUBLE LINEAR HEATER INSTALLATION 21 Step 6 5 Tube Clamp Package Installation Description Part Number Tube Clamp Package 01318901 Tube Clamp 01396801 Bolt 97113940 Flat Washer 95211600 Nut 9...

Page 28: ...re Hazard Support reflector with reflector hanger and support strap Reflector must not touch tube Failure to follow these instructions can result in death injury or property damage Hanger Burner Tube...

Page 29: ...lector support with loose screws at the reflector overlap 3 The remaining reflector overlaps require a non slip overlap connection To affix the reflectors together in a non slip overlap either a use r...

Page 30: ...ep 6 7 Double Linear Tee Installation for double linear heaters only Tee Coupling Coupling Fan Tube Fan Tube Weld Spot Weld Spot Description Part Number Tee E0009170 Fan Tube S51XXW Coupling 01329600...

Page 31: ...XXXXX Burner Assembly Input and Fuel Varies 1 1 1 1 1 1 1 1 07260001 Fan Package XP1 1 1 1 1 07260002 Fan Package XP2 1 1 1 07260003 Fan Package XP3 1 03051100 Burner Tube 100 mm x 3048 mm 1 1 1 1 1 1...

Page 32: ...91907302 or spring hooks P N 91903300 rather than bow shackles Part No Description BH15UT BH20UT BH25UT BH25UT EF BH30UT BH30UT EF BH35UT BH35UT EF BH40UT BH40UT EF BH45UT BH45UT EF BH50UT BH50UT EF...

Page 33: ...SECTION 7 U TUBE HEATER INSTALLATION 27 Figure 23 U Tube Assembly Overview mm 200...

Page 34: ...5UT EF BH15UT BH30UT EF BH35UT EF BH40UT EF BH45UT EF BH50UT EF a overall width not shown 850 mm b end cap to burner fan 50 mm c end cap to hanger 50 mm d distance first hanger 2290 mm e distance typi...

Page 35: ...orque 13 5 Nm 129 in lb Bow Shackle NOTE Spreader bar must be used on single suspension point installations Do not hang heater from spreader bar Threaded Bar Tube and Reflector Hanger Suspension Chain...

Page 36: ...e with M6 lockwashers and M6 nuts TIGHT Loose U bolt 100 mm u bolt secured to bracket with M6 lockwashers and M6 nuts on top and bottom to allow for tube expansion and contraction U tube Standard U tu...

Page 37: ...oupling Tube Slide Bar A Close coupling with tab B Start slide bar coupling lock onto coupling C Insert tubes into coupling D Tighten coupling to join tubes Description Part Number Coupling 01329600 S...

Page 38: ...ERVICE MANUAL 32 Step 7 6 Tube Installation Step 7 7 U Tube Installation Tube Coupling Weld Spot Coupling U tube U tube Support Bracket Assembly Weld Spot Description Part Number Coupling 01329600 Sli...

Page 39: ...allation WARNING Fire Hazard Support reflector with reflector hanger and support strap Reflector must not touch tube Failure to follow these instructions can result in death injury or property damage...

Page 40: ...ctor support with loose screws at the reflector overlap 3 The remaining reflector overlaps require a non slip overlap connection To affix the reflectors together in a non slip overlap either a use ref...

Page 41: ...Multiburner Damper Flange Installation WARNING Severe Injury Hazard Secure burner to burner tube with bolts and lockwashers Hang heater with materials with a minimum working load of 75 lbs 33 kg Failu...

Page 42: ...on Typical Fan Arrangement 150 mm Hanger 150 mm Manifold Damper Typical Cross 100 x 150 x 100 x 150 100 mm Manifold 100 mm Hanger ID ID Sleeve Tee 100 x 100 x 100 Cross 100 x 150 x 100 x 150 Max 3000...

Page 43: ...ption Part Number Bolt 94273914 Lock Washer 96411600 Gasket 02568200 Burner R0720XXXX NOTE Tube clamp package not shown for clarity For details see Page 21 Step 6 5 Fan Assembly Vent Adapter Screw Tor...

Page 44: ...AND SERVICE MANUAL 38 9 3 Linear U Tube Fan Installation Step 9 4 Double Linear Fan Installation Fan Tube Fan Assembly Tighten securely until tube cannot be removed Weld Spot Tee Fan Assembly Tighten...

Page 45: ...l Exhaust Bend Vertical Exhaust Tee Spiral Aluminum Tube ID ID Sleeve Horizontal Exhaust Sleeve Horizontal Exhaust Louver Condensation runs to low level 3 4 CPVC pipe 1 BSP threaded hole Use 1 x reduc...

Page 46: ...MANUAL 40 Step 9 6 Condensate Drain Assembly Tee Condensate Cap Wall 1 BSP threaded hole Use 1 x reducer not supplied Must be connected to a drain system in accordance with local codes 3 4 CPVC Pipe...

Page 47: ...EATER ACCESSORIES 41 SECTION 10 OPTIONAL HEATER ACCESSORIES WARNING Cut Pinch Hazard Wear protective gear during installation operation and service Edges are sharp Failure to follow these instructions...

Page 48: ...tallation Reflector Side Extension Bracket 2 per reflector Use additional supports in high air movement applications Tube and Reflector Hanger Reflector Tube Reflector Support Description Part Number...

Page 49: ...10 2 3 Cut away the reflector to clear the tube leaving about 1 of material inside the scribed contour to attach the accessory joint Drill or punch six 3 mm diameter holes in reflector in the positio...

Page 50: ...stallation Step 10 3 2 Frame Shield Installation Step 10 3 3 Reflector Side Extension Installation for Decorative Grilles Description Part Number Aluminium Grille 610 mm X1220 mm 91407000 Distance A E...

Page 51: ...on Step 10 4 2 Grille End Cap Installation Step 10 4 3 Grille Installation Silicone Cap Grille Finger Description Part Number Grille Section 08050001 Grille End Cap 08050002 Silicone Cap 91915951 6P B...

Page 52: ...sh Guard Connection Tube and Reflector Hanger Reflector Tube Reflector Support Strap Stainless Steel Mesh Guard Description Part Number Mesh Guard 2438 mm E0009855 Mesh Guard 1524 mm C2329B Strap Stai...

Page 53: ...embly Hanging Bracket Stud Hex Nut Description Part Number Undershield Reflector Package 101 cm S7399K Assembly Hanging Bracket C0318B Stud M6 x 90 C0693B Nut M6 C0090B Undershield Reflector Hex Nut S...

Page 54: ...be heaters see Page 28 Figure 24 10 7 1 Hardware Installation The wall mounting brackets must be attached to a suitable wall through all mounting holes Screw sizes less than M8 5 16 may not be used In...

Page 55: ...SECTION 10 OPTIONAL HEATER ACCESSORIES 49 Figure 28 U Tube Angle Mounted Figure 29 Linear...

Page 56: ...ation Requirements Detailed recommendations for air supply are given in the relevant National Standards There must be an adequate supply of air for both combustion and general ventilation Air vents sh...

Page 57: ...necessary The fresh air duct must be self supporting 11 3 1 Air Supply Requirements When fresh air duct is used follow one of these rules The flue must penetrate the roof while fresh air can penetrat...

Page 58: ...4 Common Duct When using a common air inlet duct always ensure that the area of the common air inlet duct represents the area of all air ducts Burner Dust Arrest Baffle Plate 100 mm Diameter Fresh Air...

Page 59: ...burners being installed plus any other connected load The gas hose which feeds the system must be large enough to supply the required gas with a maximum pressure drop of 13 mm wc When gas piping is no...

Page 60: ...y Roberts Gordon 1000 mm Long Minimum Bend Radius 140 mm Shut Off Valve Flex Line Connector 45 0 45 545 mm minimum Gas Supply Pipe Flexible Gas Hose 1000 mm length 300 mm Shut Off Valve included with...

Page 61: ...ner heater systems All wiring must comply with current wiring regulations and any local regulations which may apply Always switch off the supply to the burner and disconnect by removing the plug befor...

Page 62: ...Wiring Diagram Double Linear Option 2 13 4 Typical External Wiring Diagram Multiburner Controller or Thermostat Burner 1 Burner 2 L N Earth Fan Earth N L 230 V 1 50 Hz 83 90 BTLW Fan 230 V 1 50 Hz Bu...

Page 63: ...N E blue blue black black SOCKET FAN EMC FILTER MAINS IN SOCKET 230 V 50 Hz blue brown brown EARTH STUD GAS VALVE green yellow sense ELECTRODE brown blue purple 1 2 Lockout Indicator Connector Dotted...

Page 64: ...r protective gear during installation operation and service Edges are sharp WARNING Failure to follow these instructions can result in death electric shock injury or property damage Burn Hazard Allow...

Page 65: ...at the end burner furthest from the exhaust fan with the inclined pressure gauge connected as described above Turn on the gas supply and con nect appliance electrical plug reset the pressure switch b...

Page 66: ...mately 3 mm 15 1 3 Tube and Reflector Maintenance With burner and fan removed clean the outer surfaces of the tubes using a brush and wipe the inner surface of the reflector with a soft damp cloth use...

Page 67: ...nual inspections of your RADIANT SERVICES equipment and perform service where necessary using only replacement parts sold and supplied by Radiant Services Ltd The Vicinity of the Heater Do not store o...

Page 68: ...Thermostat There should be no exposed wire or damage to the thermostat See Page 55 Section 13 Suspension Points Make sure the heater is hanging securely Look for signs of wear on the chain or ceiling...

Page 69: ...and vapors the minimum required clearances to combustibles away from heater Some objects will catch fire or explode when placed close to heater Cut Pinch Hazard Wear protective gear during installatio...

Page 70: ...ck White leads from the pressure switch place jumper between leads Does the fan turn on Replace pressure switch Remove obstruction Unplug burner Does the fan turn freely Is the fan obstructed Fan bear...

Page 71: ...SECTION 16 TROUBLESHOOTING 65 Troubleshooting Flow Chart Linear Double Linear and U Tube...

Page 72: ...s from the pressure switch place a jumper between leads Is there a spark Replace pressure switch Is the igniter gap set at 3 mm Carefully reset gap to 3 mm Replace automatic control unit Unplug burner...

Page 73: ...SECTION 16 TROUBLESHOOTING 67 Troubleshooting Flow Chart Multiburner...

Page 74: ...3 4 5 6 1 2 3 4 5 6 0 1 2 3 4 5 6 1 2 3 4 5 6 Manometer Governor Adjustment Screw behind cover Governor orifice pressure while burner is running See Page 73 Section 18 9 1 or See Page 74 Section 18 9...

Page 75: ...Hazard WARNING Use only genuine RADIANT SERVICES replacement parts per this installation operation and service manual Failure to follow these instructions can result in death electric shock injury or...

Page 76: ...Amber Neon Lamp 91320602 N S Outside Air Kit 07260000 F Gas Valve 90033101 N S Flue Collar 100 mm 91911700 G Governor Screw N A N S Outside Air Mounting Plate 07261000 H Outlet Pressure Tap N A N S 8...

Page 77: ...um Inlet 50 mbar 20 in wg 18 3 Venting Specifications 18 3 1 Fans BH 15 20 25 30 Model Torin DSF 133 42 BH 25 EF 30 EF 35 EF BH 35 40 45 Model Torin DSA 524 202 BH 40 EF 45 EF 50 EF BH 50 Model Magnet...

Page 78: ...BH50DL EF BH60DL BH60DL EF BH70DL BH70DL EF Input Gross kW 30 40 50 60 70 Input Net kW 27 5 36 45 54 63 Tube Length mm 12802 18898 18898 24994 24994 Overall Heater Length mm 13462 19558 19558 25654 2...

Page 79: ...86 3 36 3 81 4 29 4 77 5 25 Gas Consumption Natural G25 m3 h 1 66 2 22 2 77 3 32 3 88 4 43 4 99 5 54 6 09 Gas Consumption Propane m3 h kg h 0 56 1 07 0 75 1 43 0 94 1 79 1 13 2 15 1 32 2 50 1 51 2 86...

Page 80: ...AL 74 Based on Gross Caloric Value 18 9 2 EF Burner Specifications BH25 EF BH30 EF BH35 EF BH40 EF BH45 EF BH50 EF Burner Airplate ID Number 14 5 6 5 6 10 Jet Numbers Natural G20 20 16 9 5 2 B Gas Con...

Page 81: ......

Page 82: ...and supplied by Radiant Services Further Information Applications engineering and detailed guidance on systems design installation and equipment performance is available through RADIANT SERVICES repr...

Reviews: