6
QUIETCOOLSYSTEMS.COM
9.
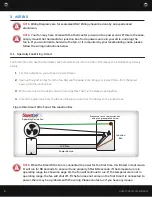
Place fan into the cut out area. Fasten the fan in each 4 corners to the vertical wood studs
(see
Figure 2.3E).
10.
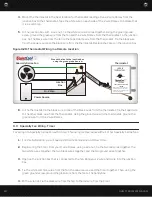
Caulk exterior around frame
(see Figure 2.3F).
11.
Attach the exterior cover to mounting frame using 4 sheet metal screws
(see Figure 2.3G).
12.
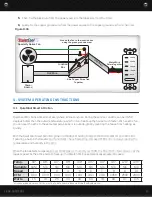
Mount inside wall grille
(see Figure 2.3H).
2.4 Installing RM model fans
1.
Determine in which area you would like to install your QuietCool Roof Mount Fan.
(see Figure 2.4D)
IMPORTANT:
If you are installing the RM fan as a ducted fan, it’s time to find the exact location for
your ceiling box and grille using a stud finder. Locate the wall studs and mark the location for the box
to be installed. Minimum of 20” clearance required. Make sure the duct will fit between the fan
location and the ceiling box location. Using a drywall saw, cut out the drywall.
2.
Drill 4 reference holes to mark where you will be cutting the roof. If you are installing the RM ES-1100,
mark a 14 1/4” x 14 1/4” square. If you are installing the RM ES-2200, mark a 16 1/4” x 16 1/4” square.
(see Figure 2.4A)
3.
Move to the roof and, using a circular saw, cut out the square.
(see Figure 2.4B)
4.
With the square cut out, place the roof mount fan over the cutout.
(see Figure 2.4C)
5.
Fasten the fan to the roof using appropriate connectors for your roof material.
6.
Flash in fan curb using appropriate weatherproofing method and materials based on roof material.
IMPORTANT:
If you are installing the RM fan in a flat or cathedral ceiling application, find the
location for your ceiling box and grille using a stud finder. Locate the wall studs and mark the
location for the box to be installed. Using a drywall saw, cut out the drywall. The move on to
step 7. If installing as an attic fan, you are done!
7.
Place the ceiling box (if applicable) over the ceiling cut out. Attach the ceiling box using screws into
the ceiling joists.
(see Figure 2.2D)
Install the ceiling grille.
(see Figure 2.3H)
Figure 2.3E
Figure 2.3F
Figure 2.3G
Figure 2.3H


