Pronto! 482/486/682/863
9-13
If you don`t want to change the linear blade you can skip to step 9.
6
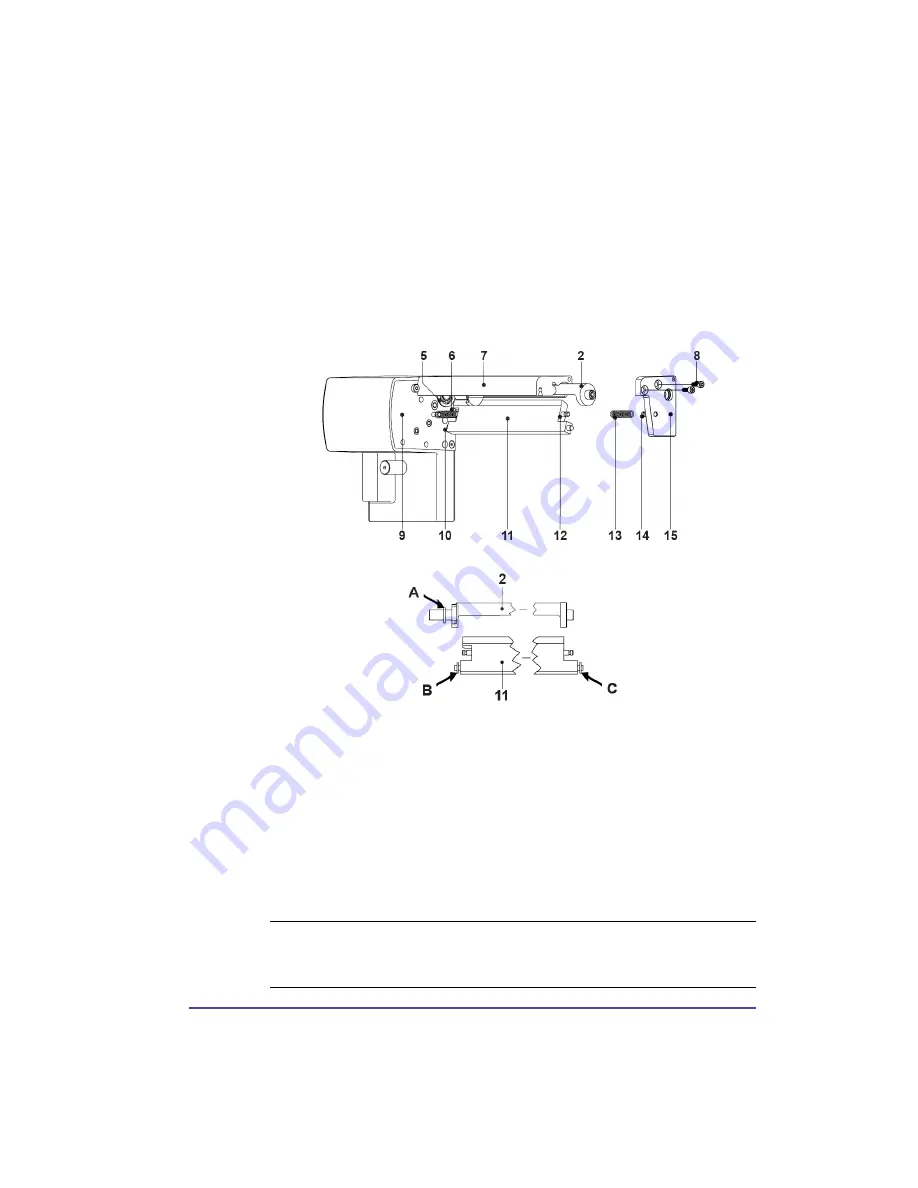
Take the spring (6) and the linear blade (11) from the mounting plate (9).
7
Insert the axle of the (new) linear blade withe the washer (B) in the
bearing (10) of the mounting plate. (The inscription of the linear blade has
to point downwards.)
8
Hang the spring (6) without tense on the pins of the mounting plate (9)
and the linear blade (11).
1
Turn the linear blade (11) backwards. The spring (6) gets tense. Insert the
Axle of the (new) circular blade (2) with the washer (A) in the bearing (5)
of the mounting plate.
2
Place the washer (C) on the axle of the linear blade.
3
Hang the spring (13) without tense on the pins of the linear blade (12) and
the bearing plate (14).
4
Positioning the bearing plate (14) on the axles (2, 11). The spring (13) gets
tense.
Note:
Attend on an accurate position of the bearing plate (15) to the
profile (7) of the cutter. A bad positioning could cause undefined cutting
edges.
Summary of Contents for pronto! 482
Page 2: ......
Page 12: ......
Page 20: ...8 Pronto 482 486 682 863...
Page 50: ...4 4 Device types...
Page 74: ...5 24 Configuration...
Page 88: ...6 14 Loading media...
Page 97: ...Pronto 482 486 682 863 8 7 2 Flange 3 Clamp 4 Rewind Axle Adapters 2...
Page 100: ...8 10 Accessories Rewinding directly onto the Rewind Axle...
Page 102: ...8 12 Accessories Rewinding onto 3 in 76 mm Cardboard Core...
Page 137: ...Pronto 482 486 682 863 8 47...
Page 152: ...8 62 Accessories...
Page 168: ...9 16 CU4 Cutter Accessory...
Page 183: ...Pronto 482 486 682 863 10 15 8 Move the table upwards until it stops 9 Close cover...
Page 220: ...13 8 Service functions...
Page 234: ...15 10 Memory media...
Page 244: ...16 10 Error treatment...
Page 250: ...17 6 Specifications...
Page 251: ...Pronto 482 486 682 863 A 1 Appendix A Menu Map...
Page 256: ...Index Pronto 482 486 682 863...


