background image

56

You should initialize the CYBER -6 completely

1.) When you want to recall the preprogrammed patterns.
2.) When the internal battery was changed
3.) When you´re told to do so by our service department

Since all sequencer patterns and masterkeyboard programs are cleared during the complete initialisation
process, you should save them first with a MIDI dump.

This is how you do it:

To initialize single memory areas, consult the “Initialization of memory areas” section in this manual.

COMPLETE INITIALIZATION

COMPLETE
INITIALIZA-
TION

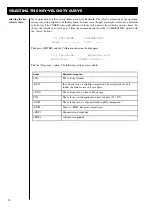
procedure of initialization

1.) Turn your CYBER-6 off

2.) Press and hold the “INFO” and the “1” button simultanously while turning the CYBER-6 back on.

3.) This message should appear on your display:

REALLY LOAD PRESET DATA INTO RAM

ENTER: YES / EXIT: NO

4.) Press [ENTER] to initialize or [EXIT9 to abort. After a few seconds the CYBER-6 is ready to play

5.) Calibrate the controllers as described above.

Summary of Contents for CYBER-6

Page 1: ...1 B E D I E N U N G S H A N D B U C H CYBER 6 The Realtime Enhancer...

Page 2: ...2...

Page 3: ...for removing the main lead only pull plug for connecting this keyboard with other equipment please follow the instructions in this script do not expose the keyboard to moisture should any liquid or s...

Page 4: ...tivators 26 The operating modes of the motivators 27 exercise 7 get to know the parameters in the arpeggiator mode 29 rhythmizing the motivator patterns 30 How to edit the instruments of the motivator...

Page 5: ...encer with much possibilities and interventions during live operations 6 drum programs in the fashion of TR 909 7 Up to 32 midi channels over two midi outs First of all these features cause enthusiasm...

Page 6: ...the info key Cyber 6 automatically jumps to the edit menu of the corresponding section The info button is also a great help in the selection of midi channels All submenus which are relevant for midi...

Page 7: ...ers can control motivator and interior sequencer parameters The sliders current data are not being stored in masterkeyboard programs The snap copy key enables copying the notes created by the arpeggia...

Page 8: ...midi output of the CYBER 6 Basic Operation You have learnedhow to use the keyboard and how to connect it Now we would like to give you an example For immidiate use of Cyber 6 we have programmed 30 mas...

Page 9: ...load a chain Chain numbers marked with a star are empty So it makes no sense to load them With enter key you can confirm a chain selection With seq start stop you can start the chain song When started...

Page 10: ...pro grams You will get very soon an impression of different kinds of utilization of Cyber 6 Using all the presented example programs you will avoid a lot of work If you have erased the example progra...

Page 11: ...On Off 5 bis 8 controller on off and polarity This parameters have an effect for the whole masterkeyboardprogramm So you can not change these values for individual zones Here you fix the functions of...

Page 12: ...intersection s restriction of speed caused by the midi transfer rate When Cyber 6 is switched on it is set to the masterkeyboard mode If you have searched in the menus of Cyber 6 press exit key an tu...

Page 13: ...ms and masterkeyboard set tings because you don t have problems with double used midi channels In our demonstra tion programms we have reserved the first eight midi channels for the motivators channel...

Page 14: ...alog synthesizers The monophone playmode of this instruments allows technics wich are not available by using polyphonic playmode Now we present the most important function of masterkeyboards After lea...

Page 15: ...ograms are the motivator parameters They will not be stored automaticly within the masterkeyboard program In the mas ter keyboard program you only select the number of the desired motivator program Th...

Page 16: ...channels all with the same key range 2 Split program with two sounds on each side of the keyboard Creating Split Programs is with two layered sounds on each side of a selectable splitpoint is possibl...

Page 17: ...controllers to manipulate the sounds of your synth in realtime For every zone you can decide which controller you want to use on and which you don t want to send on the zones midi channel With this f...

Page 18: ...to fit the display message For that reason look at the following list PitchB Pitch Bender Whl1 Wheel 1 Whl2 Wheel 2 Aftert Aftertouch Pedal Footpedal Jack Con1 Control 1 Regler 1 Con2 Control 2 Regle...

Page 19: ...one PROG NR 1 At this submenu you can now select the Keyboard zone which will control the motivator You can also select for both motivators a program number Both motivators can store up to 64 programs...

Page 20: ...the PAGE dial The following message should be displayed 10 WHEEL 1 Assign Modulat 1 WHEEL 2 Assign GenP1 16 11 AFTERTOUCH Assign AFTERT PEDAL Assign DrumPitch C2 12 CONTROL1 Assign GenP2 17 CONTROL2 A...

Page 21: ...or sending the LSBs of the controllers 0 31 This would make possible an extreme expansion of the resolution of the first 32 controllers As this feature is not implemented in any well known device and...

Page 22: ...ootswitches you can also provide these with different functions Before you turn on the CYBER 6 the footswitches should already be connected to the corresponding sockets so that the CYBER 6 can ascerta...

Page 23: ...ontrollers no 68 79 specified Hold 2 69 These controllers have no defined function Since the first MIDI specification the controller 69 is defined as Hold 2 We are sorry but we couldn t find out the d...

Page 24: ...ning this read also the chap ter realtime control of sequencer tracks on page 39 The determination is done in the submenus 16 and 17 of the masterkeyboard edit area 16 SEQ Mod1 OFF Invert OFF SEQ MOD2...

Page 25: ...n all steps in the grid have been activated the resulting rhythm scheme is equal to the rhythm of the sequencer But if in contrast to that not all steps are activated this causes an alteration in the...

Page 26: ...e display 1 MOT 1 EDIT Speed 120 Reso 16 Gate Time 65 Mode ARPEG The parameters are selected with the CURSOR keys as you already know from the masterkeyboard edit menu and changed with the keys The fo...

Page 27: ...e again In this case you won t hear anything of the gater effect Of course this is the same with also for controllers which cannot be processed at all If in the display the cursor is positioned at the...

Page 28: ...eresting Perhaps you look at the chapter The rhythmization of the motivator patterns before trying out the gater and chord mode to make your first attempts with these functions more interestingly The...

Page 29: ...ibed in the next chapter If some things seem be left unexplained or unclear in this chapter they will be solved at last in the next chapter exercise 7 get to know the param eters in the arpeggiator mo...

Page 30: ...urself with the next menu rhythmization of the motivator patterns Adjusting the loop length Loop Also this parameter influences the rhythmization One programmed rhythm motif can contain up to 32 steps...

Page 31: ...ode which indicates in which way the inputs done with the keyboard are processed This parameter can be changed as usually with the buttons The following settings are possible desired action parame ter...

Page 32: ...on the selected instrument a motivator pattern may sound very differently In the submenu 5 the instruments can be changed After the selection of the page 5 of the display you should receive the follo...

Page 33: ...iations move in the stereo panorama Use different intensities of modulation for receiving differ ing intensities of the influences on each instrument when using realtime controls Programm variing tran...

Page 34: ...ectly into the memory of the sequencer for a quick conservation or a further arrangement For playing in your own sequences please use the EDIT SEQ button at the top right If you have already used this...

Page 35: ...g submenu Sequencer Pattern Format measure length 4 4 With the Tasten you can set the desired measure Therefore the CYBER 6 allows the following values 2 4 5 8 3 4 7 8 4 4 9 8 5 4 After you have confi...

Page 36: ...ed up to four times before the following note is played Track oriented parameters The following two pages of the display page 3 and 4 contain important parameters concerning the tracks track oriented...

Page 37: ...g the buttons or with the help of the keyboard therefore the ENTER button must be kept pressed and then hit the corresponding key on the keyboard Of course in this case the cursor must be positioned a...

Page 38: ...before are erased 2 OVERDUB The played in notes are added to the already existing ones Pressing the button once more after having already selected the OVERDUB mode another treat follows a special reco...

Page 39: ...ossible 8th 12th 16th 24th and 32th notes If you press the ENTER button you receive a display that may remind you of the rhythmization grid of the motivator patterns and really a certain similarity wa...

Page 40: ...as simple as a game There are to ways to select the instruments 1 Using the Inst mode that is described below it is only for the selection of instruments 2 Keep the ENTER button pressed and press the...

Page 41: ...er step rec on notes and then push the enter button Now you have a lot of time to play your e g melody or bass line one note cup of tea one note cup of tea one you can play single notes or completly c...

Page 42: ...her adjustments These adjustments have effect on the realtime modulation of previously played in sequencer tracks via masterkeyboard programs As you could already see editing the masterkeyboard progra...

Page 43: ...ed track solo you have to push the INFO button Now push the ENTER button and the MIDI controller on this track should be delete This process could be undone by the UNDO function Snapshot Copy motivato...

Page 44: ...then press enter button Now you have a new pattern with all the settings from the original The following track parameters will be copied MIDI channel chan The sequenzer tracks have the same MIDI chann...

Page 45: ...e MIDI channel with the current one are copied to it and then cleared for use with other instruments The fourth function is the track copy function wich can be used copy single tracks such as an extre...

Page 46: ...you can select wether transposing via keyboard is valid or not And if it IS you can select how many steps up or down it will work You see every single step you make is magic Plus you can even tell th...

Page 47: ...the chain In the first line of the display you can see apart from the mute sttings the current masterkeyboard program and the selected pattern for example MKB 5 PAT 5 means masterkeyboard program 5 an...

Page 48: ...e entered here so you can jump to any of the steps in the chain Masterkeyboard program number MKB Here you can enter the number of the masterkeyboard program to use in the step If you want to keep the...

Page 49: ...e you have an active masterkeyboard layer in the area designated for realtime transposing it s MIDI output will be sup pressed kind of transpose handling name description Realtime transpose OFF This t...

Page 50: ...onfirm with ENTER or abort with EXIT Guess you knew that Like the chain mode also the motivator freeze function is another highlight for live performance of the CYBER 6 With the freeze function you ca...

Page 51: ...ogram plus motivator programs act Keyb Mot Transmits the current masterkeyboard program and the Motivator programs These must must have been saved before you can dump it If you have changed them and n...

Page 52: ...chains are cleared but NOT the patterns used therein Use this function to set the realtime controller ranges and curves Normally the factory presets should be ok except for the external pedals How sho...

Page 53: ...ne or more keys using the amount of pressure that should not trigger the Aftertouch 4 Press ENTER and the value is saved as the minimum value Set the MAXIMUM value for the selected controller MAX 1 Ch...

Page 54: ...INIT DUMP CALIBRATION Dump Init Then press ENTER and the Calibration submenu should appear 1 Calibrate Dynamics LIN Controller AFTER Value Pick the Dynamics option The following settings are availabl...

Page 55: ...function assigned to footswitch 2 in the masterkeyboard program is disabled Freezing a Motivator sequence and enabling the Motivator transpose function Mot Freeze This setting enables the a special M...

Page 56: ...This is how you do it To initialize single memory areas consult the Initialization of memory areas section in this manual COMPLETE INITIALIZATION COMPLETE INITIALIZA TION procedure of initialization 1...

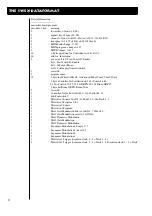
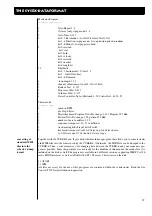
Page 57: ...w 8 dt data 7 bit F7 end of System Exclusive Adress Map H M L 00 xx 00 Masterkeyboard Program xx 0 127 01 xx 00 Motivator Program xx 0 63 MOT1 64 127 MOT2 02 xx 00 Pattern Nr xx nibbled 03 xx yy Chain...

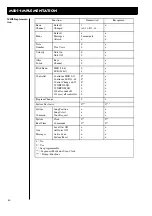
Page 58: ...1 byte Controller Nr 0 Aftertouch 1 63 Control 1 63 64 90 Control 70 95 91 98 NRPN 99 103 Drum NRPN 2 byte bei Drum NRPN Drum Note 9 reserved 1 Controller Nr for Footswitch1 0 19 Control 64 83 1 dito...

Page 59: ...ence transpose 0 12 23 in halftones 1 track muting bit0 Track1 bit1 Track2 1 keyboard transposer 0 off 1 1Octave up 2 1Octave down 3 1 2Octave up 1 2 Oct down 2 Octave range The SYSEX Dataformat Toget...

Page 60: ...bit LSB 14 bit 0 x x x Controller Continous MSB 0 31 Continous LSB 32 63 Control Change 64 95 98 NRPN LSB 99 NRPN MSB 120 all sounds off 121 reset all controller 0 0 0 0 0 x 0 x x x x x x x Program Ch...

Page 61: ...your unit to an Authorized QUASIMIDI Repair Station If you are unable to locate one write or call the QUASIMIDI Factory Service Department We will either refer you to an Authorized Repair Staion or i...

Page 62: ...62 Warranty card...

Page 63: ...e acces motivators and sequencer Weight 12 5 KG Connections 2 footswitch jacks 1 footpedal jack MIDI In MIDI Out and MIDI Thru jack Power requirement 110 V 60 Hz 10 Watt max Physical dimensions Width...

Reviews: