background image

22

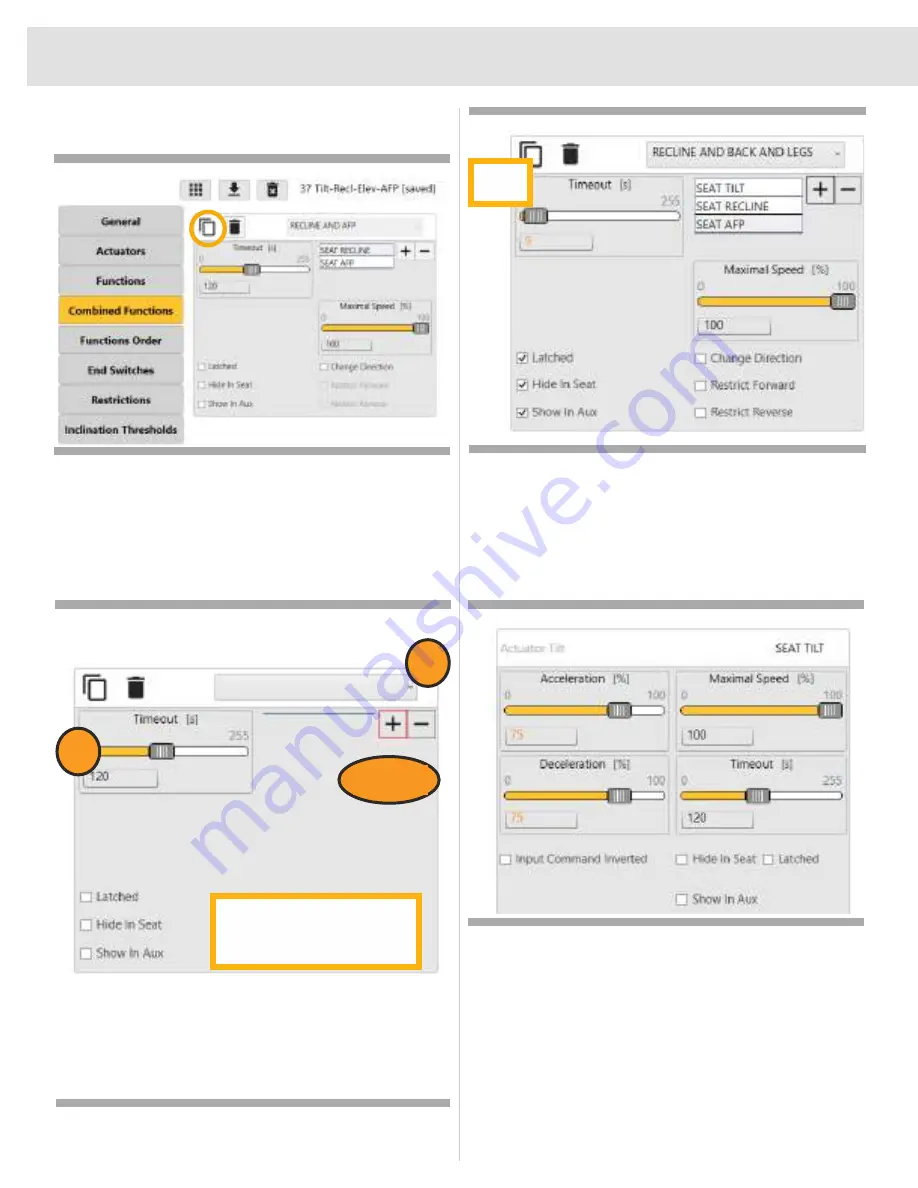
3.  Once in Combined Functions, click on the Add New 

Combined Function icon.

4.  Select Recline and Back and Legs from the drop down.
5.  Set  timeout to the approximate time needed (keep in 

mind this time can change depending on the end user.)

6.  Click on the + sign, click on Seat Tilt, and click OK.
7.  Click on the + sign, click on Seat Recline, and click OK.
8.  Click on the + sign, click on Seat AFP, and click OK.

9.  Next Click on Functions on the Left side of the screen. 

Below is an example of where to set the actuators to; 
however, depending on the situation and the position 
the end use,r needs to be in, it can be changed to 
read the goal. It's all about manipulating the speeds 
of the actuators in combination with the time out set in 
Combined Functions.

4.

5.

6, 7, 8

1.  Latch the function.

2.  It can either show in the seat 

or in the Aux profile under 

User Functions

Finished 

Product

SEAT

Summary of Contents for Q-Logic 3

Page 1: ...Q LOGIC 3 PROGRAMMING GUIDE ...

Page 2: ...tion On the product this icon is represented as a black symbol on a yellow triangle with a black border MANDATORY WARNING These actions should be performed as specified Failure to perform mandatory actions can cause personal injury and or equipment damage On the product this icon is respresented as a white symbol on a blue dot with a white border Intended Use A wheelchair component is a device int...

Page 3: ...all the warnings and safety information found in the Consumer Safety Guide and refer to this resource often Please refer to the Q Logic 3 Basic Operation Instructions and the Consumer Safety Guide included with the power chair prior to making any changes to the pre programmed parameters of the controller WARNING A Quantum Rehab Provider or a qualified technician must perform the initial setup of t...

Page 4: ...r is programmed incorrectly or outside of the safe limits as determined by the healthcare professional it can create a dangerous situation Only the power chair manufacturer or a Quantum Rehab Provider should program the controller Programming Startup Configuration Input Device Selection Screen Programming the Input Device Selection will tell the system how the power chair will power up There are 3...

Page 5: ...ll be programmed i e if you have a 3 Switch Head Array plugged into the Enhanced Display of the power chair 2 On the first screen choose Enhanced Display 3 On the second screen choose Head 4 On the third screen choose 3 Switch Head Adding Provider Information A Provider can add their contact information in a Q Logic 3 Enhanced Display or Hand Control The serial number of the power chair is automat...

Page 6: ...nabled disabled Key I II Can be set to Disabled Drive 1 Seat Aux Menu and Custom MIO Home Button Allows the Home Button to be enabled disabled Programming Hand Control Options Button Operation 1 Parameter Settings Program Adjustments 2 Hand Control 3 Button Operation Toggle Mode Allows the toggle function of the on off toggle to be disabled Horn Button Allows the horn button to be enabled disabled...

Page 7: ... the power chair to System Ready See page 33 Programming Mode Programming Proportional Alternative Drive Controls Proportional Alternative Drive controls consist of joysticks such as the mo Vis All Round Stealth Mushroom Joystick and Switch It Joystick A Can These proportional controls plug into the 9 pin connection on either the SCIM Enhanced Display in the Q Logic 3 Drive Control System To progr...

Page 8: ...See page 33 Programming Mode Programming Mini Joystick Calibration Proportional Alternative Drive controls at times do require a calibration through the Q Logic 3 system This is to ensure the system knows where the center position is At power up the error message that will show on the joystick is 35 Joy stick Not Centered To calibrate the joystick 1 Parameter Settings Program Adjustments 2 Enhance...

Page 9: ...there will be a drop down menu From there either Enable Left or Enable Right can be selected Click on the little arrow at the bottom of the screen next to Programming Mode to reset the system for driving The system is now ready to drive See page 33 Programming Double Command Timing Double CommandTime is the time the end user has to pro vide a double command There are two ways this can be accomplis...

Page 10: ...owing the directions provided for the end user to set their own double command time Programming Mode Jack E Stop Mode Jack E Stop enables the switch plugged into the mode jack to perform an emergency stop command 1 Parameter Settings Program Adjustments 2 Enhanced Display or SCIM 3 Switch Options Timing 4 On Off Jack E Stop Off E Stop will not function Decal Stop Power chair will come to a gradual...

Page 11: ... Command to the end user s choice for Sleep Mode Programming Switched Turning Adjustments Switched Turn allows the speed and tightness of the turn to be adjusted 1 Parameter Settings Program Adjustments 2 System Shape settings Fromhereyoucanadjusteachparameterindividually per profile setup Provide a left command on the home screen or provide a mode command until you reach the Auxiliary screen High...

Page 12: ...tment 4 Sampling Delay Puff Click on the sliding bar and move it until the desired time is reached 5 Sampling Delay Sip Click on the sliding bar and move it until the desired time is reached Programming Sip N Puff Assign Direction Pressure Direction Assignment can be changed if a end user has an easier time performing a hard sip instead of a hard puff for a forward command 1 Parameter Settings Pro...

Page 13: ...et for a certain length of time When that time expires the power chair goes into a standby mode Standby mode then reverts to the home screen where the end user can choose which part of the chair they want to go into such as Settings Drive or Seat 1 Parameter Settings Program Adjustments 2 Sip N Puff 3 Standby Select Enabled 4 Standby Select Timeout Use the Slide Bar in the time out box to set the ...

Page 14: ...and over 50 is given the chair will come an quick stop Speed Step Reduce When a short reverse command is given when Cruise is in use the speed of the power chair will reduce to the speed they wish to drive in A long reverse command will stop the power chair When using 3 Step a short reverse command is given the speed will step down A full stop can be done with a long reverse command Programming 5 ...

Page 15: ...3 Switch 1 Parameter Settings Program Adjustments 2 Enhanced Display or SCIM 3 Input Configuration From the drop down scroll and select 3 Switch The unit will go into Programming Mode Click on the arrow next to Programming Mode to reset the power chair to System Ready See page 33 Programming 3 Switch Toggle Command 1 Parameter Settings Program Adjustments 2 Enhanced Display 3 3 Direction Arrow Tog...

Page 16: ...ge the power chair back to System Ready See page 33 Programming 1 Switch 1 Switch Scan Settings 1 Parameter Settings Program Adjustments 2 1 Switch Scanner 3 1 Switch Scanner Settings Scan Rate Will set the scanner speed rotation E Stop for Latch If Latch Forward is Enabled the chair will come to a stop when the switch is pressed for the time set in E Stop Switch Hold Time Defines the amount of ti...

Page 17: ...mmed Example With a 3 Switch Head Array plugged into the enhanced display of the power chair highlight Enhanced Display on the first screen and give a right input device command On the second screen highlight Head and give a right input device command On the third screen highlight 3 Switch Head and give a right input device command Changing Input Devices Quickly Another option for changing input d...

Page 18: ... be adjusted from there 4 After the changes are made click on the Save icon Seat Programming Drive Inclination HHP Drive Inclination Allows the individual to drive while in a preset amount of tilt or tilt recline The standard settings from Quantum Rehab is 25 degrees 1 Program Adjustments 2 Seat Configuration 3 Inclination Thresholds 4 Drive Restriction 5 Angle Using the up and down arrows on the ...

Page 19: ...eclining seatback do not attempt to negotiate inclines with the seat in a reclined position Do not attempt to negotiate obstacles with the seat in a reclined position unless an attendant is present to help stabilize the chair Failure to heed this warning may result in inadequate inaccurate programming and may result in instability product damage and dangerous situations that may lead to serious pe...

Page 20: ...ed Deceleration Timeout Show in Aux Input Command Inverted x100 x10 Add to 6 8 Latched Hide in Seat Program Adjustments Change to 1 Seat Configuration Functions SEAT TILT Min 0 Max 1 Latched 0 x100 x10 Add to Program Adjustments Seat Configuration Functions SEAT TILT Min 0 Max 1 Latched 0 x100 x10 Add to Program Adjustments Seat Configuration Functions Seat Tilt Acceleration Maximal Speed Decelera...

Page 21: ...ick on the Save icon Figure 8 Seat Programming Input Command Inverted Econ W Combined Latched Seating This document will help you set a demo chair with combined latched seating to mimic Memory Seating Keep in mind do not call this memory seating This is just a way to mimic what memory seating does in the Q Logic 3 Drive Control System by using the Combined Function Feature along with the actuator ...

Page 22: ...nd click OK 8 Click on the sign click on Seat AFP and click OK 9 Next Click on Functions on the Left side of the screen Below is an example of where to set the actuators to however depending on the situation and the position the end use r needs to be in it can be changed to read the goal It s all about manipulating the speeds of the actuators in combination with the time out set in Combined Functi...

Page 23: ...ow program a Mapped I O to that combined function so it works through a press of a switch 1 Once connected to the power chair click on the Mapped I O icon on the top tool bar 2 Next click on the Mapped I O 3 Program the Mapped I O like normal 4 Make sure to Save and change the configuration of either the Key or Mode Jack to Custom MIO Program the output to the Combined Latched Actuator function pr...

Page 24: ...Latched Show in Aux Input Command Inverted x100 x10 Add to 8 8 Program Adjustments Seat Configuration Preset Modified General Actuators x100 x10 Add to 7 7 Inclination Thresholds Functions Save Seat Configuration Save Seat Configuration x100 x10 Add to Seat Configuration Changes in seat configuration successfully saved Program Adjustments Seat Configuration Functions SEAT TILT Min 0 Max 1 Input Co...

Page 25: ...ect Actuator Restriction 3 Set the Restriction to Forward Restricted 4 Set the Actuator Type to Actuator Tilt for a pretilt or Actuator Recline for a pre recline 5 Click on the sign and choose Condition 1 6 Set drop down to Inclination Condition 7 Use the slide bar to select your pretilt or pre recline angle 8 Click on the drop down and select Inclination Seat Recline 9 Set Threshold to Threshold ...

Page 26: ...ure 13 iAccess Programming Module 2 Buttons Delete iAccess Programming Single Page Mode HHP Press the left soft key to change from 1 Button and 2 Button Use the and keys to select the function you wish those buttons to have Press the right arrow to change to the next button set When completed press the right soft key twice Press the soft key under Save and the configuration will save Program Adjus...

Page 27: ... Configurator 1 1 x100 Mx0 Add to Mode Next Mode Brochure x100 Mx0 Add to iAccess Configuration Changes in iAccess configuration successfully saved Multi Page Left Mo Delete All iAccess Programming Multiple Page Mode 1 Click Tap on the Mapped I O icon 2 Click Tap on the iAccess button 3 Select either Multi Page right mode or Multi Page left mode The screen will change showing a picture of the iAcc...

Page 28: ... is highlighted and give a right input device command This will check the box Programming Bluetooth Mouse First the mouse clicks need to be programmed within the system To program mouse clicks and enable mouse in the system follow these steps 1 Parameter Settings Program Adjustments 2 Bluetooth 3 Mouse Mouse set to Enabled Mouse Clicks there is an array of different ways to click within the system...

Page 29: ...r 9 A new window will pop up about the icon Find Show Bluetooth Devices and click on it This will show all the available Bluetooth signals in this area When you find the ID number which for mouse will be MouseXXXX the XXXX will represent a 4 digit number Click on it 10 A new drop down will appear on the screen click on Pair 11 Confirm the pairing number on the power chair first by giving a forward...

Page 30: ...t hand side of the screen tap on General 3 Find Accessibility and tap on it 4 Find Switch Control and tap on it 5 Make sure the Switch Control is switched to green or to the right side 6 Next tap on Switches on the right half of the screen 7 Find Add New Switch and tap on it 8 Tap on External 9 The right half of the screen will only say Activate your external switch 10 Give a input device command ...

Page 31: ...ill check 4 Go to the Home Screen again and now give a right turn command 5 Highlight Mouse Connections and give a right turn command 6 Highlight New and give a right turn command 7 Picture of the mouse will appear with the ID number Pair the power chair to the iPhone or iPad as you would a computer mouse Once the pairing is complete the power chair will work the iPhone much like a computer mouse ...

Page 32: ...u 6 Button Configuration The 6 Button Configuration can be used for a vast array of configurations such as but not limited to Favorite Channels Toys DVD Players DVD Recorders Up to 4 pages can be added along with custom text for each button Figure 22 Function Remote Menu Figure 21 Button Configuration IR Menu Remote Menu The Remote menu is an easy way to set up a remote control that will resemble ...

Page 33: ...ter the project is saved or the project is opened to load it to a end user s power chair click on the Load IR Project to Device icon Once the project is successfully loaded into the connected power chair the following window will pop up Click OK and now you are ready to program the IR signals Provide a left command with the input device IR Learn Mode After the menus are built and loaded into the p...

Page 34: ... command you wish to program from the remote control You do not need to press the button down on the remote control until is leaves the learning screen Once the signal is received and recognized it will go to this screen Scroll down to Test and give a right input command to test the signal The command you pressed should be outputted by the Enhanced Display If the output is good go down to Save and...

Page 35: ... 7 Another new section will open up Click on Menu Tree Editor 8 Under the Remote Control Menu Tree Editor all the menus programmed into the system are visible regardless if they have signals sent to them or not 9 Click on the Save button on top off the toolbar under Remote Control Menu Tree Editor 10 When the Save button is clicked a new windows will appear 11 Make sure that the Include learned IR...

Page 36: ...rameter Settings Program Adjustments 2 Reminder 3 System Day Reminder System Days Reminder Set to Enabled System Days Reminder Text Choose the text that will show up when the reminder is triggered Text is from the General Settings page System Days Trigger Is to choose the number of days until the reminder will trigger User Reminder Settings allows the user to turn off reminders or postpone the rem...

Page 37: ...out of Programming Mode HHP Program Adjustments Hand Control Wrong System State 1 1 YES NO Change state of connected accessory to programming mode Change into Programming Mode Press the left arrow to come out of the programming mode to the Main Screen When you press Yes system will go back to System Ready Program Adjustments Hand Control Exit Programming Mode 1 1 YES NO Press the yes softkey to ex...

Page 38: ...38 NOTES ...

Page 39: ...39 NOTES ...

Page 40: ...40 NOTES ...

Page 41: ...41 NOTES ...

Page 42: ...42 NOTES ...

Page 43: ......

Page 44: ...L www quantumrehab co uk Netherlands Authorised EU Representative De Zwaan 3 1601 MS Enkhuizen www quantumrehab eu Italy Via del Progresso ang Via del Lavoro Loc Prato della Corte 00065 Fiano Romano RM www quantumrehab italia it France 26 Rue Monseigneur Ancel 69800 Saint Priest www quantumrehab fr Spain Calle Las Minas Número 67 Polígono Industrial Urtinsa II de Alcorcón 28923 Madrid www quantumr...

Reviews: