7
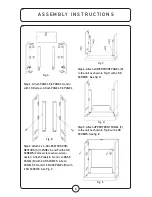
Step 6: Attach TOP PANEL [A] on top with
3 KD SCREWS. See fig. F
Fig. F
Step 7: Tighten all KD SCREWS.
FIREPLACE INSERT
INSTALLATION:
The fireplace insert can be installed after the
mantel has been fully assembled.
WARNING: Make sure the fireplace insert
controls are in the OFF position and the unit
is NOT plugged in.
Step 1: Attach 2 Large “L” brackets [Q] to
each side of the fireplace insert with wash-
ers [S] and secured with small screws [T]
and nuts [R]. See Fig. G.
Fig. G
Step 2: Attach fireplace insert into the unit
as shown in Fig. H with 5 screws [U]. (3 KD
short screws at the top of the insert and 2
short KD screws at the Large “L” bracket
[Q]). See Fig. H.
Fig. H
Step 3: Move assembled unit to desired
location. Unit should not be positioned in
area exposed to direct sunlight.
A S S E M B LY I N S T R U C T I O N S
Summary of Contents for M850P-26FDC
Page 13: ...13...


