background image

17

35 

cm

35 

cm

15 

cm

15 

cm

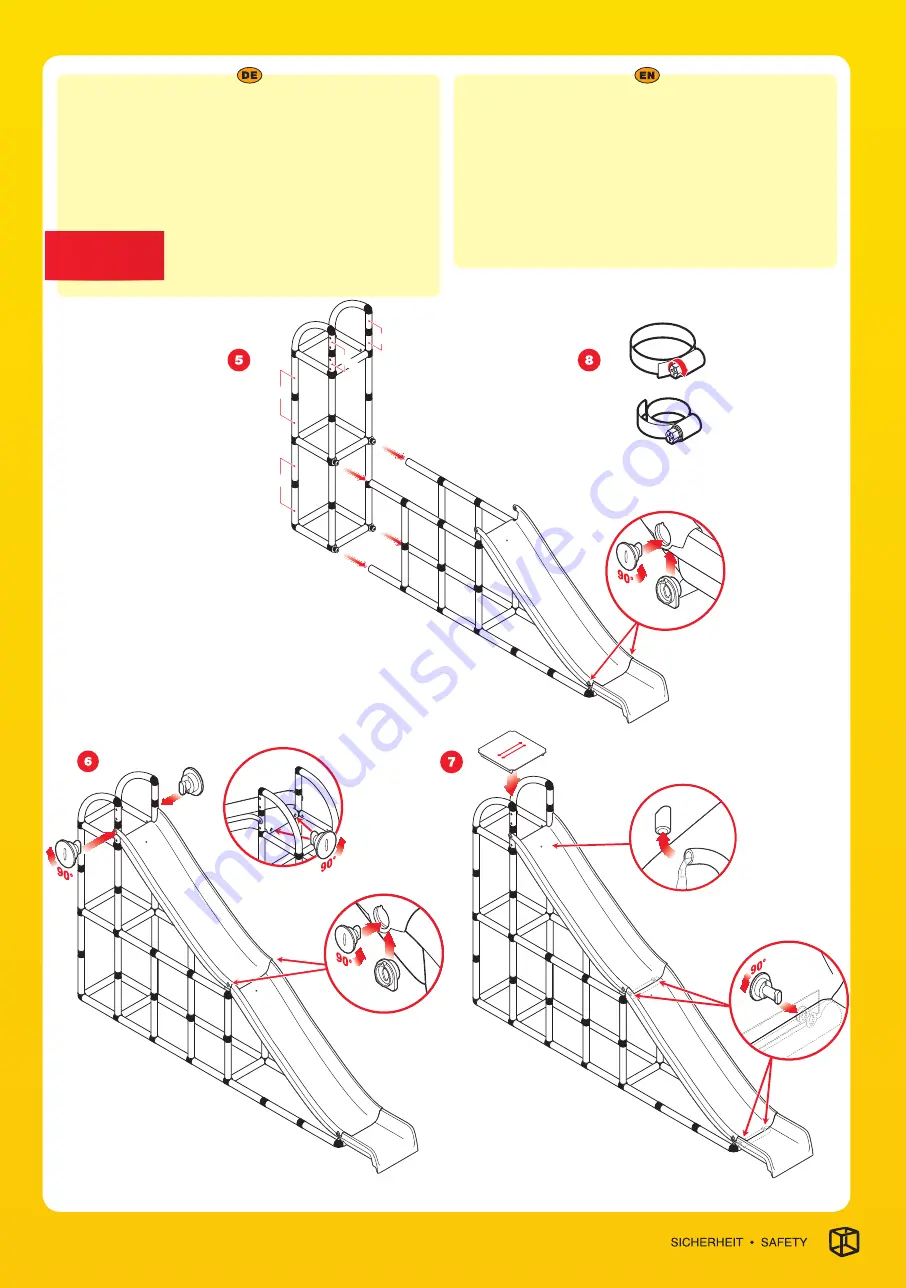
Hinweis (Abb. 7): 

Die QUADRO Doppelrutsche bietet die Möglich-

keit einen Gartenschlauch anzuschließen. Stülpen Sie hierzu ei-
nen Gartenschlauch über den Zapfen auf der Rückseite der Modu-
larrutsche. Dieses Feature lässt sich am besten nutzen, wenn die 
QUADRO Doppelrutsche mit der QUADRO Rutschenverlängerung (Art. 
10035) kombiniert wird. Modellverschläge finden Sie in der QUADRO 
Modelldatenbank (quadroworld.com/models, quadroworld.com/getcreative 
und quadroworld.com/yougen).

Hinweis: 

Die hier gezeigten Aufbauhinweise können sich von Modell zu Mo-

dell leicht unterscheiden. Folgenden Sie diesbezüglich den Hinweisen in der 
Aufbauanleitung des Modells. 

Es kann vorkommen, daß der Schlauch nicht fest genug auf 

dem Zapfen der Bogenrutsche sitzt. In diesem Fall fixieren Sie ihn mit einer 
Schlauchschelle (erhältlich u.a. im Baumarkt).

Advice (Illustration 7): 

The Double Slide gives you the opportunity to connect 

a hose pipe. Pull the hose pipe over the connector on the backside of the slide. 
This opportunity is recommended when the Double Slide is combined with 
the QUADRO Slide Extension (Art. 10035). Model proposals are shown in the  
Model Database (quadroworld.com/models, quadroworld.com/getcreative 
and quadroworld.com/yougen).

Advice: 

The assembly instructions shown here may vary slightly from model 

to model. In this case please follow the notices in the assembly instruction 
of the model. 

Tip (Illustration 8): 

It can happen that the hose cannot be attached tight 

enough to the connector. In this case, use a hose clamp to additionally fix it. 
(Supplied amongst others in do-it-yourself stores).

Summary of Contents for Starter Kit

Page 1: ...re reference Bitte bewahren Sie diese Informationen f r sp tere R ckfragen auf tested approved recommended worldwide since 1979 SICHERHEIT SAFETY EN DE BUILD CLIMB DRIVE SLIDE SPLASH tested approved r...

Page 2: ...sche Assembling of the Curved Slide 12 13 1 22 Montage der Integralrutsche Assembling of the Integrated Slide 14 1 23 Montage der Doppelrutsche Bogen Modularrutsche Assembling of the Double Slide Curv...

Page 3: ...t allowed to leave un connected or unscrewed tubes or connector plugs Caution Each tube always needs two connector pins Assembling and Dismantling To connect or remove tube from connector turn tube sl...

Page 4: ...rschraubens der Rohre darauf wo Platten eingesetzt werden sollen An diesen Stellen findet die Fixierung der Rohre nur durch die Plattenschraube statt Only put weight on the panels when they are screwe...

Page 5: ...be wird f r das Verbinden von QUADRO und miniQUADRO verwendet sowie zur Fixierung des QUADRO Holz gitters Art 00552 00555 The VIP screw is used for connecting the QUADRO and miniQUADRO pieces with eac...

Page 6: ...en Before assembling the multi wheel Art 00852 00855 in the QUADRO mo del put the tread Art 00895 on the multi wheel to achieve a smoother and more quiet rolling Tip To facilitate the assembling of th...

Page 7: ...to connect the goal net to the goal you need to put it over the wing screw Art 00663 Double tube connector assembled inflexible The Double tube connector is screwed according to illustration 1 4 1 2 o...

Page 8: ...m innen Poolfolie Maximale Wasserh he 15 cm Pool L Ma e 245 x 125 x 45 cm aussen 162 5 x 122 5 x 45 cm innen Poolfolie Maximale Wasserh he 35 cm Pool XXL Ma e 325 x 205 x 45 cm aussen 242 5 x 122 5 x...

Page 9: ...the aluminium profile as many times as you like illustration 3 Please note that in the middle of the Alu profile connector a Cable strap is fixed properly in order to prevent the slipping of the Alu p...

Page 10: ...bes Rundtextil mit 35 cm Rohren Round textile with 35 cm tubes Hinweis Das Rundtextil w hrend der Montage nicht zu sehr spannen Achtung Niemals versuchen sich auf das Rundtextil zu setzen oder zu stel...

Page 11: ...hers in do it yourself stores Montage der Modularrutsche Schritt 1 Abb 1 Bauen Sie zun chst den Rahmen f r die Modularrutsche entsprechend der Abbildung Schritt 2 Abb 2 Setzen Sie dann den Auslauf ein...

Page 12: ...diesem Fall fixieren Sie ihn mit einer Schlauchschelle erh ltlich u a im Baumarkt Assembling of the Curved Slide Step 1 Illustration 1 First of all assemble the frame for the QUADRO Curved Slide and...

Page 13: ...13 Art 00612 00615 Art 00620 Art 00630 Art 00630 Art 00623...

Page 14: ...In diesem Fall fixieren Sie ihn zus tzlich mit einer Schlauchschelle erh ltlich im Baumarkt Assembling of the Integrated Slide Step 1 Illustration 1 As shown in the illustration attach the QUADRO pan...

Page 15: ...r Schlauch nicht fest genug auf dem Zapfen der Bogenrutsche sitzt In diesem Fall fixieren Sie ihn mit einer Schlauchschelle erh ltlich u a im Baumarkt Step 1 Illustration 1 2 First of all assemble the...

Page 16: ...beren Be reich des Modells In diesem letzten Schritt wird auch die lange Rutschen schraube Art 00623 fixiert um den Auslauf mit der Modular und die Modu lar mit der zweiten Modularrutsche vollst ndig...

Page 17: ...Schlauch nicht fest genug auf dem Zapfen der Bogenrutsche sitzt In diesem Fall fixieren Sie ihn mit einer Schlauchschelle erh ltlich u a im Baumarkt Advice Illustration 7 The Double Slide gives you t...

Page 18: ...r horizontal ab 60 cm H he gilt ffnungen die ein Innenma von 35 x 15 cm aufweisen m ssen durch die QUADRO Halbplatte Art 00202 05 geschlossen werden da die Gefahr einer Kopf falle und damit einer Stra...

Page 19: ...den dauerhaft zu fixieren Abb 1 Weicher Untergrund und Montage im Freien Zus tzliche Installation der QUADRO Bodenverankerung bestehend aus 35 cm Rohren sowie 4 armige Raum und 3 armige Fl chenkupplun...

Page 20: ...a distance of 200 cm to avoid the risk of injury Caution The safety heights for free falls depends on the landing surface Recommen ded heights are 0 cm 60 cm all surfaces 0 cm 100 cm topsoil waterbou...

Page 21: ...iven Effekt auf die Oberfl che der QUADRO Einzelteile haben Use in summer Caution Do not expose QUADRO models to a temperature higher than 104 F 40 C Always mount the model in a way that it is in the...

Page 22: ...ing damages and mis sing screw connections To avoid injuries caused by lack of quality only use original parts and tools from QUADRO They are easy to identify by the QUADRO Logo Children should not be...

Page 23: ...00911 Lochzapfenkupplung Hole connector Art 00841 Lochzapfenkupplung 3 armig 3 way Hole connector Art 00843 Lagerkupplung Bearing connector Art 00821 Platten Panels Platte 30 x 30 cm Panel 30 x 30 cm...

Page 24: ...es 15 cm 180 Art 41512 41515 Spezialrohr 4 L cher 15 cm 90 Special tube 4 holes 15 cm 90 Art 41612 41615 Spezialrohr 4 L cher 35 cm 180 Special tube 4 holes 35 cm 180 Art 41632 41635 Spezialrohr 4 L c...

Page 25: ...5 cm Art 40276 Alu Profil Verbinder Alu profile connector Art 40274 Textilen und Netze Textiles und nets Rundtextil Round textile Art 00363 Dachtextil Roof textile Art 00353 Dachtextil Ballcage Roof t...

Page 26: ...25605 Plexiglasschraube Plexiglas screw Art 40640 Displayschraube Display screw 14 mm Art 00673 Displayschraube Display screw 24 mm Art 00683 Sicherungsclip Safety clip Art 00034 Spezialteile Special...

Page 27: ...2 20855 Arretierung f r Multirad Steering lock for Multi wheel Art 20835 Raumkupplungen Connectors 3D Raumkupplung 6 armig 6 way connector Art 20061 Raumkupplung 5 armig 5 way connector Art 20051 Raum...

Page 28: ...98 23 32 info quadroworld com www quadroworld com DOWNLOAD AUF DOWNLOAD AT www QUADROWORLD com Lassen Sie sich einfach und bequem die Teileliste Ihres eigenen QUADRO Modelles ausgeben Just klick on th...

Reviews: