


Quad Power Brush
Operators Manual – Version 06
3
WHEN IN USE:
Attach the clip end of the Tether Cord
to your belt, until you dismount the ATV. The switch the
cord is attached to: will shut off the engine if pulled
deliberately or by inadvertently dismounting from the
ATV seat.
Gage Wheels
1. The gage wheels (one on each side) are to be used
on surfaces that are not hard enough for the full
weight of the brush, such as sweeping leaves on
grass. The wheels are not needed for hard
surfaces, such as concrete or asphalt.
2.
When not used:
the gage wheel assemblies can be
removed from the unit OR stored upside down in
the same holder and tightened (refer to procedure
3).
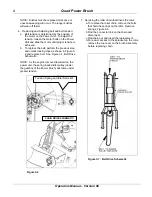
3. Lift the Brush and adjust the wheels to the desired
height, depending on the degree of aggressive
desired. Secure the gage wheels with the offset
locking pins (Figure 3-5) to achieve proper locking
tightness.
Figure 3-5
GENERAL OPERATION
1. Start brush engine and warm up at LOW RPM.
2. Increase engine RPM to desired speed and
start operating. Refer to the Power Unit Manual
for illustrations and operation of throttle
controls).
3. Operate brush so wind blows debris away from
operator, engine and power unit.
4. For a longer lasting brush; take note of the
following:
a) More pressure does not produce a better sweep
b) A level brush lasts longer.
c) The faster the ground speed, the faster the
brush will wear.
d) More aggressive brush down pressure will
reduce brush life.
5. Drive at low speed.
6. When climbing curbs or loading brush on trailer,
raise brush to maximum height and drive slowly.
The bristles might come in contact with curb or
trailer ramp.
STORAGE
1. Keep all nuts, bolts and screws properly tightened.
This maintains the unit in good working condition.
2. Remove weight from brush bristles by putting
blocks under the frame and setting up gage wheels
to maintain brush to floor clearance.
3. Refer to Power Unit manual on storage instruction
for the Power Unit
MAINTENANCE
1. Refer to the engine manual for servicing and
lubrication specifications and intervals.
2. Clean engine air cleaner frequently (hourly, if
necessary, if subject to a lot dust).
3. Clean debris from engine and gearbox area after
each use.
4. The gearbox is sealed and therefore the oil level
cannot and is not required to be checked.
5. Bristles wear off after time and will be in need of
replacement:
a.
Disconnect the roller chain that attaches the
gearbox to sprocket on the brush.
b.
Remove the bolted front shield for easier access,
if desired, but not necessary.
c.
Remove the bearing (Figure 3-5) on each side of
the brush and slide out the shaft.
d.
Remove bolts from bristle shaft and replace all
bristles at once.
NOTE:
Refer to pages 10 to 13 of the Parts
Replacement Section of this manual.


