5
TD-000477-01-A
Amplifier Control
APRT!:
The following scenarios assume that
the amplifier is connected to the Q-SYS Core via
Q-LAN.
hen the amplifier is not connected
to the Q-SYS ore, it is in a Fault mode, and
not operational unless previously configured
for fail-over or standalone mode as part of a
Q-SYS design.
With the exception of the Power
Switch, found on the rear panel, all of the
following controls are on the front panel.
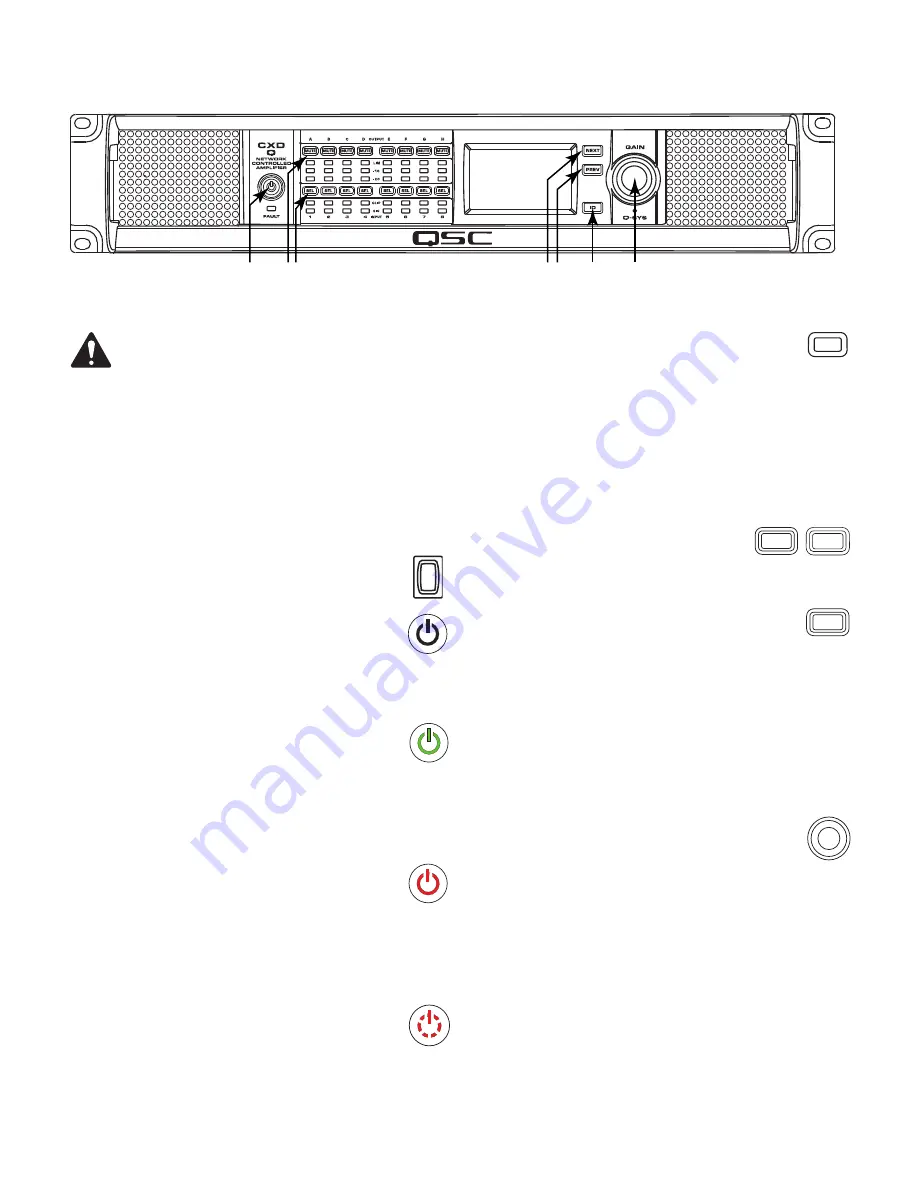
Refer to — Figure 13 for location of front-panel controls.
Off Mode
• Rear-panel power switch is off, the
amplifier is not operable.
Rhe power
switch is the T Iains disconnect.
• The front-panel power button (1) is
not illuminated.
• Turn the power switch to ON. The
amplifier enters the mode in which it was
when power was removed – Run, Mute All, or Standby.
Run Mode
• From Standby or Mute All mode, press and
release the power button on the front panel.
The amplifier is in Run Mode.
• The power button (1) is illuminated green.
• The amplifier is fully operable; audio can pass.
Standby Mode
• From Mute All or Run mode, press and hold
the power button (1) on the front panel for
approximately four seconds.
• The power button illuminates solid red.
• The amplifier is not operable; audio will not pass.
Mute All Mode
• From the Run Mode, quickly press and release the
power button (1).
• The power button flashes red, all output Mute buttons (2) are red.
• The amplifier output is disabled, but the front panel is
fully operable.
SEL Buttons (3)
• Channel gain can be adjusted from the Q-SYS
Designer software or from the front panel of the amplifier.
• Use the SEL button to select one or more than one
channel to change gain settings. All selected channels
will change at the same time.
• If two or more outputs are bridged or in parallel, pressing
one button in the group selects all channels in that
bridged or parallel group.
NEXT (4) and PREV (5) Buttons
• Navigates forward and backwards
through the screens.
ID Button (6)
• Press this button to display a screen with the
amplifier's network name. In addition, the ID buttons
on the associated Q-SYS Amplifier component and
the associated Q-SYS Configurator item flashes. Press
again, or click one of the other ID buttons, to stop the
flashing and exit the screen.
• When prompted, press this button to change the
amplifier configuration to match the configuration of the
associated Q-SYS design.
Master Control Knob (7)
• Adjusts the Gain for the selected channel or
channels. At least one channel must be selected.
• When one or more channels are selected, turn the Master
Control knob to jump to the Gain screen. After a few
seconds with no activity, it returns to the earlier screen.
• If there is more than one channel selected, and the
gains for those channels are different, the difference is
maintained unless the gain is raised or lowered to the
limits for both channels.
Power
Switch
Power
Button
SEL
NEXT
PREV
ID
— Figure 13 —
1
2 3
4 5
6
7


