


Page 18
Owners Manual
B
ASIC
P
IANO
H
OOKUP
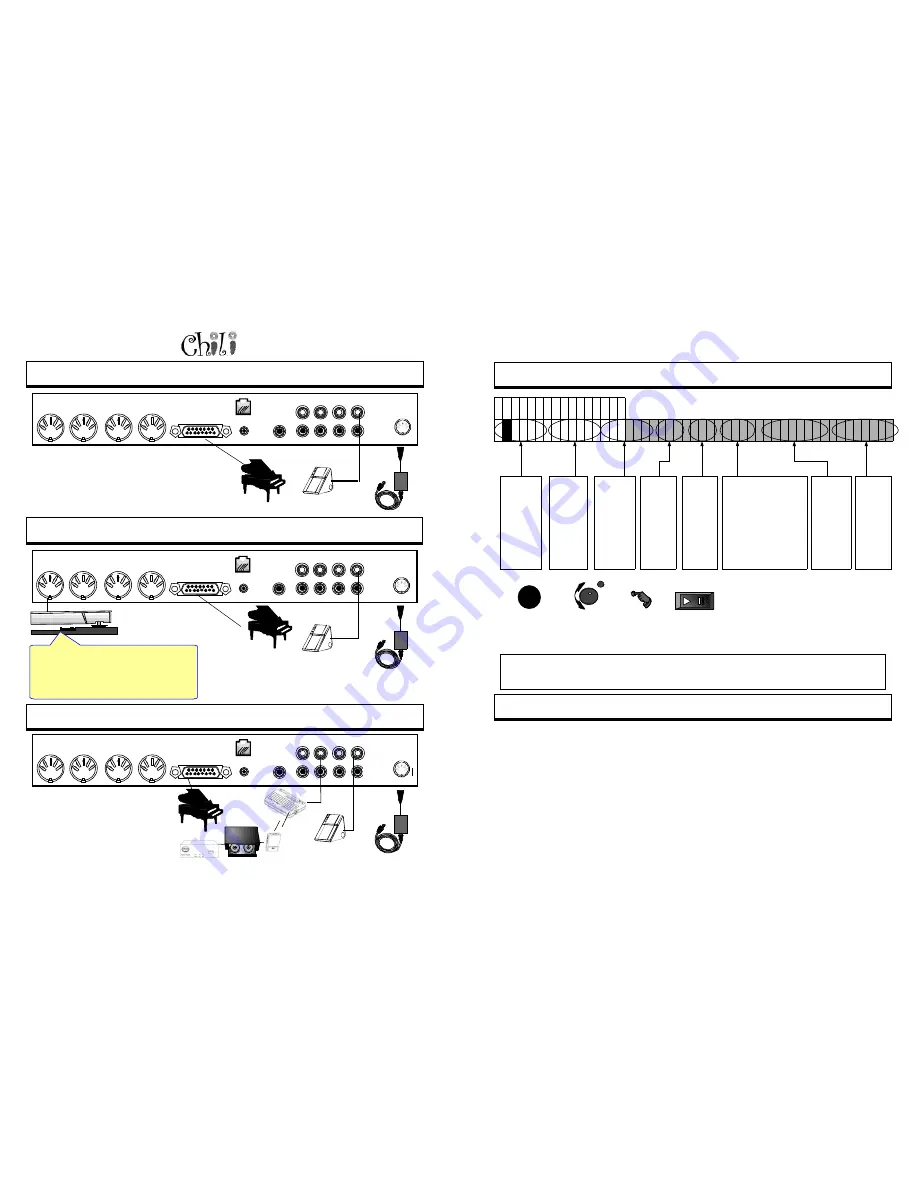
Basic Setup
Record
•
Mounted on the piano
•
Speaker under the Piano
•
MIDI Record Sensor
Strip
Unmixed Out
Mixed Out
Aux In
CD In
AMI Out
PMM Reset
IR Port
Mic In
To Pianomation
MIDI Through
MIDI Out Delayed
MIDI Out
MIDI In
Power
......................
......................
......................
......................
......................
......................
......................
......................
......................
......................
......................
......................
......................
......................
......................
......................
......................
......................
......................
......................
......................
......................
......................
......................
......................
......................
......................
......................
......................
......................
......................
......................
......................
......................
......................
......................
......................
......................
......................
......................
......................
......................
......................
......................
......................
......................
......................
......................
......................
......................
......................
......................
......................
......................
......................
......................
......................
......................
......................
......................
......................
B
ASIC
P
IANO
H
OOKUP
W
ITH
R
ECORD
Record Strip
Basic Setup No Record
•
Mounted on the piano
•
Speaker under the Piano
Unmixed Out
Mixed Out
Aux In
CD In
AMI Out
PMM Reset
IR Port
Mic In
To Pianomation
MIDI Through
MIDI Out Delayed
MIDI Out
MIDI In
Power
......................
......................
......................
......................
......................
......................
......................
......................
......................
......................
......................
......................
......................
......................
......................
......................
......................
......................
......................
......................
......................
......................
......................
......................
......................
......................
......................
......................
......................
......................
......................
......................
......................
......................
......................
......................
......................
......................
......................
......................
......................
......................
......................
......................
......................
......................
......................
......................
......................
......................
......................
......................
......................
......................
......................
......................
......................
......................
......................
......................
......................
A
DDING
A W
IRELESS
C
ONNECTION
F
ROM
Y
OUR
M
ULTIDISC
CD P
LAYER
Basic Setup No Record
•
Mounted on the piano
•
Speaker under the Piano
•
Receiver under the Piano
•
Transmitter at the Stereo
•
Smart Switch or Cables at the
Stereo
Unmixed Out
Mixed Out
Aux In
CD In
AMI Out
PMM Reset
IR Port
Mic In
To Pianomation
MIDI Through
MIDI Out Delayed
MIDI Out
MIDI In
Power
......................
......................
......................
......................
......................
......................
......................
......................
......................
......................
......................
......................
......................
......................
......................
......................
......................
......................
......................
......................
......................
......................
......................
......................
......................
......................
......................
......................
......................
......................
......................
......................
......................
......................
......................
......................
......................
......................
......................
......................
......................
......................
......................
......................
......................
......................
......................
......................
......................
......................
......................
......................
......................
......................
......................
......................
......................
......................
......................
......................
......................
A quick way to know if your record strip is
working or turned on, is to push record. A
metronome will start to tick, press a key and the
metronome should stop. If it doesn’t, check the
record strip's cables and power.
For Technical Support Call 1-941-597-5888
Page 51
I/O
Enter
To Play a CD, Floppy,
Demo, Audio CD or MIDI CD
Press the I/O
button
Source
Select your
source
Press Enter
Press Play
S
OURCE
F 1 D 1 S O U R C E
Ÿ
Q
R S C D
F L O P P Y D
–
E M O E C D A U X M I D I A U D I O _ C D
M I D I _ C D
•
•
•
•
•
•
•
•
•
•
•
•
•
•
•
•
Tells Chili
that a
QRS CD is
the source
of music in
the
internal
CD tray.
Sets the
internal
Floppy
player as
the
source of
the
music.
Sets the
Demo
song files
as the
source of
the music.
Sets the
External
CD input
as the
source of
the
music.
Sets the
Aux
input on
the back
as the
source of
the
music.
If there is a record strip
present (set in setup)
the MIDI input will gen-
erate the sound as-
signed to channel 1 and
not play the piano. If
there is no record strip
present it will play the
MIDI file being re-
corded.
Note: At start up Chili will determine the last source played. If it was an external source such as ECD, Aux or MIDI
it will set the source to that selection. If the last played source was not an external source Chili will cue up the last
played source. If there is no content present, it will load the first Demo song.
Tells Chili
that an
Audio CD
is the
source of
music in
the
internal
CD Drive.
Tells
Chili that
a data
CD with
MIDI
Files is
the
source.
C
REATING
A MIDI D
ATA
CD
A data CD can hold MIDI files, similar to the way a floppy disk does. The advantage of a Data CD is the amount of
data you are able to hold.
This leaves you with a lot of flexibility in how you structure play lists. A Data CD is a CD ROM similar to the one
you put in your PC. If you have a CD Burner you can burn your own CD's full of MIDI Files. You can put them in
file folders to classify them. A MIDI file is so small relative to the vast amount of room you have on a CD ROM that
you can put the same song on the disk several times under different classifications. For example, you may have a
category called classical, and one called Mozart. Then you have the option of playing either all of your classical
pieces or just the Mozart pieces without having to figure out how to program a sequence.
QRS is planning on making available their MIDI library on CD ROM. Until then you have the capability to do it
yourself if you have a CD Burner.


