background image


114 


4.


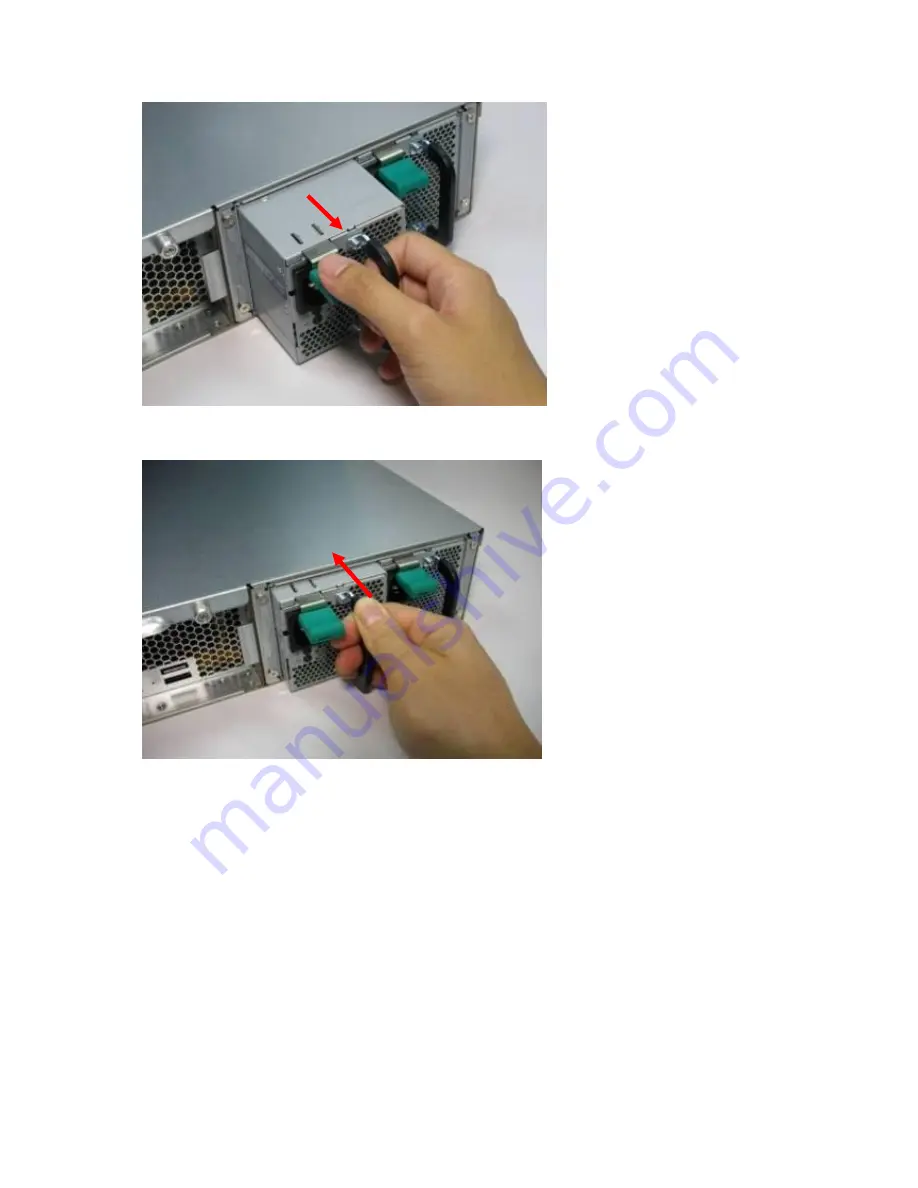
Plug in a new power supply to the NAS.   


5.


Turn on the NAS.   


Enable warning alert for redundant power supply on the web-based interface: 

 
If two power supply units (PSU) have been installed on the NAS and connected to the power 
sockets, both PSU will supply the power to the NAS (applied to 1U and 2U models). Users 
can enable redundant power supply mode in “System Administration” > “Hardware” to 
receive warning alert for the redundant power supply. The NAS will beep and record the 
error messages in “System Logs” when the PSU is plugged out or fails. 
 
If only one PSU is installed on the NAS, users are suggested NOT to enable this option. 

Summary of Contents for HS-210

Page 1: ...QNAP Turbo NAS Hardware User Manual 2016 QNAP Systems Inc All Rights Reserved...

Page 2: ...S 879 Pro TS 879U RP TS EC879U RP TS 1079 Pro TS 1253U TS 1253U RP TS 1263U TS 1263U RP TS 1270U RP TS 1279U RP TS EC1279U RP TS 1635 TS 1679U RP TS EC1679U RP IS 453S TS 453Bmini TS 453mini TAS 168 T...

Page 3: ...accompanying software and specifically disclaims its quality performance merchantability or fitness for any particular purpose QNAP reserves the right to revise or update its products software or doc...

Page 4: ...ts for a Class A digital device pursuant to Part 15 of the FCC Rules These limits are designed to provide reasonable protection against harmful interference when the equipment is operated in a commerc...

Page 5: ...dio communications However there is no guarantee that interference will not occur in a particular installation If this equipment does cause harmful interference to radio or television reception which...

Page 6: ...6 SJ T 11364 2006 RoHS RoHS Pb Hg Cd CR VI PBB PBDE O O O O O O O O O O O O O O O O O O O O O O O O O O O O O O O O O O O O O O O O O O O O O O O O O SJ T11363 2006 X SJ T11363 2006...

Page 7: ...ctions must be strictly followed Failure to do so could result in injury to human body or death Caution This icon indicates the action may lead to disk clearance or loss OR failure to follow the instr...

Page 8: ...3 TVS 673 TVS 873 49 5 6 TS 431U TS 451U TS X53U TS X63USERIES 4 8 12 BAY 51 5 7 TS 251 TS 251 TS 451 TS 451 TS 251A TS 451A 53 5 8 IS 453S 56 Chapter 6 Network Expansion Card Installation 59 6 1 TVS...

Page 9: ...INSTALLATION 98 8 2 1 TBS 453A 99 8 2 2 TVS 473 TVS 673 TVS 873 100 Chapter 9 RAID Recovery 104 Chapter 10 Using the LCD Panel 106 Chapter 11 Install Power Supply Unit 112 11 1 1U TURBO NAS WITH HOT S...

Page 10: ...7 Do not place the NAS near any liquid 8 Do not place the NAS on any uneven surface to avoid falling off and damage 9 Make sure the voltage is correct in the location where the NAS is installed Conta...

Page 11: ...s due to changing the hardware parts modifying the default system firmware or installing any unauthorized third party applications on QNAP products System TS 112P TS 212P CPU Marvell 1 6GHz Marvell 1...

Page 12: ...placeable Number of RAM slots Number of hard drive slots 1 2 System TAS 168 TAS 268 CPU Dual core Realtek 1 1GHz Dual core Realtek 1 1GHz Memory 2GB DDR3 2GB DDR3 Flash 4GB 4GB Memory replaceable Numb...

Page 13: ...Number of RAM slots Number of hard drive slots 4 4 System TS 231 TS 431 CPU Annapurna Labs Alpine AL 212 Dual core 1 4GHz Cortex A15 Annapurna Labs Alpine AL 212 Dual core 1 4GHz Cortex A15 Memory 1G...

Page 14: ...h DDR3 RAM Compatible with DDR3 RAM Compatible with DDR3 RAM Number of RAM slots 2 SODIMM 2 SODIMM 2 SODIMM Number of hard drive slots 5 5 8 PCI E expansion slot 1 1 1 Built in 10GbE LAN ports 2 x SFP...

Page 15: ...451U TS 453U TS 453U RP CPU Dual core Intel Celeron 2 41GHz up to 2 58GHz Quad core Intel Celeron 2 0GHz up to 2 42GHz Quad core Intel Celeron 2 0GHz up to 2 42GHz Memory 1GB DDR3L Expandable RAM up...

Page 16: ...z up to 2 42GHz Memory 4GB 8GB DDR3L Expandable RAM up to 8GB 4GB 8GB DDR3L Expandable RAM up to 8GB Flash 512MB USB DOM 512MB USB DOM Memory replaceable Compatible with DDR3L RAM Compatible with DDR3...

Page 17: ...DOM Memory replaceable Compatible with DDR3L RAM Compatible with DDR3L RAM Number of RAM slots 2 SODIMM 2 SODIMM Number of hard drive slots 12 12 Power supply unit 250W 2 x 250W System IS 453S CPU Qua...

Page 18: ...ontrol RM IR002 QNAP remote control RM IR002 QNAP remote control RM IR002 System TS 451 TS 451 4G TS 451A 2G TS 451A 4G TS 451S CPU Dual core Intel Celeron 2 41GHz up to 2 58GHz Dual core Intel Celero...

Page 19: ...mpatible with DDR3L RAM Number of RAM slots 2 SODIMM 2 SODIMM Number of hard drive slots 6 8 IR sensor QNAP remote control RM IR002 QNAP remote control RM IR002 System HS 251 HS 251 HS 251 2G CPU Quad...

Page 20: ...p to 2 08GHz Quad core Intel Celeron N3150 1 6GHz up to 2 08GHz Memory 4GB DDR3L 8GB DDR3L Flash 4GB 4GB CPU replaceable Memory replaceable Compatible with DDR3L RAM Compatible with DDR3L RAM Number o...

Page 21: ...2 42GHz Memory 2GB 8GB DDR3L Expandable RAM up to 8GB 2GB 8GB DDR3L Expandable RAM up to 8GB Flash 512MB 512MB Memory replaceable Compatible with DDR3L 1333 1600 RAM Compatible with DDR3L 1333 1600 R...

Page 22: ...J1900 2 0GHz up to 2 42GHz Memory 4GB 8GB DDR3L Expandable RAM up to 8GB 2GB 8GB DDR3L Expandable RAM up to 8GB Flash 512MB 512MB Memory replaceable Compatible with DDR3L RAM Compatible with DDR3L 13...

Page 23: ...2GB 8GB DDR3L Expandable RAM up to 8GB 2GB 8GB DDR3L Expandable RAM up to 8GB 2GB 8GB DDR3L Expandable RAM up to 8GB Flash 512MB 512MB 512MB Memory replaceable Compatible with DDR3L RAM Compatible wi...

Page 24: ...z Memory 2GB 8GB DDR3L Expandable RAM up to 8GB 4GB DDR3L Expandable RAM up to 8GB 4GB DDR3L Expandable RAM up to 8GB Flash 512MB 512MB 512MB Memory replaceable Compatible with DDR3L RAM Compatible wi...

Page 25: ...DR3L Expandable RAM up to 16GB 4 8 GB DDR3L Expandable RAM up to 16GB Flash 512MB 512MB 512MB Memory replaceable Compatible with DDR3L 1600 RAM Compatible with DDR3L 1600 RAM Compatible with DDR3L 160...

Page 26: ...8 16 GB DDR3L Expandable RAM up to 16GB Flash 512MB 512MB Memory replaceable Compatible with DDR3L 1600 RAM Compatible with DDR3L 1600 RAM Number of RAM slots 2 SODIMM 2 SODIMM Number of hard drive sl...

Page 27: ...32GB 16GB DDR4 Expandable RAM up to 32GB Flash 512MB 512MB Memory replaceable Compatible with DDR3L 1600 RAM Compatible with DDR3L 1600 RAM Number of RAM slots 2 SODIMM 2 SODIMM Number of hard drive...

Page 28: ...xpandable RAM up to 8GB 4 8 GB DDR3L Expandable RAM up to 8GB 4 8 GB DDR3L Expandable RAM up to 8GB Flash 512MB 512MB 512MB Memory replaceable Compatible with DDR3L 1600 RAM Compatible with DDR3L 1600...

Page 29: ...0 1 6GHz up to 2 08GHz Memory 4 8 GB DDR3L Expandable RAM up to 8GB Flash 512MB Memory replaceable Compatible with DDR3L 1600 RAM Number of RAM slots 2 SODIMM Number of hard drive slots 8 PCI E expans...

Page 30: ...2GB 16GB DDR4 Expandable RAM up to 32GB Flash 512MB Memory replaceable Compatible with DDR4 RAM Number of RAM slots 2 SODIMM Number of drive slots 8 x 2 5 SATA 6Gb s PCI E expansion slot 1 x PCIe Gen3...

Page 31: ...R4 Expandable RAM up to 32GB Flash 512MB Memory replaceable Compatible with DDR4 RAM Number of RAM slots 2 SODIMM Number of drive slots 8 x 2 5 SATA 6Gb s PCI E expansion slot 1 x PCIe Gen3 x8 1 x PCI...

Page 32: ...GB DDR3L Expandable RAM up to 16GB Flash 512MB 512MB 512MB Memory replaceable Compatible with DDR3L 1600 RAM Compatible with DDR3L 1600 RAM Compatible with DDR3L 1600 RAM Number of RAM slots 2 SODIMM...

Page 33: ...4 GB DDR3L Expandable RAM up to 16GB Flash 512MB 512MB 512MB Memory replaceable Compatible with DDR3L 1600 RAM Compatible with DDR3L 1600 RAM Compatible with DDR3L 1600 RAM Number of RAM slots 2 SODIM...

Page 34: ...andable RAM up to 64GB Flash 512MB Memory replaceable Compatible with DDR4 RAM Number of RAM slots 4 SODIMM Number of drive slots 4 x 3 5 2 5 SATA 6Gb s 6 x 3 5 2 5 SATA 6Gb s 8 x 3 5 2 5 SATA 6Gb s s...

Page 35: ...is enabled dual LAN models only the port trunking mode will be reset to Active Backup Failover System Port 8080 system service port Security Level Low Allow all connections LCD panel password blank VL...

Page 36: ...NAS The default network share Qusb or Usb is created 2 Turn on the NAS 3 Configure the behavior of the Copy button on Backup USB one touch copy page 4 Connect the USB storage device to the front USB p...

Page 37: ...ss Red 1 The hard drive is invalid 2 The disk volume has reached its full capacity 3 The disk volume is going to be full 4 The system fan is out of function 5 An error occurs when accessing read write...

Page 38: ...he front USB port is being detected 2 A USB device connected to the front USB port is being removed from the NAS 3 The USB device connected to the front USB port of the NAS is being accessed 4 The dat...

Page 39: ...3 The user tries to copy the NAS data to the external storage device from the front USB port but the data cannot be copied Long beep 1 5 sec 3 every 5 min The system fan is out of function Long beep 1...

Page 40: ...g the entire process to prevent electrostatic discharge The crocodile clip should be connected to the ground When installing more than one memory module it is recommended to use the same size and idea...

Page 41: ...ote Always ensure that a memory module is installed in the Primary red slot If not then the system will fail to start The maximum supported memory is 8GB combined 3 Slide the memory module to the slot...

Page 42: ...he power and network cables to the NAS 5 2 TBS 453A 1 Remove the rubber feet and loosen the four hand screws on the bottom of the NAS Then lift the compartment cover away 2 To remove installed memory...

Page 43: ...emory is 8GB combined 3 Slide the memory module to the slot at a 45 degree angle approximately and press the memory module down until it clips into place Ensure the memory module sits properly with th...

Page 44: ...cover of the NAS gently 3 Locate the memory slot Make sure the slot is empty Note For TS x53 x53S Pro TS 451S TS 531P TS 651 TS 851 and TS x53A models always ensure that a memory module is installed...

Page 45: ...uring clips clicks into place 7 Close the case cover and fasten the screws Connect the power adaptor and cables back to the NAS 8 To check that the memory module is recognized by the NAS power up the...

Page 46: ...Gently remove case cover from case 3 To remove installed memory modules gently pull the retention clips outwards on each side so that the module tilts up at a 45 degree angle for easy removal Remove m...

Page 47: ...he memory socket Slide the memory module into the socket at a 45 degree angle Ensure that the module is firmly inserted into slot Note Memory module must be installed in the primary slot red outline i...

Page 48: ...the NAS Power on NAS 7 To verify that the memory module has been installed correctly and is being recognized by the operating system log into QTS as administrator a For QTS 4 3 0 and above Go to Contr...

Page 49: ...49 5 5 TVS 473 TVS 673 TVS 873 1 Loosen the screws on the back of the NAS that are connecting the case cover to the case 2 Gently remove case cover from case...

Page 50: ...he ridge in the memory socket Slide the memory module into the socket at a 30 degree angle Ensure that the module is firmly inserted into the socket and that the retention clamps are secure Note The m...

Page 51: ...NAS Power on NAS 7 To verify that the memory module has been installed correctly and is being recognized by the operating system log into QTS as administrator and go to Control Panel System System St...

Page 52: ...3U TS 863U TS 1253U TS 1263U series Loosen the two screws on the rear of the NAS 2 Open the NAS Pull the retention clips on each side so that the module tilts up for easy removal Remove installed memo...

Page 53: ...els always ensure that a memory module is installed in the primary slot red box in the below figure or the system will fail to start The maximum supported memory is 8GB combined 4 Close the NAS cover...

Page 54: ...f the NAS by sliding it apart see the underside of the NAS for visual indicators of the NAS case being locked unlocked 3 Remove the four inner screws two on each side of the hard drive cage 4 If it is...

Page 55: ...memory module is installed in the Primary slot red If not then the system will fail to start When installing two memory modules please ensure that they are the same size and ideally use the same type...

Page 56: ...the two four screws onto the rear of the NAS 10 Reinsert your hard drives to the NAS 11 Connect the power adaptor and cables back to the NAS 12 To check that the memory module is recognized by the NAS...

Page 57: ...that a memory module is installed in the primary slot that is on the top marked with DIMM1 If not then the system will fail to start The maximum supported memory is 8GB combined 3 Slide the memory mod...

Page 58: ...58 properly with the clips in place 4 Close the NAS bottom cover and fasten the screws refer to Step 1 for screw positions Reconnect the power and network cables to the NAS...

Page 59: ...ath Some NAS models provide expansion slots for network expansion Insert an extra network expansion card optional purchase to the motherboard of the NAS to increase the network bandwidth Please refer...

Page 60: ...rk Adapters Short reach optical OCe11102 NM 3 Emulex OneConnect 10GbE Network Adapters SFP Direct attach copper OCe11102 IX 4 Emulex OneConnect 10GbE Network Adapters Short reach optical OCe11102 IM 1...

Page 61: ...61 For TVS 463 only Unscrew and remove the power supply unit 5 Loosen the screws and remove the expansion slot cover...

Page 62: ...edge of the network expansion card Align the notch on the gold edge of the card with the notch in the PCIe slot Insert the network expansion card to the PCIe slot until it cannot go any further 7 Fas...

Page 63: ...635 The TS 1635 provides aPCIe2 0x2 expansion slot so that users may choose to install a network expansion card for added network performance To do so follow the below steps 1 Turn off the NAS Disconn...

Page 64: ...64 4 Gently remove case cover from case 5 Loosen the screw of the top full sized PCIe bracket Remove bracket...

Page 65: ...65 6 Hold the network card by grasping the edges Align the notch on the network card to the break in the PCIe slot Fully insert the network expansion card to the expansion slot...

Page 66: ...asten screw to lock in card 8 Close the case cover and fasten the screws Connect the power adaptor and cables to the NAS 9 To verify that the network expansion card has been installed correctly and is...

Page 67: ...rn off the NAS Disconnect power cord s network cable s and any other cables attached to the device 2 Before opening the NAS wear an antistatic wrist strap and connect the crocodile clamp to ground to...

Page 68: ...68 5 Gently remove case cover from case 6 Loosen and remove the 3 screws on the back of the PSU...

Page 69: ...and remove the remaining 2 screws connecting the PSU to the case 8 Position the PSU so that a screw driver can access the screw of the PCIe bracket 9 Loosen and remove the screw of the PCIe bracket Re...

Page 70: ...ten the screws Connect the power adaptor and cables to the NAS 14 To verify that the network expansion card has been installed correctly and is being recognized by the operating system log into QTS as...

Page 71: ...be connected to the ground 3 Loosen all the screws on the top of the NAS as shown in the illustration 4 Remove the top cover in both hands 5 Loosen the screws as shown in the illustration 6 Grasp the...

Page 72: ...r TS 463U and TS 463U RP loosen the screw and remove the network expansion card b For TVS 471U loose the screw and remove the bracket 8 Insert the new network expansion card to the riser card module u...

Page 73: ...notch on the gold edge of the riser card with the notch in the PCIe slot Insert the riser card module to the PCIe slot until it cannot go any further 10 Fasten the screws Close the case cover and fas...

Page 74: ...63U RP TS 1263U TS 1263U RP 1 Turn off the NAS Disconnect the power adaptor network cable s and any other connectors or cables from the NAS 2 Before installing the network expansion card put on an ant...

Page 75: ...the edge of the expansion card Align the notch on the gold edge of the card with the notch in the PCIe slot Insert the network expansion card to the PCIe slot until it cannot go any further 7 Fasten...

Page 76: ...e power adaptor and cables to the NAS 9 To check that the network expansion is recognized by the NAS power up the NAS and login the web interface as an administrator Go to System Administration Networ...

Page 77: ...S Please ensure that you wear an antistatic wrist strap during the entire process to prevent electrostatic discharge The crocodile clip should be connected to the ground 7 1 Install Hard Drives Follow...

Page 78: ...he hard drive tray b For 2 5 HDDs follow the signs which are marked on the tray then secure the three screws in the back of the hard drive tray 3 Insert the hard drive trays into the NAS all the way t...

Page 79: ...h the blue lock switch on the tray down to the unlock position ii Push the button below the blue switch to release the lever iii Pull out tray using lever 2 Install HDD SDD onto tray a 3 5 HDD i Remov...

Page 80: ...arddrive iii Reinsert fastening panels to lock drive to tray b 2 5 HDD SSD i Remove the fastening panels from the sides of the drive tray ii Place hard drive onto tray so that the bottom holes of the...

Page 81: ...the drive tray into the NAS Verify that the tray is correctly oriented top of HDD facing right and fully pushed in ii Close the latch and lock the switch 7 1 3 TS 453Bmini TS 453Mini 1 Remove the cas...

Page 82: ...82 2 Install the HDD a For 3 5 HDDs remove both brackets pinch the end marked pull to pull and separate the bracket from the tray Place the hard drive on the tray and clip in both brackets...

Page 83: ...e bracket next to the 2 5 screw holes they are marked on the bottom of the tray Secure the three screws in the back of the hard drive tray 3 Insert the hard drive tray into the Turbo NAS all the way t...

Page 84: ...84 7 1 4 TVS 473 TVS 673 TVS 873 1 Remove hard drive tray from NAS i Push the lock switch on the tray down to the unlock position...

Page 85: ...using lever 2 Install HDD SDD onto tray a 3 5 HDD i Remove the fastening panels from the sides of the drive tray ii Place hard drive onto tray so that the bottom holes of the tray are aligned with the...

Page 86: ...86 b 2 5 HDD SSD i Insert 2 5 drive onto tray so that HDD SSD connector is perfectly aligned with the opening at end of the tray ii Secure the three screws in the back of the hard drive tray...

Page 87: ...op of HDD facing right and fully pushed in ii Close the latch and lock the switch 7 1 5 TS 112P TS 212P and TS 251C 1 Loosen the screws on the rear top and bottom of the NAS Remove the case cover of t...

Page 88: ...on the slides of the hard drive b For TS 212P and TS 251C Place the first hard drive in the hard drive cradle and slide it forward to look it into the connector Place the second hard drive on top of...

Page 89: ...stalling the hard drives cover the NAS with the case cover and fasten the round head screws Then place the NAS vertically on the stands 7 1 6 TAS 168 TAS 268 TS 128 TS 228 1 Remove the handscrew and t...

Page 90: ...ts slide the bracket into the hole in point 2 before pressing the bracket towards the HDD for the TAS 268 repeat the same step for the second drive 3 Align point a on the case cover with point b on th...

Page 91: ...91...

Page 92: ...92 7 1 7 IS 453S 1 Remove all four screws from the front panel 2 Remove the drive tray 3 Attach the drive to the tray and secure the four screws in the back of the drive tray...

Page 93: ...93 4 Insert the drive tray into the NAS all the way to the end 5 Repeat Step 2 to 4 to install the remaining drives Please follow the HDD Sequence shown in Step 2 to do so...

Page 94: ...94 6 Close the front panel and fasten the screws...

Page 95: ...r used which has never been installed on the NAS before it is installed the hard drive will be formatted and partitioned automatically and all the disk data will be cleared System Support s 3 5 inch S...

Page 96: ...Pro TS 1079 Pro TS 879U RP TS 1279U RP TS EC879U RP TS EC1279U RP TS 1679U RP TS EC1679U RP TS 451U TS 453U TS 453U RP TS 853U TS 853U RP TS 1253U TS 1253U RP TS 870U RP TS 1270U RP TS 470 470 Pro TS...

Page 97: ...onfiguration in Volume Management 2 The volume status should be in degraded mode 3 Prepare a new hard drive to replace the failed one The capacity of the new hard drive should be the same as or larger...

Page 98: ...controller To install heat sink 1 Locate the SSD controller on the M 2 SSD Location of SSD controller varies by model Refer to SSD manufacturer for details 2 Remove any existing stickers or labels on...

Page 99: ...dure demonstrates how to add replace M 2 SSD modules To remove the bottom cover first remove the rubber feet Next unscrew the four screws installed on the four corners of the bottom cover by turning t...

Page 100: ...four corners clockwise Then put the rubber feet back as well 8 2 2 TVS 473 TVS 673 TVS 873 1 Turn off the NAS Disconnect power cord s network cable s and any other cables attached to the device 2 Bef...

Page 101: ...101 clamp to ground to prevent electrostatic discharge from damaging equipment 3 Loosen the screws on the back of the NAS that are connecting the case cover to the case 4 Remove case cover from case...

Page 102: ...Hold the M 2 SSD module by grasping its edges Align the notch on the module with the ridge in the M 2 socket Gently slide the memory module into the socket at a 15 degree angle Ensure that the module...

Page 103: ...ecurely fasten the M 2 SSD in place Do not over tighten the screw 8 Close the case cover and fasten the screws Connect the power adaptor and cables to the NAS Power on NAS 9 To verify that the M 2 SSD...

Page 104: ...0 Yes 1 or more RAID 1 Yes 1 or 2 RAID 5 Yes 2 or more RAID 6 Yes 3 or more RAID 10 No If the volume status is not active users can install the same hard drives back to the same slots of the NAS Then...

Page 105: ...rting all the original hard disk drives to the NAS and they can be spun up identified accessed and the hard drive superblock is not damaged N A If re inserting all the original hard disk drives to the...

Page 106: ...ew system information Viewing system IP addresses 1 Press ENTER or SELECT to turn on the panel 2 Press SELECT to browse the NAS model name and the available IP addresses for each network and thunderbo...

Page 107: ...nfigure the selected option The first digit will begin to blink iii Press SELECT to increment the selected digit press ENTER to confirm the value and go to the next digit until all digits are set iv R...

Page 108: ...ecific volume LUN D a t a V o l 1 7 5 0 G B L U N _ 0 1 0 0 G B System This section shows the system temperature and the rotation speed of the system fan C P U T e m p 5 0 C S y s T e m p 5 5 C F a n...

Page 109: ...ing your desired password press ENTER When the cursor moves next to OK press ENTER to confirm the password N e w P a s s w o r d 2 3 4 O K Verify the password to confirm the changes V e r i f y P a s...

Page 110: ...unit 3 M 2 SSD Ejected A M 2 SSD has been ejected and may be defective as hot plugging isnot supported for M 2 drives PCIe SSD Ejected A PCIe SSD has been ejected and may be defectiveas hot plugging i...

Page 111: ...resolve issues Startupphases o Checking Memory The system checksthe installed memory o Powering up all disks Power up all disks sequentially o Hardware initialization Initialize additional hardware co...

Page 112: ...thorized and trained technician 11 1 1U Turbo NAS with Hot swappable PSU Note The following instructions should only be performed by an authorized and trained technician To install a redundant power s...

Page 113: ...l a new power supply unit 11 2 2U 3U Turbo NAS TS 853U RP TS 1253U RP only Note The following instructions should only be performed by an authorized and trained technician To replace a failed power su...

Page 114: ...to the power sockets both PSU will supply the power to the NAS applied to 1U and 2U models Users can enable redundant power supply mode in System Administration Hardware to receive warning alert for t...

Page 115: ...is disabled by default WARNING RISK OF ELECTRIC SHOCK The connectors on the back panel bracketed parts below contain high voltage Do NOT touch these parts to avoid the risk of electric shock to the ma...

Page 116: ...tant messenger Online Support http qnap com support Forum http forum qnap com Technical Support in the USA and Canada Online Support http qnap com support TEL 1 909 595 2782 3 Address 168 University P...

Page 117: ...freedom not price Our General Public Licenses are designed to make sure that you have the freedom to distribute copies of free software and charge for them if you wish that you receive source code or...

Page 118: ...y program is threatened constantly by software patents States should not allow patents to restrict development and use of software on general purpose computers but in those that do we wish to avoid th...

Page 119: ...m in the list meets this criterion 1 Source Code The source code for a work means the preferred form of the work for making modifications to it Object code means any non source form of a work A Standa...

Page 120: ...by this License only if the output given its content constitutes a covered work This License acknowledges your rights of fair use or other equivalent as provided by copyright law You may make run and...

Page 121: ...d on the Program or the modifications to produce it from the Program in the form of source code under the terms of section 4 provided that you also meet all of these conditions a The work must carry p...

Page 122: ...e interchange for a price no more than your reasonable cost of physically performing this conveying of source or 2 access to copy the Corresponding Source from a network server at no charge c Convey i...

Page 123: ...nformation must suffice to ensure that the continued functioning of the modified object code is in no case prevented or interfered with solely because modification has been made If you convey an objec...

Page 124: ...r can give appropriate copyright permission Notwithstanding any other provision of this License for material you add to a covered work you may if authorized by the copyright holders of that material s...

Page 125: ...y terminate your rights under this License including any patent licenses granted under the third paragraph of section 11 However if you cease all violation of this License then your license from a par...

Page 126: ...paragraph plus a right to possession of the Corresponding Source of the work from the predecessor in interest if the predecessor has it or can get it with reasonable efforts You may not impose any fu...

Page 127: ...for the patent license your conveying the covered work in a country or your recipient s use of the covered work in a country would infringe one or more identifiable patents in that country that you h...

Page 128: ...rmission to link or combine any covered work with a work licensed under version 3 of the GNU Affero General Public License into a single combined work and to convey the resulting work The terms of thi...

Page 129: ...VICING REPAIR OR CORRECTION 16 Limitation of Liability IN NO EVENT UNLESS REQUIRED BY APPLICABLE LAW OR AGREED TO IN WRITING WILL ANY COPYRIGHT HOLDER OR ANY OTHER PARTY WHO MODIFIES AND OR CONVEYS TH...

Page 130: ...1271U RP Class B Class B TS 853S Pro TS 453S Pro TS 870 Pro TS 853 Pro TS 670 Pro TS 653 Pro TS 470 Pro TS 453 Pro TS 253 Pro TS 431 TS 231 TS 451S TS 870 TS 851 TS 670 TS 651 TS 470 TVS 863 TVS 863...

Reviews: