6
EN
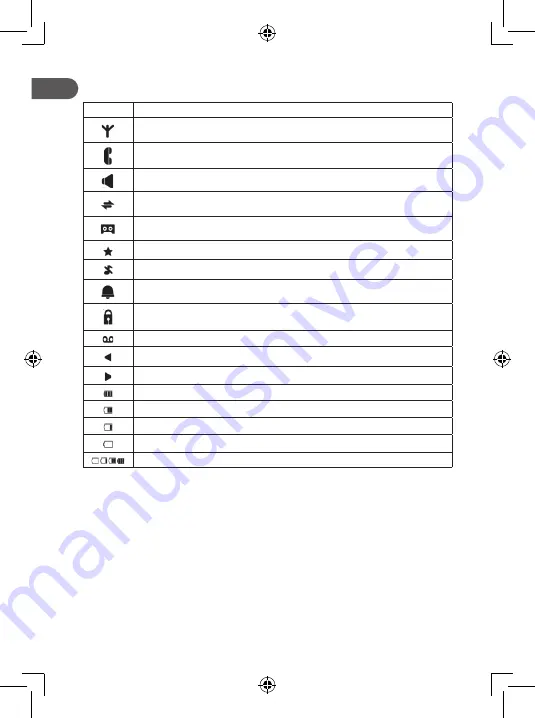
3.2 On-screen icons
The LCD screen provides information on the current status of the phone.
Icon
Description
Displayed continuously while in range of the base station.
Flashes while in marginal range of the base station.
Displayed continuously while a call is in progress.
Flashes while there is an incoming call.
Displayed continuously while the speaker is turned on.
Displayed continuously while in a successful intercom call.
Flashes while there is an internal call incoming or on hold.
Displayed continuously while the telephone answering machine (TAM) is enabled.
Flashes while a new TAM message is received.
Displayed continuously while a new TAM message or call is received.
Displayed continuously while the ringer is disabled.
Displayed continuously while an alarm is enabled.
Flashes while an alarm is ringing.
Displayed while the keypad is locked.
Displayed while there are unread voice messages.
Displayed when there are more digits before the number on the screen.
Displayed when there are more digits after the number on the screen.
Indicates full battery power.
Indicates 2/3 battery power.
Indicates 1/3 battery power.
Flashes when battery power is low to indicate that charging is required.
Animation cycles
4. INSTALLATION
4.1 First steps
4.1.1
Connecting the handset to the base station
All handsets come pre-registered with the base on purchase.
•
To use the handset and the base together, you must be able to establish a radio connection between them.
The signal between the handset and the base conforms to the usual standards of a DECT telephone:
maximum range of up to 300 meters outdoors and up to 50 meters indoors.
•
Signal range may decrease if there are large metal objects (such as a refrigerator, mirror, archive cabinet,
metal door, or reinforced concrete) between the handset and the base. Signal strength may also decrease in
the presence of other solid structures such as walls or other radio or electrical interference.
•
Do not place the handset or base near another telephone, TV, or audio device as this may cause interference.
4.1.2
Configuring the handset language
1.
Press the <LEFT KEY> then use the <UP/DOWN> keys to select «HS SET».
2.
Press the <LEFT KEY> then use the <UP/DOWN> keys to select «LANGUAGE».
3.
Press the <LEFT KEY> then use the <UP/DOWN> keys to select your desired language.
4.
Press the <LEFT KEY> to confirm your selection.
Summary of Contents for Q.4436
Page 3: ...EN 1 6 7 8 9 10 4 5 2 3 11 12 13 14 17 16 15 FR ES PT PL HU RU RO UA...
Page 89: ...89 RU 8 9 10 11 0 12 13 14 15 16 17 3 2...
Page 90: ...90 RU RU 2 3 1 3 4 4 1 4 1 1 DECT 300 50 4 1 2 1 2 3 4 4 2 100 240 50 60...
Page 95: ...95 RU 5 5 2 5 5 3 12 24 5 5 4 5 5 5 5 5 6 45 1 5 5 7 5 6 1 5 6 1 10 5 6 2 5 6 3 5 6 4...
Page 97: ...97 RU PIN PIN PIN 5 8 4 PIN 5 9 4 PIN 6 7 36 24 12 6 SIM SD IMEI...
Page 98: ...98 RU RU 6...
Page 101: ...101 UA 9 10 11 0 12 13 14 15 16 17 3 2...
Page 102: ...102 UA UA 2 3 1 3 4 4 1 4 1 1 DECT 300 50 4 1 2 1 2 3 4 4 2 100 240 50 60...
Page 107: ...107 UA 5 5 2 5 5 3 12 24 5 5 4 5 5 5 5 5 6 45 1 5 5 7 5 6 1 5 6 1 10 5 6 2...
Page 108: ...108 UA UA 5 6 3 5 6 4 5 6 5 5 1 8 5 6 6 5 6 7 5 6 8 5 6 9 5 6 10 5 6 11 VMWI 5 7 1 5 7 1 4 PIN...
Page 109: ...109 UA PIN 5 7 2 5 7 3 5 7 4 PIN PIN 0000 PIN PIN PIN 5 8 4 PIN 5 9 4 PIN 6 7 36 24 12 6...
Page 110: ...110 UA UA SIM SD IMEI 6...


