background image


EZ2 Connect MDx User Manual   05/2022 

160 

4.


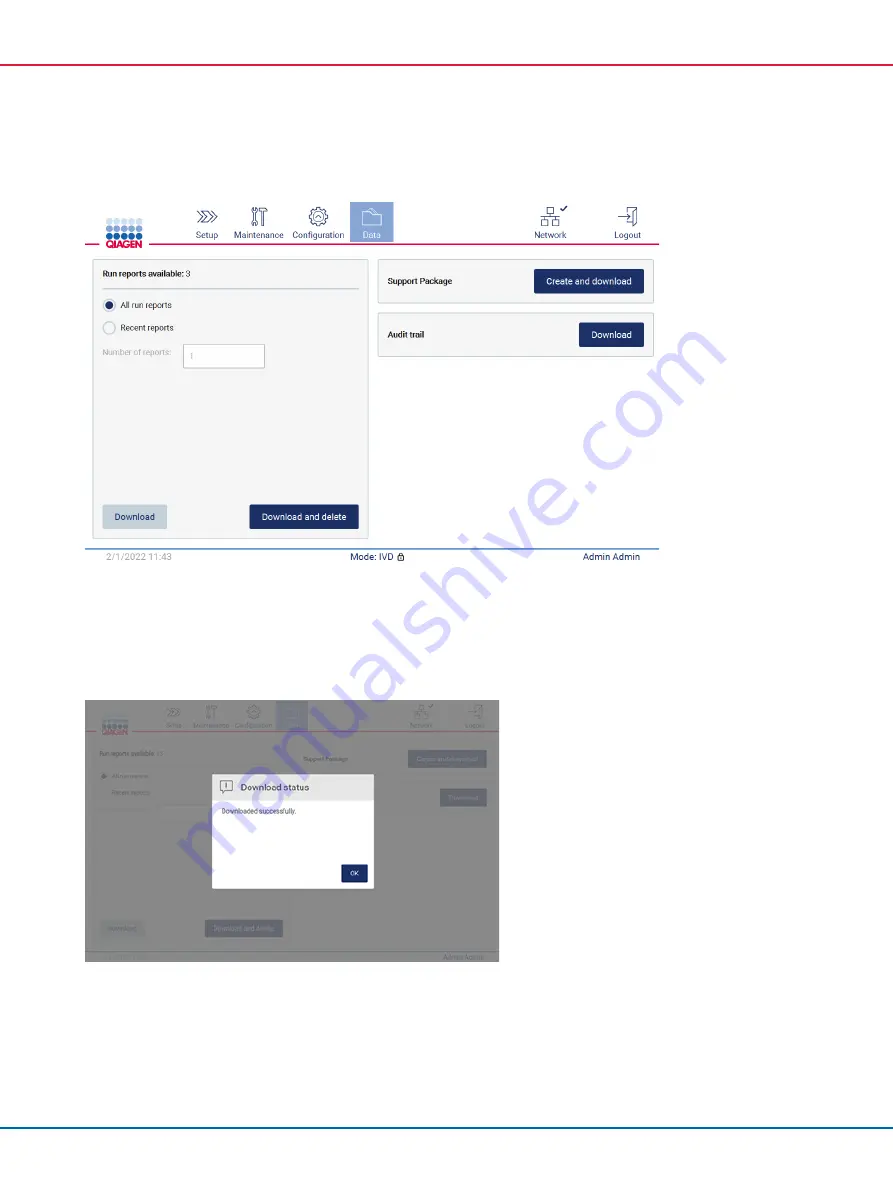
Tap 

Create and download

 in the Support Package section. 


Figure 157. Data tab. 


5.


The support package is now saved on the USB flash drive. The download successful screen is 
displayed. Tap 

OK 

to close. 

Note

: The support package contains information about the last performed runs and hence can 

contain sensitive information. 


Figure 158. Download successful status. 


Summary of Contents for 9003230

Page 1: ...Sample to Insight__ May 2022 EZ2 Connect MDx User Manual The EZ2 Connect MDx is intended for in vitro diagnostic use 9003230 QIAGEN GmbH QIAGEN Strasse 1 40724 Hilden GERMANY 1124548...

Page 2: ...but not provided 9 1 7 Glossary 9 1 8 Accessories 9 2 Safety Information 10 2 1 Proper use 11 2 2 Electrical safety 13 2 3 Operating conditions 15 2 4 Biological safety 16 2 5 Chemicals 18 2 6 Waste d...

Page 3: ...4 4 1 2 Power requirements 45 4 1 3 Grounding requirements 46 4 2 Unpacking the EZ2 47 4 3 Installing the EZ2 Connect MDx 49 4 3 1 Removal of the EZ2 accessories and shipping materials 50 4 3 2 Instal...

Page 4: ...rs 104 5 4 3 Selecting sample positions 105 5 4 4 Entering sample IDs 106 5 4 5 Loading the cartridge rack 109 5 4 6 Loading the tip rack 110 5 4 7 LIMS Workflow 112 5 5 Canceling the protocol run set...

Page 5: ...ion 157 6 7 Servicing 158 7 Troubleshooting 159 7 1 Contacting QIAGEN Technical Services 159 7 1 1 Creating a support package 159 7 2 Operation 162 8 Glossary 163 9 Technical Specifications 164 9 1 Op...

Page 6: ...intended use and requirements of the EZ2 Safety Information includes important information on any hazards related to the EZ2 and how to properly use the instrument General Description an overview of t...

Page 7: ...about product performance or new applications and techniques For technical assistance and more information please see our Technical Support Center at support qiagen com or call one of the QIAGEN Tech...

Page 8: ...Installation Laboratory technicians or equivalent Appropriately trained and experienced personnel familiar with the use of computers and automation in general Routine use running protocols Laboratory...

Page 9: ...se Catalog number 9027102 Barcode Reader Catalog number 9027101 Note Only use accessories supplied by QIAGEN 1 6 Materials required but not provided Safety glasses Gloves Lab coat 1 7 Glossary For a g...

Page 10: ...this user manual WARNING The term WARNING is used to inform you about situations that could result in personal injury to you or others Details about these circumstances are given in a box like this o...

Page 11: ...handle attached to the box to lift the EZ2 After the EZ2 has been unpacked two people must lift the instrument Lift the instrument by placing your hands underneath the bottom of the instrument WARNIN...

Page 12: ...s and substances supplied with QIAGEN kits as outlined in respective Information for use Use of other reagents and substances may lead to fire or explosion If hazardous material is spilled on or insid...

Page 13: ...r outside the instrument or disconnection of the protective conductor terminal is likely to make the instrument dangerous Intentional interruption is prohibited Lethal voltages inside the instrument W...

Page 14: ...the instrument Do not operate the instrument with any covers or parts removed If liquid has spilled inside the instrument switch off the instrument and if the spill has not been completely contained i...

Page 15: ...ING Explosive atmosphere The EZ2 instrument is not designed for use in an explosive atmosphere WARNING Risk of overheating To ensure proper ventilation maintain a minimum clearance of 10 cm at the sid...

Page 16: ...operated high frequency sources or mobile radio devices because these can interfere with the proper operation 2 4 Biological safety Samples and reagents containing materials from humans should be tre...

Page 17: ...he surrounding workplace is safe and that the instrument operators are suitably trained and not exposed to hazardous levels of infectious agents as defined in the applicable Material Safety Data Sheet...

Page 18: ...ng for fumes and disposal of wastes must be in accordance with all national state and local health and safety regulations and laws OSHA Occupational Safety and Health Administration United States of A...

Page 19: ...hood of the EZ2 must remain closed during operation of the instrument Only open the hood when instructed to do so by the instruction for use or when prompted by the GUI The worktable of the EZ2 instr...

Page 20: ...2 9 Radiation The EZ2 instrument has a UV LED lamp The wavelength of the UV light produced by the UV LED lamp is 275 to 285 nm This wavelength corresponds to ultraviolet light Type C which can be used...

Page 21: ...e EZ2 must only be operated by suitably qualified personnel Servicing of the EZ2 instrument must only be performed by QIAGEN Field Service Specialists Operate the EZ2 instrument only as described in t...

Page 22: ...rom the worktable and if permitted by local laboratory operating practices CAUTION Damage to the instrument After wiping the worktable with paper towels make sure that no residual pieces of paper towe...

Page 23: ...ht On handheld barcode scanner Hazard Level 2 laser light Do not stare into the light beam when using handheld barcode scanner Robotic arm inside instrument Crush hazard the pipettor unit may crush yo...

Page 24: ...Global Trade Item Number Type plate on the back of the instrument Serial number Type plate on the back of the instrument Catalogue number Type plate on the back of the instrument In vitro diagnostic...

Page 25: ...ons on how to operate the EZ2 Connect MDx using the Research mode of the software with MBA protocols or any customized protocols please refer to the user manual of the EZ2 Connect available on the EZ2...

Page 26: ...g system The EZ2 Connect MDx incorporates the following features An internal camera which is used for load checks and reagent cartridge bar code reading An external bar code reader which is used for r...

Page 27: ...te Two additional USB ports are located on the rear of the touchscreen not shown Figure 2 The back of the EZ2 instrument 5 RJ 45 Ethernet port 6 Power cord socket including instrument main fuse 7 Vent...

Page 28: ...ith a resolution of 1280 x 800 pixels The Graphical User Interface GUI is displayed on the touchscreen allowing the user to operate the instrument set up and start runs perform maintenance procedures...

Page 29: ...he duration of the run This protects users from moving parts on the worktable The hood can be manually opened to gain access to the worktable when no protocol is running During operation of the EZ2 th...

Page 30: ...to the power button on the front of the instrument Two are located on the back of the touchscreen display The USB ports allow you to connect a USB drive to the EZ2 A USB drive that is connected to th...

Page 31: ...he USB flash drive provided by QIAGEN Do not connect other USB flash drive devices to USB ports Important Do not remove the USB drive or interrupt power while downloading or transferring data or softw...

Page 32: ...05 2022 32 3 2 5 RJ 45 Ethernet port The RJ 45 Ethernet port is located on the back of the instrument highlighted white in image below The port is used to connect the EZ2 to a local area network Figu...

Page 33: ...ord Figure 7 Location of power cord socket WARNING Electrical hazard Any interruption of the protective conductor earth ground lead inside or outside the instrument or disconnection of the protective...

Page 34: ...anual 3 2 7 Ventilation openings EZ2 ventilation openings allow the internal components of the instrument to be cooled CAUTION Risk of overheating To ensure proper ventilation maintain a minimum clear...

Page 35: ...dule 5 Camera Internal features not marked in the picture Heating system UV LED lamp Internal light 3 3 1 Pipettor head The pipettor head is mounted above the worktable and moves in the Z direction me...

Page 36: ...is the piercing unit that is located behind the tip adapters The piercing unit is a row of 24 metal spikes that puncture the foil sealing the reagent cartridges During operation the piercing unit open...

Page 37: ...g parts during operation of the EZ2 Under no circumstances should hands be placed under the pipetting arm during movement Do not attempt to remove any plasticware from the worktable whilst the instrum...

Page 38: ...ted behind the tip rack Both parts of the cartridge rack together hold up to 24 reagent cartridges For more information on how to load the cartridge rack refer to the Loading the cartridge rack sectio...

Page 39: ...f the worktable Each consists of four rows and 12 positions Row A which is the row that is closest to the cartridge rack holds up to 24 sample tubes Important Only use QIAGEN recommended tubes see res...

Page 40: ...ovided with EZ1 DSP or EZ1 2 kits Important Only use QIAGEN recommended tubes for elution For information on how to load the tip rack refer to the Loading the tip rack section see page 110 Heating sys...

Page 41: ...le is to prevent contamination of the EZ2 that could be caused by liquids that are unintentionally spilled The tray can be removed and cleaned as described in the Daily maintenance section see page 14...

Page 42: ...check are shown on the screen For more information on the load check refer to the Load check section see page 118 The camera also reads the cartridge 2D bar codes Information that is collected from th...

Page 43: ...e hood closed If the hood sensor or lock is not functioning correctly contact QIAGEN Technical Services 3 3 6 Internal light The EZ2 has a built in LED light The internal light illuminates the worktab...

Page 44: ...ould not be subject to large temperature fluctuations Use a level workbench that is large enough and strong enough to accommodate the EZ2 Refer to Technical Specifications section see page 164 for the...

Page 45: ...ION Damage to the instrument Direct sunlight may bleach parts of the instrument cause damage to plastic parts and may interfere with the load check The EZ2 must be located out of direct sunlight CAUTI...

Page 46: ...al is likely to make the instrument dangerous Intentional interruption is prohibited Lethal voltages inside the instrument When the instrument is connected to line power terminals may be live and open...

Page 47: ...nected to line power terminals may be live and opening covers or removing parts is likely to expose live parts 4 2 Unpacking the EZ2 WARNING Risk of personal injury The EZ2 is too heavy to be lifted b...

Page 48: ...up the outer carton box 5 Remove the two pieces of protector from the unit 6 Move the unit to the workbench or trolley from the packaging When lifting the EZ2 slide your fingers under the side of the...

Page 49: ...parts If anything is damaged contact QIAGEN Technical Services Make sure that the EZ2 has equilibrated to ambient temperature before powering on 16 Retain the package in case you need to transport th...

Page 50: ...de products ez2 connect mdx 4 3 1 Removal of the EZ2 accessories and shipping materials 1 Remove the power cord barcode scanner and the quick start guide from accessories box on top of the EZ2 2 Remo...

Page 51: ...heck the recommended supply voltage refer to the specifications indicated on the type plate of the instrument WARNING Electrical hazard Any interruption of the protective conductor earth ground lead i...

Page 52: ...2 Before turning on the instrument plug the Wi Fi adapter into one of the 3 USB ports located on either the front of the instrument or on the rear of the touchscreen Note It may be more convenient to...

Page 53: ...Managing user security section see page 77 and as per instruction in the Changing password section see page 75 3 From the Configuration menu under the System tab you can modify the Instrument Name Da...

Page 54: ...y Administrators can perform the camera exposure calibration WARNING Moving parts To avoid contact with moving parts during the operation of the EZ2 the instrument must be operated with the hood close...

Page 55: ...ck Cat No 9027009 shall be used for exposure calibration Figure 26 Camera exposure calibration screen 4 During the calibration routine the following message will be displayed Figure 27 Camera exposure...

Page 56: ...locks two for Y Axis 3 Install transport lock for P Axis 4 Close instrument hood and install the foam strip in the gap between the hood and the front top cover 5 Move instrument to transportation box...

Page 57: ...tomatically lock during operation of the instrument Only open the hood when instructed to do so by the instruction for use or GUI The worktable of the EZ2 instrument moves during operation of the inst...

Page 58: ...Damage to the instrument Avoiding spilling water or chemicals onto the EZ2 Instrument damage caused by water or chemical spillage will void your warranty WARNING Risk of fire or explosion When using...

Page 59: ...b coat The responsible body for example a laboratory manager must take the necessary precautions to ensure that the surrounding workplace is safe and that the instrument operators are suitably trained...

Page 60: ...skin to UV light WARNING Risk of personal injury Hazard Level 2 laser light Do not stare into the light beam when using handheld bar code scanner 5 1 General information The EZ2 is operated using a t...

Page 61: ...re 28 The home screen Toolbar The toolbar is used to access the main sections of the EZ2 software to check the connection status of the LAN and Wi Fi and to log out of the application The toolbar cont...

Page 62: ...password Shows the status of the LAN connection Shows the status of the Wi Fi connection Tap this button to log out Tap this button to access Run reports Support packages and Audit trail Tap this but...

Page 63: ...hift key a Caps Lock key and the Special Characters key To enter a character tap the relevant letter number or special character on the keyboard To enter one uppercase letter tap Shift To enter multip...

Page 64: ...all characters from the field tap Clear All Please note that press and hold of the Backspace button does not clear all Some fields have requirements or restrictions that have to be followed If the ent...

Page 65: ...ed on the keyboard and they cannot be entered in the field 5 2 Starting the EZ2 1 Close the hood of the instrument 2 Press the power button If sounds are enabled on the instrument a sound is played as...

Page 66: ...etails on how to download and delete run reports to free up disk space Note After first log in using the default Admin account the password should be changed according to the Password policy described...

Page 67: ...ings and configuration features of the software 5 3 1 Setting basic system data To set the instrument name date date format and time follow the steps below Note Only Administrators can change system s...

Page 68: ...dialog 5 To set the date format tap the Date format drop down list and select one of the listed formats 6 To set the time tap the Time field and enter the time using the on screen keyboard 7 To use th...

Page 69: ...ht of the display which makes the content on the touchscreen barely visible If this happens by mistake a restart of the instrument will make the display bright again 5 To adjust the brightness of the...

Page 70: ...0 Adding a new user Note Only administrators can add new users 1 Tap Configuration on the toolbar Figure 39 Configuration button on the toolbar 2 Tap User management Existing users are shown in the ta...

Page 71: ...ice users Note Only administrators can view the full details of a user account As a result only administrators can identify users based on their anonymous IDs 5 Select the User role and User status fr...

Page 72: ...create at least one more account with administrator role in addition to the default Admin account In case one administrator is locked due to wrong credentials the other administrator can unlock the a...

Page 73: ...t user account dialog 4 To edit the First name or Last name tap the respective boxes and modify the contents using the on screen keyboard 5 To change the User role or User status tap the respective dr...

Page 74: ...e changes made to the user account tap Accept Note For cybersecurity reasons an operator must change the password provided by the administrator upon first login Deactivating Activating a user Note Onl...

Page 75: ...All active users can change their own passwords Additionally administrators can change the passwords of other users For more information on how to change passwords of other users refer to the Editing...

Page 76: ...n password follow the procedure below 1 Tap Configuration on the toolbar Figure 49 The Configuration button on the toolbar 2 Tap Edit Figure 50 User Management tab visible only for administrator roles...

Page 77: ...e configuration screen looks different Figure 52 Configuration screen for Operator role 8 If you are logged in with an operator role you can change your password directly in the Configuration screen 5...

Page 78: ...value in the Incorrect login attempts field within acceptable range 1 to 50 It is recommended to set to at least 2 incorrect attempts Otherwise one typographical error will lock your account Only admi...

Page 79: ...anguage packs and other EZ2 related files only from www qiagen com Important Use only the USB flash drive provided by QIAGEN Do not connect other USB flash drive devices to USB ports Important Do not...

Page 80: ...ote Only administrators can change language and install new language packages Note Language tab is only available to users with administrator role Important Download software upgrades protocol files l...

Page 81: ...oice of either uploading a new Language package to make a new language available or to change the language settings Figure 59 Language Tab 5 Tap Upload in Upload language packages window 6 If language...

Page 82: ...urrently installed software version can be found from the Configuration menu under the System configuration tab Important Use only the USB flash drive provided by QIAGEN Do not connect other USB flash...

Page 83: ...p System configuration Figure 62 System Configuration tab 4 Tap Check for updates to check the attached USB drive 5 If a software update package has been detected on the USB stick a pop up window appe...

Page 84: ...he device 5 3 9 Configuring network and QIAsphere Base connections Configuring a LAN connection Note LAN tab is only available to users with administrator role 1 Tap Configuration on the toolbar Figur...

Page 85: ...onfigured LAN tab Configuring a Wi Fi connection Note Only administrators can configure Wi Fi settings Note Make sure the Wi Fi USB device was plugged in before the machine was started The EZ2 can be...

Page 86: ...ork must be visible It is not possible to connect to a network with a hidden SSID To configure the Wi Fi connection follow the steps below 1 Tap Configuration on the toolbar Figure 67 The Configuratio...

Page 87: ...9 List of available Wi Fi networks 4 To select a network tap the row that corresponds to the network you want to select 5 To connect to the selected network tap Connect 6 Enter the network password us...

Page 88: ...i Fi network 7 To disconnect from a network tap the row that represents the network that the instrument is connected to Then tap Disconnect 8 To view additional information about the network or to cha...

Page 89: ...which is available at www qiagen com Only users assigned the role Administrator can change the network configuration It is recommended to consult your network administrator when configuring the networ...

Page 90: ...he LIMS tab and by completing the following steps Upload the LIMS Connector certificate Generate new instrument certificate Enter the LIMS Connector URL Register the instrument in the LIMS connector Q...

Page 91: ...tor set up and was saved on a USB drive The certificate is designed locally and cannot be provided remotely If you need support with a QIAGEN LIMS Connector certificate contact your local Technical Se...

Page 92: ...EZ2 Connect MDx User Manual 05 2022 92 4 Tap Upload new Figure 77 Select certificate screen 5 Select the certificate and tap Update Figure 78 Successful certificate update 6 Tap OK and restart the EZ2...

Page 93: ...e will be stored on attached USB stick Figure 79 Generation of Instrument certificate 8 Tap OK 9 Install the generated certificate from the USB stick on the QIAGEN LIMS Connector 10 Tap the QIAGEN LIM...

Page 94: ...register the instrument and select a configuration If the instrument is registered and only LIMS Connector address was changed you can enter a new URL and tap Skip 13 If you want to select a new conf...

Page 95: ...Connect MDx User Manual 05 2022 95 14 Select configuration from the drop down list and tap Register Figure 83 LIMS registration successful 15 Tap OK then tap Test connection Figure 84 LIMS connection...

Page 96: ...available on the Setup screen Note If the user checks the Send results to LIMS box the LIMS results status will be displayed and the results for each sample will be sent to LIMS after the run This se...

Page 97: ...g on the icon directs the user to the Results sending status screen The information in the table on the Results sending status screen depends on the status of the results currently being sent 18 Statu...

Page 98: ...results is in progress the sending status table informs the user about sending and pending results Results with the Sending status are currently being sent to the LIMS system Results with Pending stat...

Page 99: ...ogress 20 Status icon If the results cannot be sent sending status table informs the user about the unsent status and occurred error The Unsent status is displayed with an error ID and detailed descri...

Page 100: ...ocols are pre installed on the EZ2 upon delivery You can download all available QIAGEN protocols from the QIAGEN website For MDx applications choose the IVD mode when logging in For other applications...

Page 101: ...ection Some descriptions shown on the touchscreen may only be visible by using a scrollbar Please ensure to read the entire instruction The process is started by tapping either the SCAN or LIMS button...

Page 102: ...egin set up of a protocol run start at the Setup tab then tap the scan button in the Applications pane Figure 92 Setup screen Tap into the field showing up in the next screen and scan the 1D Barcode o...

Page 103: ...pe the barcode number via the user interface Figure 94 Q Card sample By scanning the 1D Barcode on the Q Card provided with the kit the application type is selected and information on script options i...

Page 104: ...ated into the target language Choose No if the ethanol wash is not desired or choose Yes if the ethanol wash is desired Figure 96 Define parameters step with open drop down list Additional information...

Page 105: ...the positions of your samples tap the relevant rows on the worktable diagram or tap the corresponding row numbers underneath the diagram The selected positions are highlighted To select or deselect al...

Page 106: ...mm_XX where the first 16 characters represent the current date and time and the XX is the sample number Note Sample IDs can also be entered manually by use of the on screen keyboard and by use of the...

Page 107: ...ard to change the text Figure 100 Changing the sample ID There is an 80 character limit for the Sample ID field Tap Accept to save the changes or tap Cancel to go back to the Enter sample IDs screen N...

Page 108: ...D and use the on screen keyboard to enter the note Figure 101 Adding a note to a sample There is an 80 character limit for the Note optional field Tap Accept to save the changes or tap Cancel to go ba...

Page 109: ...on the diagram and the corresponding row in the table tap the well or the table row In the IVD mode of the software only the protocols for the DSP Virus Kit use the loading instruction for the additi...

Page 110: ...o highlight a position on the tip rack diagram and the corresponding row in the table tap the position or the table row Important Read the instructions carefully before loading the rack and make sure...

Page 111: ...rocess Figure 104 Run set up overview To return to the previous screen tap Return To start the protocol run tap Start The system checks available disk space when the protocol run is started If the ava...

Page 112: ...spective protocol During the LIMS connection set up service ensure that you cover with the QIAGEN service person all protocols you intend to use to get the needed application layers created during thi...

Page 113: ...ither scan using the handheld barcode scanner or by use of the onscreen keyboard Figure 108 Scan or enter sample ID 4 After scanning the first sample the check parameters and load the holder screen is...

Page 114: ...t step 6 Important Information captured in the note field will not be transmitted transferred to LIMS After pressing End scanning the review collected samples screen appears Here you have the option t...

Page 115: ...omplete Figure 112 Scan Q card The Load the cartridge rack steps page 130 features instructions on how to load the cartridge rack To highlight the well on the diagram and the corresponding row in the...

Page 116: ...position on the tip rack diagram and the corresponding row in the table tap the position or the table row Important Read the instructions carefully before loading the rack and make sure to follow all...

Page 117: ...D not found dialogue 11 To process the unknown sample along with the sample IDs found in LIMS tap Yes Previously scanned ID will be displayed Note The audit trail and support package will also contain...

Page 118: ...he labware To cancel the setup tap Cancel In the Cancel run setup dialog tap Yes to confirm the cancellation or tap No to go back to the run setup Figure 118 The Cancel run setup dialog 5 6 Starting t...

Page 119: ...erview dialog 2 If all the information in the overview is correct tap Start to immediately proceed with the protocol run To make modifications to any of the selections tap Return to go back to the run...

Page 120: ...stop the load check tap Abort Note Wait until the Load Check has successfully completed before leaving the instrument unattended Upon a failure of the load check e g due to operator errors during wor...

Page 121: ...ust make sure that they have carefully followed the instructions related to the protocol being run Note Follow the instructions on the User Interface as well as those given in the respective kit handb...

Page 122: ...to support the operator to ensure that the worktable is correctly set up as detailed on the GUI interface It is not intended as a replacement for operator diligence in confirming that consumables reag...

Page 123: ...the load check To return to the loading instructions and start the load check procedure again tap Back The Load the tip rack screen is shown If you need the instructions from the previous screen press...

Page 124: ...screen When using this option it is the responsibility of the operator to visually check to confirm correct placement of ALL consumables in ALL worktable positions in accordance with the instructions...

Page 125: ...EZ2 Connect MDx User Manual 05 2022 125 Figure 125 Skip load check option Figure 126 Confirm skip load check screen...

Page 126: ...run When the protocol has successfully finished the Protocol run completed screen is shown Information about required cleanup maintenance steps is also displayed First remove the eluates and store th...

Page 127: ...to dispense the contents of the pipettes into the first available empty tubes and to release tips into empty tip holders Then the worktable returns to its initial position After this is done a message...

Page 128: ...ully fails or is aborted a run report can be generated in two formats PDF and XML To automatically save a run report tap Finish in the Protocol run completed Protocol run failed or Protocol run aborte...

Page 129: ...d successfully if it failed or if it was aborted Errors if occurred The status of the cleanup procedure that is required after a run ends Information about the samples their positions names and any no...

Page 130: ...cartridge rack section until you feel resistance The cartridge should click into place 6 Once all the reagent cartridges are loaded place each cartridge rack section onto the worktable The rim of the...

Page 131: ...rack step of the run setup process You could be required to perform some additional actions The instructions can also be found in the kit handbooks Note Remove any caps from the labware and store safe...

Page 132: ...ct the tip rack and remove any spilled liquids or potential contamination that is present on the cartridge rack sections For more information on disinfecting and removing contamination refer to the Cl...

Page 133: ...bar code scanner 5 12 Data menu Important Use only the USB flash drive provided by QIAGEN Do not connect other USB flash drive devices to USB ports Important Do not remove the USB drive while downloa...

Page 134: ...ton on the toolbar Figure 133 Data screen Run reports If there is currently no run report on the instrument the Download and the Download and delete buttons are disabled Tap either one of the availabl...

Page 135: ...ownload or Download and delete Figure 134 Download reports in progress Figure 135 Report download successful If Download and delete is selected the following screen is displayed prior to start of the...

Page 136: ...iles should be copied from the USB stick to a final destination of the user choosing Figure 137 Run reports deleted confirmation Tap OK to complete process If no USB drive is inserted the following sc...

Page 137: ...7 1 1 Creating a support package Audit trail Note Download of Audit trail file is only available to Admin users Tap Download alongside the Audit trail section of the Data screen The following screen...

Page 138: ...tching the instrument off To log out of the Software tap the Log out button on the toolbar To switch the instrument off press the power button Important It is not recommended to switch the instrument...

Page 139: ...start the EZ2 Connect MDx in Research mode select Research Mode at the log in screen If this is the first time use of the EZ2 Connect MDx use Admin as User ID and Password Tap Log in to launch the sof...

Page 140: ...e EZ2 Connect MDx in Research mode gives the option to skip the initial Load Check When skipping the load check the instrument will not check the worktable setup but immediately start the protocol run...

Page 141: ...alent Daily maintenance At the end of each day if at least one run was performed that day Note Perform this procedure after you are done with the after run maintenance Laboratory technicians or equiva...

Page 142: ...and disinfectants Please follow the instructions provided by the manufacturer of such materials to safely clean the instrument Note If you want to use different disinfectants than the recommended one...

Page 143: ...y local laboratory operating practices WARNING Risk of fire Do not allow cleaning fluid or decontamination agents to come into contact with the electrical parts of the EZ2 WARNING Risk of electric sho...

Page 144: ...ide per 100 g with anticorrosion components fragrance and 15 30 nonionic surfactants Note If you want to use different disinfectants than the recommended ones make sure that they have the same composi...

Page 145: ...follow the manufacturer s instructions when using decontamination solutions 6 2 After run maintenance After run maintenance is required after each run of the EZ2 The EZ2 must only be operated by qual...

Page 146: ...g for fumes and disposal of waste must be in accordance with all national state and local health and safety regulations and laws Materials used on the EZ2 such as human blood serum or plasma are poten...

Page 147: ...e the piercing unit tap Move down The instrument lowers the piercing unit of the pipettor head 5 Open the hood 6 Carefully wipe the piercing unit using a lint free tissue moistened with 70 ethanol Enc...

Page 148: ...ean it with 70 ethanol and then with distilled water 6 3 Daily maintenance Daily maintenance is required after the last run of each day WARNING Moving parts To avoid contact with moving parts during t...

Page 149: ...s Some chemicals used with the EZ2 instrument may be hazardous or may become hazardous after completion of a purification Always wear safety glasses gloves and a lab coat Venting for fumes and disposa...

Page 150: ...r run maintenance see page 145 5 Clean the worktable with 70 ethanol and then with distilled water if this is not yet done during after run maintenance 6 Close the hood 7 To return the piercing unit t...

Page 151: ...ect installation of the trays 10 Wipe the cartridge and tip racks with 70 ethanol and then with distilled water 11 Wipe the surface of the instrument using a lint free tissue moistened with 70 ethanol...

Page 152: ...azardous after completion of a purification Always wear safety glasses gloves and a lab coat Venting for fumes and disposal of waste must be in accordance with all national state and local health and...

Page 153: ...O rings shown in Figure 150 by just using a fingertip moistened with grease Care should be taken not to allow grease to be applied to or cover the opening in the nub of the pipettor 6 Apply a small a...

Page 154: ...h and greasing restarted 9 Make sure that there is no grease present on parts other than the O rings especially on the bar on top and the opening of the pipettors Note The filter tips should sit flush...

Page 155: ...with the required safety regulations Some chemicals used with the EZ2 instrument may be hazardous or may become hazardous after completion of a purification Always wear safety glasses gloves and a lab...

Page 156: ...ocessed on the device 5 To begin the procedure tap Start 6 If there is a need to abort the UV cycle prior to completion tap the Abort button Important The UV cycle will not stop immediately upon selec...

Page 157: ...cution Note The camera calibration should be performed as part of installation procedure after moving the instrument as well as in case of load check issues 1 On the touchscreen tap Maintenance 2 Tap...

Page 158: ...rmed the instrument must first be decontaminated Refer to Disinfecting the EZ2 and Removing contamination sections pages 144 and 144 respectively WARNING CAUTION Risk of personal injury and material d...

Page 159: ...Sample input material and sample pre treatment Detailed description of the error situation Support package This information will help you and QIAGEN Technical Services deal most efficiently with your...

Page 160: ...Figure 157 Data tab 5 The support package is now saved on the USB flash drive The download successful screen is displayed Tap OK to close Note The support package contains information about the last...

Page 161: ...package is not possible the screen below is displayed and the creation should be attempted again Figure 159 Support package creation failure status Note The support package contains information about...

Page 162: ...ck is not damaged and is correctly positioned on the worktable Cross contamination Ensure maintenance was performed Clean the piercing unit and worktable with 70 ethanol Start UV decontamination Make...

Page 163: ...the EZ2 that aspirates and dispenses liquid and pierces cartridges via the piercing unit The pipettor head moves up and down above the worktable and contains 24 syringe pumps each of which is connect...

Page 164: ...only Pollution level 2 Environmental class 3K21 IEC 60721 3 3 3M11 IEC 60721 3 3 Average noise level over 8 hours Max 70 dBA IP Code IEC 60529 IP20 9 2 Transport conditions Air temperature 25 60 C 13...

Page 165: ...report file Pipettor head Contains 24 high precision syringe pumps each containing a tip adapter that attaches to filter tips Syringe pumps are air filled Liquids containing salts alcohol solvents and...

Page 166: ...ion tubes UV LED lamp UV LED wavelength 275 285 nm Capacity Up to 24 samples per run Display 10 1 inch color touchscreen Display with resolution 1280 x 800 pixels Camera Monochrome camera The USB inte...

Page 167: ...5 2022 167 Appendix A Declaration of Conformity Name and address of the legal manufacturer QIAGEN GmbH QIAGEN Strasse 1 40724 Hilden Germany An up to date declaration of conformity can be requested fr...

Page 168: ...ime of disposal helps to conserve natural resources and ensures that the product is recycled in a manner that protects human health and the environment Recycling can be provided by QIAGEN upon request...

Page 169: ...of the Company Read out devices interfacing devices and associated software will be warranted only for the period offered by the original manufacturer of these products Representations and warranties...

Page 170: ...ck Flip Cap Tube Tip Rack for EZ2 Connect for use with flip cap tubes 9027010 EZ2 Connect Cartridge Rack Cartridge rack for EZ2 Connect for use with prefilled kit cartridges 9027012 USB Flash Drive 90...

Page 171: ...EZ2 Connect MDx User Manual 05 2022 171 Document Revision History Date Changes 04 2022 Initial version of the EZ2 Connect MDx User Manual...

Page 172: ...to Insight EZ2 QIAGEN Group Gigasept Lysetol Mikrozid Sch lke Mayr GmbH Registered names trademarks etc used in this document even when not specifically marked as such are not to be considered unprot...

Page 173: ...EZ2 Connect MDx User Manual 05 2022 173 Ordering www qiagen com contact Technical Support support qiagen com Website www qiagen com 1124548 05 2022 HB 2907 001...

Reviews: