


7
next heavier gauge.
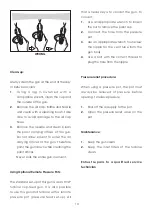
2. Hose:
use only grounded hoses.
3. Spray gun:
grounding is obtained
through connection to a properly
grounded hose and turbine.
W H E N S P R A Y I N G & C L E A N I N G W I T H
FLAMMABLE PAINTS AND THINNERS
1.
When spraying with flammable liquids,
the unit must be located a minimum
of 6 meters (20 feet) away from the
spraying area in a well ventilated area.
Ventilation must be sufficient enough
to prevent the accumulation of vapors.
2.
To eliminate electrostatic discharge,
ground the spray unit & sprayed
object. See GROUNDING. Use only
hoses which are conductive.
3.
Do not smoke in spraying/cleaning
area.
•
NEVER
use cleaning solvents with flash
points below 140 degrees F. Some of
these are: acetone, benzene, ether,
gasoline, naptha. Consult your supplier
to be sure.
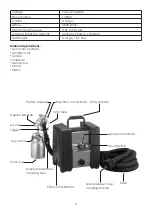
FUNCTIONAL DESCRIPTION
This HVLP (High Volume, Low Pressure)
turbine uses a controlled cone of high
volume, low pressure air created by the
gun which can spray with very little waste
and overspray. This high efficiency delivery
absolutely minimizes air pollution emissions
associated with paint spraying. Media
which are traditionally sprayed by high
pressure compressor driven paint sprayers
can be sprayed by this new technology.
The paint drying times are even quicker
because the air from the turbine is naturally
warm.
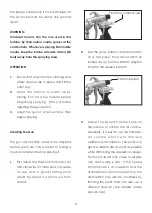
UNPACKING AND ASSEMBLY:
1
. Remove all parts from the carton.
2.
Check for any damage.
3.
Attach the hose to the turbine.
4.
Attach the hose to the gun.
PREPARATION
Prepare the paint solution
Strain the paint and all other media
components before you spray
Remember to use a slower drying reducer
than you would normally use with a
conventional air sprayer. The warm air
of the turbine causes faster drying times.
Usually one step slower will do.
For Automotive finishes, reduce and
c a t a l y z e a c c o r d i n g t o t h e p a i n t
manufacturer’s instructions, just remember
to use one step slower reducer.
For Industrial finishes, reduce and catalyze
according to the paint manufacturer’s
instructions. If there are no reduction
instructions, add reducer step by step untill


