q-Tech Q-T3 Instruction Manual Download Page 4

4

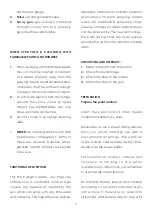
a  power  tool.  Do  not  use  tool  while  you 
are tired or under the influence of drugs, 
alcohol,  or  medication.

  A  moment  of 

inattention  while  operating  power  tools 
may result in serious personal injury. 

b) Use safety equipment. Always wear eye 
protection.

 Safety equipment such as dust 

mask, non-skid safety shoes, hard hat, or 
hearing protection used for appropriate 
conditions will reduce personal injuries. 

c)  Avoid  accidental  starting.  Ensure  the 
switch is in the off position before plugging 
in. 

Carrying tools with your finger on the 

switch or plugging in tools that have the 
switch on invites accidents.

e) Do not overreach. Keep a proper footing 
and balance at all times.

 This enables better 

control of the power tool in unexpected 
situations.

f) Dress properly. Do not wear loose clothing 
or jewellery. Keep your hair, clothing and 
gloves  away  from  moving  parts.

  Loose 

clothes,  jewellery  or  long  hair  can  be 
caught in moving parts.  

 4) Power tool use and care

a)  Do  not  force  the  power  tool.  Use  the 
correct  power  tool  for  your  application. 

The  correct  power  tool  will  do  the  job 
better and safer at the rate for which it was 
designed.

b) Do not use the power tool if the switch 
does not turn it on and off.

 Any power tool 

that cannot be controlled with the switch is 
dangerous and must be repaired.

c)  Disconnect  the  plug  from  the  power 
source  before  making  any  adjustments, 
changing  accessories,  or  storing  power 
tools.

  Such  preventive  safety  measures 

reduce the risk of starting the power tool 
accidentally. 

d) Store idle tools out of reach of children 
and do not allow persons unfamiliar with the 
power tool or these instructions to operate 
the power tool.

 Power tools are dangerous 

in the hands of untrained users.

e ) M a i n t a i n   p o w e r   t o o l s .   C h e c k   f o r 
misalignment or binding of moving parts, 
breakage of parts and any other condition 
that may affect the power tool’s operation. 
If damaged, have the power tool repaired 
before use.

 Many accidents are caused by 

poorly maintained power tools. 

g)Use  the  tool  and  accessories,  etc.,  in 
accordance  with  these  instructions  and 
in the manner intended for the particular 
type  of  power  tool,  taking  into  account 
the  working  conditions  and  the  work  to 
be performed.

  Use of the power tool for 

operations different from intended could 
result in a hazardous situation. 

Summary of Contents for Q-T3

Page 1: ...1 ...

Page 2: ...Net Weight 8 5 kgs 18 7 Lbs Material Applications Automotive refinish Architectural Marine Industrial Aerospace Wood Plastic On off switch Speed control knob Carry Handle Pattern adjuster Vent tube Air cap Needle Nozzle Trigger Cup Latch Paint cup Quick release hose coupling Gun Filter compartment Fluid flow control knob Quick release hose coupling Turbine Hose ...

Page 3: ...led and grounded in accordance with all codes and ordinances Never remove the grounding prong or modify the plug in any way Do not use any adaptor plugs Check with a qualified electrician if you are in doubt as to whether the outlet is properly grounded If the tools should electrically malfunction or break down grounding provides a low resistance path to carry electricity away from the user b Avoi...

Page 4: ...ower tool will do the job better and safer at the rate for which it was designed b Do not use the power tool if the switch does not turn it on and off Any power tool that cannot be controlled with the switch is dangerous and must be repaired c Disconnect the plug from the power source before making any adjustments changing accessories or storing power tools Such preventive safety measures reduce t...

Page 5: ...t h a n e D i c h l o r o e t h y l Ether Ethylbromide Ethylchloride Tethrachloethane PREVENT STATIC SPARKING FIRE EXPLOSIONS Vapors created when spraying can be ignited by sparks To reduce the risk of fire always locate the turbine at least 20 feet 6 m away from spray area Do not plug in or unplug any electrical cords in the spray area Doing so can cause sparks which can ignite any vapors still i...

Page 6: ...allow it to vibrate against rough sharp or hot surfaces NEVER use a damaged hose Before each use check entire hose for cuts leaks abrasions or bulging If any of these conditions exist replace the hose immediately GROUNDING G r o u n d t h e s p r a y e r o t h e r components in the system to reduce the risk of static sparking fire or explosion which can result in serious bodily injury and property...

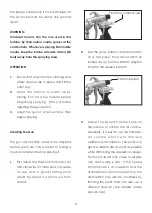
Page 7: ...ry little waste and overspray This high efficiency delivery absolutely minimizes air pollution emissions associated with paint spraying Media which are traditionally sprayed by high pressure compressor driven paint sprayers can be sprayed by this new technology The paint drying times are even quicker because the air from the turbine is naturally warm UNPACKING AND ASSEMBLY 1 Remove all parts from ...

Page 8: ...istency is found Droplets off the stir stick should be about one second apart WARNING Universal motors like the one used in this turbine by their nature create sparks at the commutator Whenever spraying flammable media keep the turbine at least 6 meters 20 feet away from the spraying area OPERATION 1 Ensure that all protective clothing and safety devices are in place and Fill the paint cup 2 Allow...

Page 9: ...ll the trigger all the way and hold it to prevent damage to the seating surfaces of the Needle and Nozzle 3 Unscrew the Fluid Control Knob all the way and remove it together with the spring 4 Pull out the Needle through the back of the Gun 5 Replacement is the opposide of removal On off switch Speed control knob Air cap Nozzle Trigger Fluid flow control knob Retaining ring Needle 6 to 8 in 150 to ...

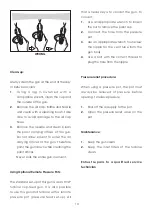
Page 10: ...gun is as an HVLP turbine cup feed gun It is also possible to use this gun and turbine with a remote pressure pot pressure feed set up All that is necessary is to convert the gun To convert 1 Use an appropriate wrench to loosen the nut to remove the paint cup 2 Connect the hose from the pressure pot 3 Use an appropriate wrench to unscrew the nipple for the vent tube from the gun body 4 Use a bolt ...

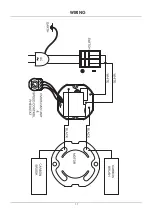
Page 11: ...11 WIRING ...

Page 12: ...3 52 51 50 30 31 27 26 25 27 26 25 29 29 28 24 31 30 33 32 34 43 44 48 20 36 23 21 20 42 18 13 15 14 13 15 14 13 12 11 09 10 09 08 07 03 04 05 06 16 17 38 37 39 02 01 55 56 57 58 59 60 59 61 62 63 22 35 49 19 40 41 45 47 46 60 2 60 1 64 65 ...

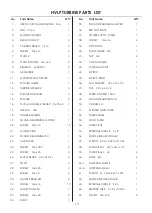
Page 13: ...0 HANDLE BRACKET 2 31 SCREW M4 x 16 10 32 CARRY HANDLE 1 33 SCREW M6 x 20 2 34 BODY 1 No Parts Name Q TY 35 SOUND DEADENING LOWER 1 36 BOTTOM PLATE 1 37 POWER SUPPLY CORD 1 38 SCREW M4 x 16 2 39 CORD CLIP 1 40 SUN WASHER M4 1 41 NUT M4 2 42 CORD ARMOR 1 43 OVERLOAD UNIT 1 44 SWITCH 1 45 SWITCH BOOT 1 46 FLAT WASHER ø7 x ø12 x 0 5 1 47 NUT 9 9 x ø6 3 x 2 1 48 SPEED CONTROL DIAL 1 49 SOUND DEADENING...

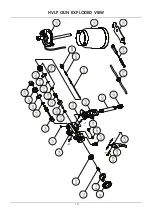
Page 14: ...14 HVLP GUN EXPLODED VIEW ...

Page 15: ...ING 1 G12 NEEDLE SPINDLE 1 G13 SPRING 1 G14 SEAL 1 G15 O RING 1 G16 O RING 1 G17 SPINDLE HOUSING 1 G18 NEEDLE ASSEMBLY 1 G19 NEEDLE SPRING 1 G20 FLUID CONTROL KNOB 1 G21 GRIP 1 G22 AIR PIPE 1 G23 AIR INLET NIPPLE 1 G24 VENT NIPPLE 1 G25 PACKING 1 G26 PACKING NUT 1 G27 FLUID INLET 1 G28 TRIGGER STUD 1 G29 E CLIP 1 G30 TRIGGER 1 G31 CUP LATCH ASSEMBLY 1 G32 PAINT CUP 1 G33 VENT TUBE ASSEMBLY 1 G34 C...

Reviews: