


6 –
How to use and choose the finish line/circuit
Before using the device, you need to choose the way in which you want to use the Start device:
CLOSED CIRCUIT: circuits where the start and finish line coincide (ex. racetracks, kartdromes, etc.)
FROM ONE POINT TO ANOTHER: circuits where the start and finish line do not coincide (ex. rallies, up-hill races, etc.)
ACCELERATION: for acceleration races where the finish line corresponds to reaching a certain distance or speed (ex. 0-100 km/h, ¼ mile, etc.)
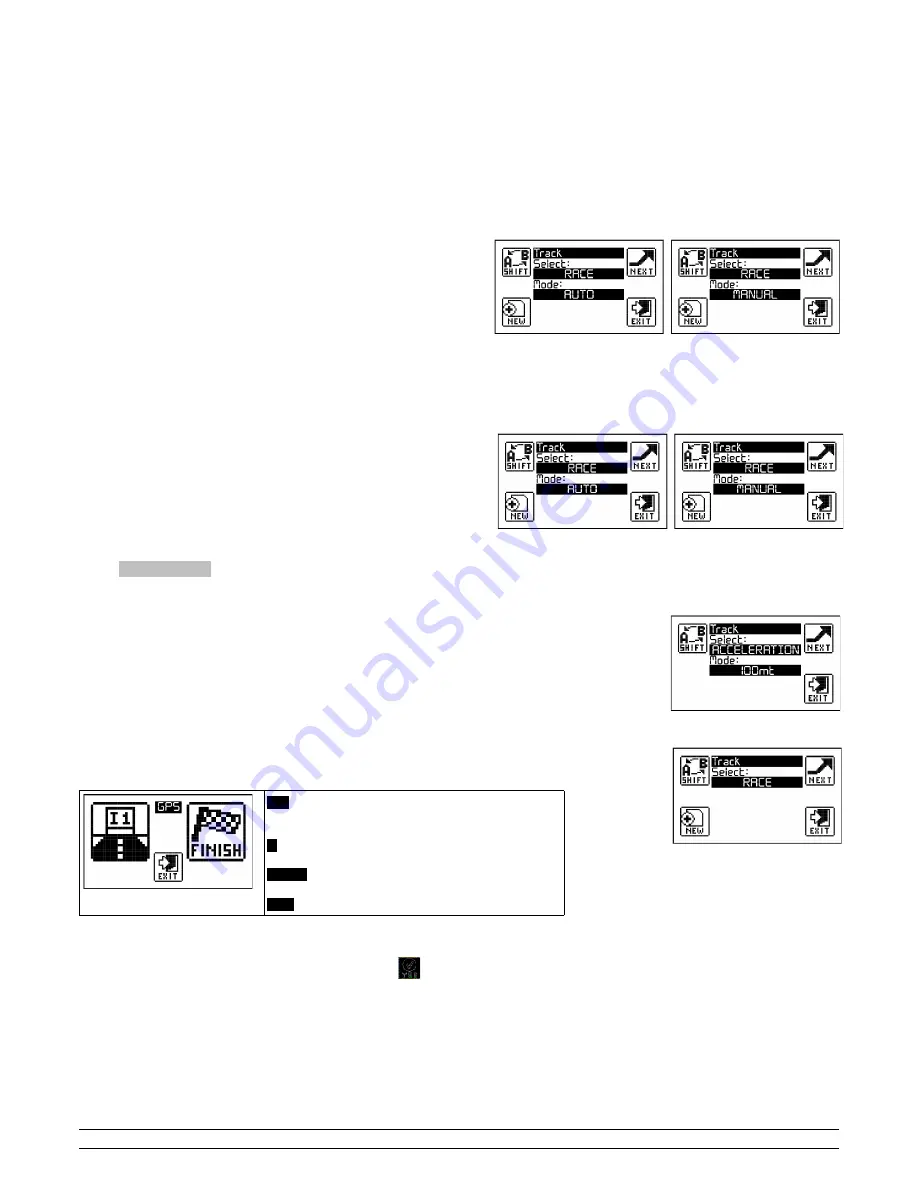
You select the finish line and circuit from the TRACK menu; access the Menu and click on the TRACK icon.
6.1 – Closed circuit
The standard mode of a track chronometer, in which a session is made of multiple times per lap; each time the finish line is crossed, the chronometer
records the time taken to perform the lap and sets the chronometer back to zero to start a new lap.
On the first line where "Select" appears, click on RACE (you can amend your
choice by pressing SHIFT); press NEXT to confirm.
You will then be asked to choose to select the circuit in "Mode"; by selecting
AUTO, the circuit will be selected automatically; the Start device will retrieve
your position and determine which track is closest to you amongst those saved
on the memory card in the TRACKS folder.
In MANUAL mode, you can manually scroll all the tracks stored in the folder by
pressing SHIFT; confirm by pressing NEXT.
6.2 – Point to point
Standing start mode; thanks to the internal accelerometer, Start will retrieve the starting point; the finish line will be retrieved using the GPS
coordinates stored on the device, like with a normal circuit, in the TRACKS folder of the memory card.
For a standing start, you need to set on MANUAL the start mode of the recording (see chap. 5); this way you can first position the vehicle up to the
starting point, then press YES to request the beginning of the storage when the
vehicle is standing and ready to start the lap.
In the TRACK menu, press "Select" and choose RACE (you can change your
choice by clicking on SHIFT), press NEXT to confirm your choice.
You will then be asked to choose to select the circuit in "Mode"; by selecting
AUTO, the circuit will be selected automatically; the Start device will retrieve
your position and determine which track is closest to you amongst those saved
on the memory card in the TRACKS folder.
In MANUAL mode, it is possible to scroll all the finish lines which have been saved manually in the folder by pressing on the SHIFT icon and then
confirming by pressing NEXT.
6.3 – Acceleration
Standing start mode; thanks to the internal accelerometer, Start will retrieve the starting point; the finish line will be retrieved using one of the options
suggested depending on the type of race you are doing. Using this mode, each session has a single lap.
Press "Select" and choose ACCELERATION (you can change your choice by clicking on SHIFT), press NEXT to
confirm your choice.
You will then be asked the finish line "Mode"; you can choose from the following entries: 100mt, 150mt, 400mt,
800mt, 1000mt, 0-100Km/h, 0-160Km/h, 0-60mph, 0-120mph, 1/2mile, 1/4mile, 1/8mile.
By choosing ACCELERATION, the storage function of a new session is automatically set to MANUAL so you can
position the vehicle on the starting line and then press YES when the vehicle is standing and ready to start.
7 – Storage of a new finish line/circuit
You can download a list of the most famous world circuits directly from our website; if your racetrack is not available, you can create a new circuit using
the RacePro software (see the software manual for details) or directly on the track by doing as follows:
Access the TRACK menu and select the NEW icon in the bottom left hand corner. The following screen will appear:
GPS
: it informs us whether the GPS receiver is connected
to the satellites.
I1
: saves the coordinates of split time 1.
FINISH
: saves the coordinates of the finish line
EXIT
: exits the procedure without saving
Wait for the GPS to retrieve the satellites (the letters GPS on a black background like in the photo); place yourself in the spot where you wish to store the
coordinates, press the "I1" button if you wish to save split time 1 , press "Finish" if you want to save the finish line. When you press the button you have
chosen, the icon you selected will turn into a confirmation icon
, if you press "Finish", the procedure will be complete and the track will be saved in
the TRACKS folder of the memory card under TRACKxxx.TRK (xxx are a sequence of numbers); if you press "I1", the following screen will appear where
you can set the second split time or simply the finish line, and so on up to three split times.
PZRacing Via de Gasperi 5 – 61032 Fano (PU) Italy - Tel: +39 0721 820434 – Email: [email protected]


