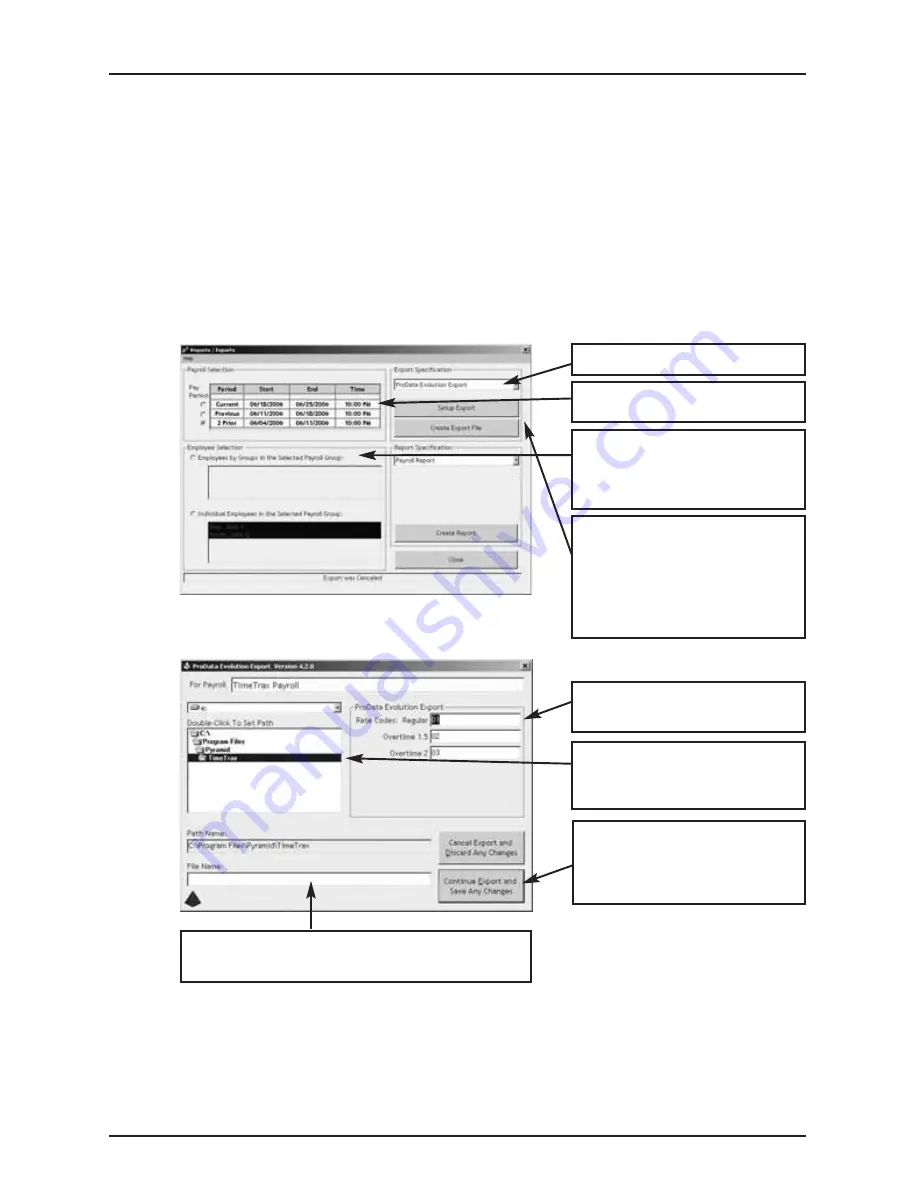
background image

30

TIMETRAX BIO

Choose EXPORT.

Select PAY PERIOD to be
included in EXPORT.

Select who is included in 
the EXPORT. Choose either
EMPLOYEE GROUP or
INDIVIDUAL EMPLOYEES.

Choose SETUP or CREATE
EXPORT. Setup is typically a
one-time screen for setup –
CREATE EXPORT will create
the export with the setup
options you have selected. 

ProData will provide RATE
CODES for this export.

Select the drive and location
where you want the export
file to be saved.

Click CONTINUE EXPORT
and SAVE ANY CHANGES
to export and save the file
where you selected.

ProData will provide you with the file name
for this export.

PRODATA EVOLUTION EXPORT

The following are instructions for setting up and using the PRODATA
EVOLUTION EXPORT contained in the TimeTrax Bio. You will have to go
into the REPORTS/EXPORTS tab to proceed with the export. It may also 
be necessary for you to setup the CATEGORY CODES within the SETUP –
PAYROLL GROUPS – SETUP PAY CATEGORIES. (These codes will be provid-
ed to you from your payroll service provider). It is also required that indi-
vidual payroll records are approved before export on the PAYROLL DETAILS
SCREEN.

Setup/Create Export:

Congratulations, you have successfully created and saved a PRODATA
EXPORT file. You will need to contact ProData to obtain steps on how 
to import the file you created and saved into ProData software.

Summary of Contents for TimeTrax Bio Ethernet

Page 1: ...REFERENCE GUIDE IMPORTANT READ THESE INSTRUCTIONS BEFORE INSTALLING AND USING THIS PRODUCT Keep these instructions for future reference Time and Attendance System...

Page 2: ...TIME ATTENDANCE SYSTEM REFERENCE GUIDE...

Page 3: ...he TimeTrax Bio software is protected by intellectual property laws and treaties The TimeTrax Bio software is licensed not sold 1 GRANT OF LICENSE This Section of the EULA describes your general right...

Page 4: ...age of software programs that You licensed as a single product the TimeTrax Bio software may be used and transferred only as part of that single product package and may not be separated for use on mor...

Page 5: ...REGARD TO THE TIMETRAX BIO SOFTWARE AND THE PROVISION OF OR FAIL URE TO PROVIDE SUPPORT SERVICES THE LIMITED WARRANTY GIVES YOU SPECIFIC LEGAL RIGHTS YOU MAY HAVE OTHERS WHICH VARY FROM STATE JURISDIC...

Page 6: ...gerprint Reader 5 Installing the Software 6 Log In Window 8 Initial Communication Form 8 TimeTrax Bio Setup Wizard 9 Payroll Setup 9 Pay Categories Setup 10 Employee Groups Setup 10 Advanced Employee...

Page 7: ...3 Importing Sync Employees From QuickBooks 24 ADP Export 26 Generic Text Export 27 Paychex Preview Export 28 Paychex Paylink Export 29 ProData Evolution Export 30 QuickBooks 2003 Export 31 QuickBooks...

Page 8: ...32 adapter MINIMUM SYSTEM REQUIREMENTS PC with a Pentium class or faster processor 64 megabytes of RAM 1 gigabyte of free space on the system s hard drive CD ROM drive Monitor and video card capable o...

Page 9: ...also to the TimeTrax Bio unit fig E Two available options for connecting the TimeTrax Bio to your central PC fig A OPTION 1 PC has an available Serial 9 pin COM port Connect the white 50 RJ45 cable f...

Page 10: ...oks and Excel Produces a variety of useful reports Using the Time Recorder Once the time recorder is installed the employee swipe records that are generated from finger swiping are stored within the r...

Page 11: ...and free of debris For employees with dry fingers apply a light coating of moisturizer For employees with moist or oily fingers wipe dry using a clean dry cloth Place your fingertip on the top of the...

Page 12: ...ard pointed object Scraping the surface of the reader with your nail or anything hard Using a dirty finger while touching the reader If you notice any of the following conditions gently clean the surf...

Page 13: ...AX BIO Click NEXT to continue Accept licensing agreement then click NEXT to continue Enter User Name and Organization Choose for whom to install the application Click NEXT to continue INSTALLING THE S...

Page 14: ...7 TIME ATTENDANCE SYSTEM Click INSTALL to begin installation When installation is completed click FINISH Double click the ICON placed on your desktop to begin...

Page 15: ...UNICATION FORM After you successfully log in the system initializes communications with the time recorder attached to the PC When this is successfully accom plished you will see Recorder Found Enter A...

Page 16: ...and Semi Monthly basis could accrue overtime in one Pay Period that is applied to the next Select the day that your Pay Period starts on Select the time to begin the new Pay Period The time selected s...

Page 17: ...tiplier 1 if the employee is paid regular rate for the day If you choose to pay time and a half the rate multiplier is 1 5 APPLY TO WEEKLY OVERTIME Check box if category hours can accrue towards overt...

Page 18: ...vals 7 02 AM becomes 7 00 AM and 7 07 AM becomes 7 05 AM Leave box unchecked for No Pay Interval Rounding Filter Out Punches Closer Than This will eliminate duplicate punches within a user definable t...

Page 19: ...the regular pay period 7th Day Worked Overtime Allows the employer to specify whether or not an employee who works 7 consecutive days is eligible for overtime regardless of hours worked during the reg...

Page 20: ...me Phone Work Phone Enter Work Phone Hourly Pay Rate Enter Hourly Pay Rate Inactive Check box if employee terminates employment To view inactive employees click VIEW INACTIVE EMPLOYEES on the bottom l...

Page 21: ...poyee fingerprint Have employee swipe finger for the 1st capture of fingerprint The terminal will say Swipe 1 of 2 Have the employee swipe finger for a 2nd time with the same finger when the terminal...

Page 22: ...and enroll each employee s fingerprint Employee fingerprint ID is posted here and will also be displayed on the terminal LCD display during employee punch TO DELETE FINGERPRINT To delete a fingerprin...

Page 23: ...ng sure the correct employee appears in the Select Employee drop down box and Selecting REGISTER a fingerprint Have the employee re swipe according to the Employee Details Setup section of this manual...

Page 24: ...he software as well as on reports TIME TOTALS FORMAT The format in which you want the times displayed in the software as well as on reports TIME OF DAY FORMAT The format in which you want the hours di...

Page 25: ...c Standards NOTE Please remember to save each user record ACTIVATE AUTOMATIC BACKUP Select this option to turn on automatic backups BROWSE Click this button to find the location in which you would lik...

Page 26: ...ll in and out punches This screen allows you to view insert edit and delete punches as well as assign comments to punches You can also view Current Previous and 2 Prior pay periods This screen categor...

Page 27: ...ails is the location in the program that allows you to enter excep tions to the employee payroll record as well as approving and un approving employee payroll records Most fields are pre populated fro...

Page 28: ...RY Choose the special pay category and the date if the pay category accrues towards overtime you will be required to enter the date If the pay category does not accrue towards overtime you will be req...

Page 29: ...ches for the selected pay period for TODAY YESTERDAY or the SELECTED PAY PERIOD Punch Report Shows the first IN and last OUT punch for a selected pay period for TODAY YESTERDAY or the SELECTED PAY PER...

Page 30: ...PAY CATEGORY hours Attendance Report Shows a history of absenteeism and missing punches Detail Pay History Report Shows a history of the combined PAYROLL REPORT and TIME CARD REPORT Comments input by...

Page 31: ...iminate the double entry of employee information After you complete the setup of EMPLOYEE GROUPS you will be presented with the following screen Click YES to continue Click SYNC EMPLOYEES WITH QUICKBO...

Page 32: ...d this option will always import the QuickBooks employee into TimeTrax Bio without asking ASK BEFORE When selected the system will always ask before it imports any employee into TimeTrax Bio Pyramid s...

Page 33: ...eate Export Congratulations you have successfully created and saved an ADP EXPORT FILE You will need to contact ADP to obtain steps on how to import the file you created and saved into ADP software Ch...

Page 34: ...IC TEXT EXPORT file You will need to go to the location where you created and saved the file and import it into the software of your choosing Choose EXPORT Select PAY PERIOD to be included in EXPORT S...

Page 35: ...elected PAYCHEX PREVIEW EXPORT The following are instructions for setting up and using the PAYCHEX PREVIEW EXPORT contained in the TimeTrax Bio You will have to go into the REPORTS EXPORTS tab to proc...

Page 36: ...ed PAYCHEX will provide you with the file name for this export PAYCHEX PAYLINK EXPORT The following are instructions for setting up and using the PAYCHEX PAYLINK EXPORT contained in the TimeTrax Bio Y...

Page 37: ...the file name for this export PRODATA EVOLUTION EXPORT The following are instructions for setting up and using the PRODATA EVOLUTION EXPORT contained in the TimeTrax Bio You will have to go into the R...

Page 38: ...see that all of the hours will be assigned to the proper employees and you can go about processing payroll as you normally would Choose EXPORT Select PAY PERIOD to be included in EXPORT Select who is...

Page 39: ...munications Failure Computer cannot locate Time Recorder Resolutions 1 Connect USB Adapter Attach RJ45 DB9 adapter to a RS232 USB adapter and then connect the RS232 to your PC 2 Re assign the QuickBoo...

Page 40: ...RT Select PAY PERIOD to be included in EXPORT Select who is included in the EXPORT Choose either EMPLOYEE GROUP or INDIVIDUAL EMPLOYEES Choose SETUP or CREATE EXPORT Setup is typically a one time scre...

Page 41: ...to either Explorer or Notepad Open the Drive you saved the file in Change the File of Type to ALL FILES Look for the if with the name you assigned Open the file 8 In the export file you just opened lo...

Page 42: ...XPORT Select PAY PERIOD to be included in EXPORT Select who is included in the EXPORT Choose either EMPLOYEE GROUP or INDIVIDUAL EMPLOYEES Choose SETUP or CREATE EXPORT Setup is typically a one time s...

Page 43: ...either Explorer or Notepad Open the Drive you saved the file in Change the File of Type to ALL FILES Look for the if with the name you assigned Open the file 8 In the export file you just opened look...

Page 44: ...ax Bio is designed with a high resistance to environmental constraints such as dirt oil humidity or extreme temperatures The fin gerprint sensor can provide high quality images despite impairments suc...

Page 45: ...data to recognize a fingerprint The reader scans the finger and stores only data concerning distinctive portions of the fingerprint called minutia points The minutia points are only a mathematical re...

Page 46: ...The software scans each employee record locating the Fingerprint ID and then matches that ID with the corresponding fingerprint located on the hardware If the Employee Record indicates that a fingerp...

Page 47: ...using a finger different from the one that was registered Check that the employee finger does not have a cut burn scrape or is otherwise different from the finger at enrollment If it is enroll a diffe...

Page 48: ...meTrax Bio STEP 1 Verify that the hardware is set up correctly Pyramid TimeTrax Bio units require a COM Port for connection You must first attach the DB9 included in shipment to your PC Check to see i...

Page 49: ...splays time and date test the Time Clock First try unplugging the unit and letting it sit for a few minutes then plug it back into the wall socket If it is still not connecting correctly you will need...

Page 50: ...etc you can retrieve the last 6 000 punches by initiating an EMERGENCY PUNCH DOWNLOAD Before you attempt to do this please note that if you have any inac tive employees contained in the last 6 000 pun...

Page 51: ...d your TimeTrax Bio software as shown in the Installing the Software section of this manual Note Please make sure that you are installing the same version that you are currently running You will need...

Page 52: ...e files 4 Transfer files to the new computer 5 Navigate to the TimeTrax directory and paste the files Examples of transfer methods are email attachment Pyramid does not recommend this method due to th...

Page 53: ...ADMIN in QuickBooks to complete this step STEP 1 Remove the TimeTrax Bio application from QuickBooks From the Edit Menu select PREFERENCES For 2004 edition and earlier you reach PREFERENCES by accessi...

Page 54: ...t Intuit QuickBooks QuickBooks 2003 Link Failure The new QuickBooks 2007 upgrade also moves the location of the company file from the Application Folder to a special folder located in the Shared Docum...

Page 55: ...s or damage incurred in shipping Pyramid reserves the right to determine whether the parts failed because of defective material workmanship or other causes Failure caused by accident alteration misuse...

Page 56: ...ive in both of the anchors flush with the wall Now lineup your terminal bracket with the anchors and use the 2 supplied 10 x 1 screws and fasten the bracket to the wall Make sure not to over tighten t...

Page 57: ...Warranty TTBIOW1S 1 1 Year Extended Technical Support 41400 1 Adapter RJ45f to DB9 41685 1 Converter USB to RS232 41269 1 50 White Flat RJ45 Cable 41314 1 100 White Flat RJ45 Cable 41313 1 Splice RJ45...

Page 58: ...Format 17 Date Time 17 Daylight Savings Time 17 DB9 1 2 32 41 42 50 Delete Punch 19 Detail Pay History Report 23 Detailed Payroll Report 22 E Edit Punch 20 Emergency Punch Download 43 Employee Contac...

Page 59: ...irements 1 Missed Out 19 Missed Punch 11 22 Monthly Semi Monthly Pay 11 Moving TimeTrax Bio From One Computer to Another 44 N Network PC Users 45 Non Network PC Users 45 Notes 13 P Parts List 50 Passw...

Page 60: ...Supervisor Functions 18 Sync 18 19 System Crash 39 System Requirements 1 T Technical Support 48 Terminated 13 Time Card Report 22 23 Time of Day 17 Time Source 18 19 Time Totals 17 Time Tracking Data...

Page 61: ...54 TIMETRAX BIO...

Page 62: ...48 Elm Street Meriden CT 06450 www PyramidTechnologies com I2078...

Reviews: